Two Timelines on One Dynamics 365 Form
I noticed almost in passing a new feature in the October “Wave 2” release of Dynamics 365. This is the ability to add more than one timeline per form. In this post I will explore this feature and try and explain why I think this is cool! And along the way I will mention a few other timeline enhancements.
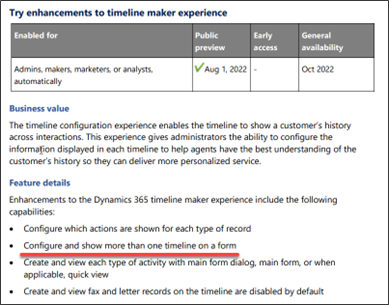
You can see above that we have several maker enhancements which allow greater configuration of the timeline.
But why would I want more than one timeline?
Commonly on records like contacts, accounts, and cases we have one timeline control. And this allows users to filter the activities, posts and notes shown. Plus interact with the items shown.
Meaning often I would say “you don’t need another timeline”! As the one control does everything.
But I have previously come across user requirements to only see certain record types in the timeline. Maybe they want a compressed version of the timeline only showing emails and phone calls. But at the same time they want to keep the original timeline and its full functionality.
Previously I would have approached this requirement by keeping the timeline unchanged and adding subgrids for any additional focused views the users want. Which is fine but a grid is not as functional as the timeline control.
As a test I have experimented with this feature!
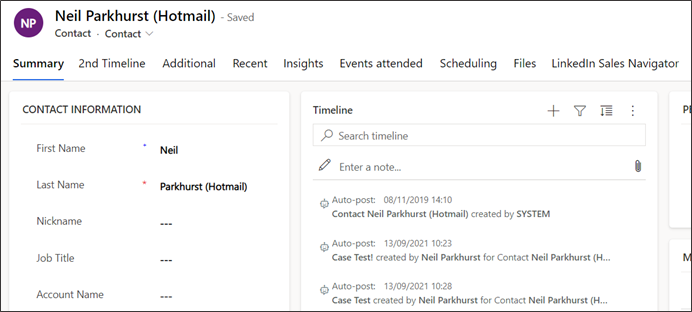
Below you can see my contact form. With the out of the box timeline on the summary. As is normal this timeline shows all posts, notes and activities associated with the contact.
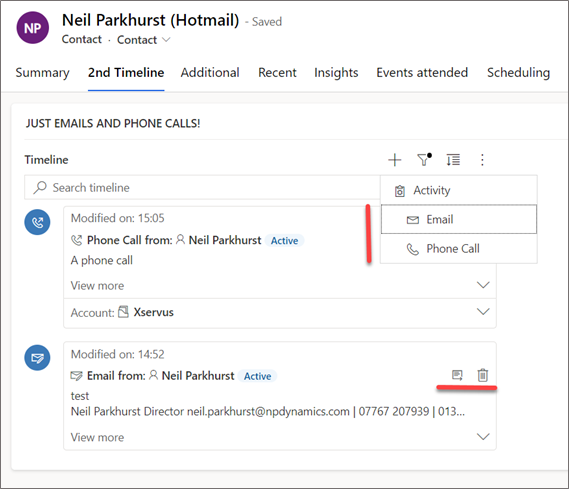
As a test I have created a second timeline and added that into a new tab. Creatively I called that tab, “2nd Timeline”!
On my second timeline I decided to exclude notes and posts. I also decided to only show email and phone call activities. And finally I decided to reduce some of the actions the user can perform from the timeline. Creating a simpler more focused second timeline.
Below you can see my second timeline control. Notice how it only shows my two activity types. And also, how the number of action button listed is shorter than normal. But everything else operates as you’d expect.
Let’s look at the maker experience!
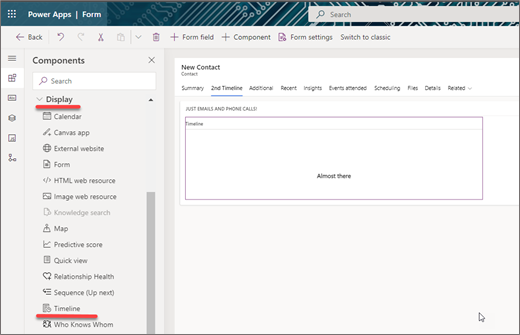
In the form design I have added a tab. Then I selected add component. If you open up the “Display” components, you will find the timeline control. This can then be simply dragged onto my form.
After a short pause I have another timeline. But at this point the second timeline will behave the same as the first.
I can now customize how my second timeline operates. My first change was to untick notes and posts as I did not want to include these.

Next, I opened each activity type in turn. Any that I didn’t want to include just had their “enable” option to set to false. For example, below you can see how I disabled appointments.
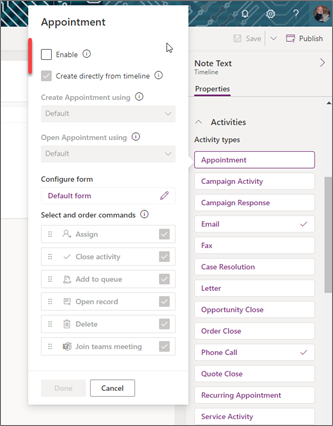
For activities like email and phone call that I wanted to remain I simply left the enable option ticked. But as you can see below, I also removed any commands that I didn’t want the user to have directly in the timeline.
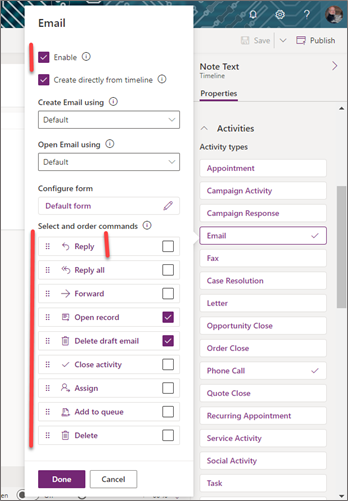
Meaning the number of actions, a user can complete from the timeline immediately became reduced.
You might also want to experiment with the option to control which form is used when opening and creating activities. For example, do we want to use a quick create form, main form, or the main form dialog.

I hope you agree that with this new release Microsoft has added some useful additions to the timeline. These are in terms of the user’s ability to filter and navigate the timeline. But also, importantly, our capabilities to customize the behavior of timelines has been enhanced. Thanks Microsoft!


