Showing posts with label Power Automate Flows. Show all posts

Thursday, 21 May 2026

How to construct a Dataverse record’s dynamic URL with Power Automate

 Sometimes it can be required/useful to include a URL to a record, for example when creating a task/email that is regarding the parent record but the action is on a child record.

As far as I can tell, a ‘dynamic record URL’ (as we have them in CRM workflows) is not available via Power Automate.

Yet another Microsoft 'feature'.

This means we have to concatenate the URL ourselves. The most important part is to get the environment variable correct, so that the flow can be deployed to other environments. The building blocks are:

1- ‘Get’ the record for which you want to build the URL (you might already have this via the trigger)

2- Extract the environment URL

Using a ‘compose’ action, manipulate the data.id from the target record:

uriHost(body('Get_a_row_by_ID')?['@odata.id'])

3- Concatenate the URL

BLUE – This is the environment URL extracted in the previous step

RED – This is the table in which the record resides

YELLOW – This is the record you want to link to

concat('https://',outputs('Compose_-_uriHost_-_environment_url'),'/main.aspx?pagetype=entityrecord&etn=incident&id=','INSERT GUID HERE')

This is what the output looks like when you run the flow.

or      uriHost(outputs('Get_a_row_by_ID')?['body/@@odata.id'])


Saturday, 30 November 2024

How to Trigger a Microsoft Flow from a Custom Button in Dynamics 365

 When using Microsoft Flow the out-of-the-box button is nested under the ‘Flow’ section and is not easy to find nor is it customizable. Triggering the flow using a ‘Flow Button’ makes the button appear under the ‘Run Flow’ branch which is a nested button that is unintuitive for users.

It is much nicer to have your own customized button to trigger a flow and to do this is surprisingly easy.

image

Creating a Button in Dynamics 365

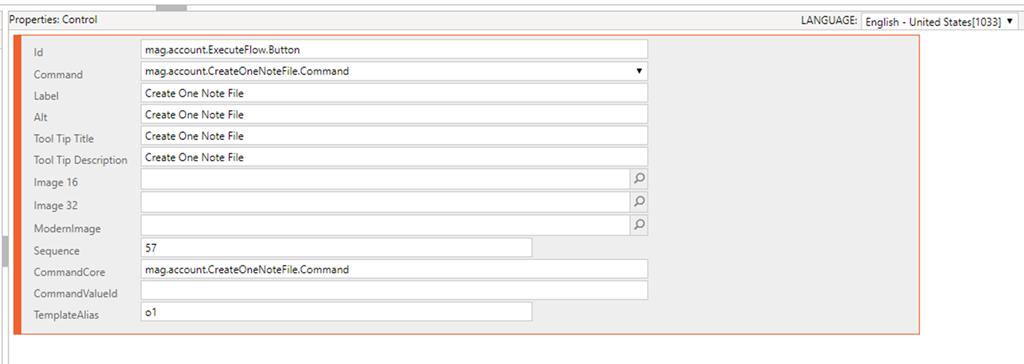
I created my button using the Ribbon Workbench which calls a command. We’ll go into detail what this command does later on. Here’s my button.

image

Create your Flow

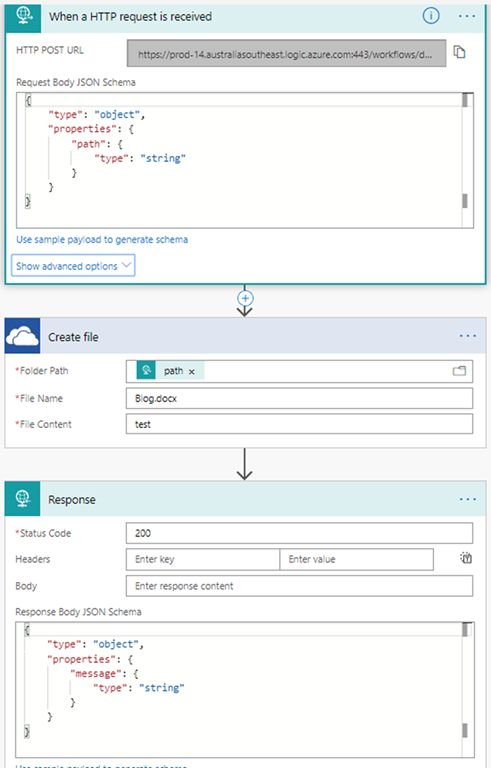
Below is the flow I want to call from the button in Dynamics 365. As you can see there’s a trigger that says ‘When a HTTP request is received’. Once saved the URL will generate for this endpoint and you can define a JSON object that will be received by the Flow. In this example I’m passing through a ‘path’ to the ‘Create File’ method. We’ll keep this blog on the topic of calling Flows from a Dynamics 365 but there’s plenty of information out there on how passing parameters to Flow works. The Flow is simply going to create a File under the path and then send a response with an object.

image


JavaScript

 1
 2
 3
 4
 5
 6
 7
 8
 9
10
11
12
13
sendFlowRequest = function () {
    var pathObj = { "path": "/Account/" };

    parent.$.ajax({
        type: "POST",
        url: "https://prod-14.australiasoutheast.logic.azure.com:443/workflows/d5035afc26d740be9c5387da88a06749/triggers/manual/paths/invoke?api-version=2016-06-01&sp=%2Ftriggers%2Fmanual%2Frun&sv=1.0&sig=CJeWFL357zMMIcUKsGu-464rhyfz765BLqOzWhrNm5o",
        contentType: 'application/json',
        data: JSON.stringify(pathObj),
        success: function () {
            alert("success");
        }
    });
}


Above is the code I used to call my Microsoft Flow. The code passes through a ‘pathObj’ which is the object that the request endpoint created in Flow is expecting. The Flow will now create a File under the ‘/Account/’ path.

Response

image

There you have it, using the out of the box way of calling Microsoft Flow’s from the ‘Flow Button’ should not be defaulted to because calling it from your own custom button is surprisingly easy.

Saturday, 29 June 2024

How to Call an Action through Power Automate(MS Flow)


How to Call an Action through Power Automate(MS Flow)


Introduction

As Microsoft is providing us more flexibility with Power Automate (MS Flow), recently we found that now we can call the Action through Power Automate (MS Flow) directly. Previously we used to call an Action through HTTP request, but now we can directly call an Action through the Power Automate (flow) steps.

Before that take a short look at what are Bound and Unbound Action?

Bound Action are targeted to the entity and Unbound Action are not bound to the any entity, they are Global.

To get the Bound and Unbound actions in Power Automate (MS Flow) follow the steps given below:

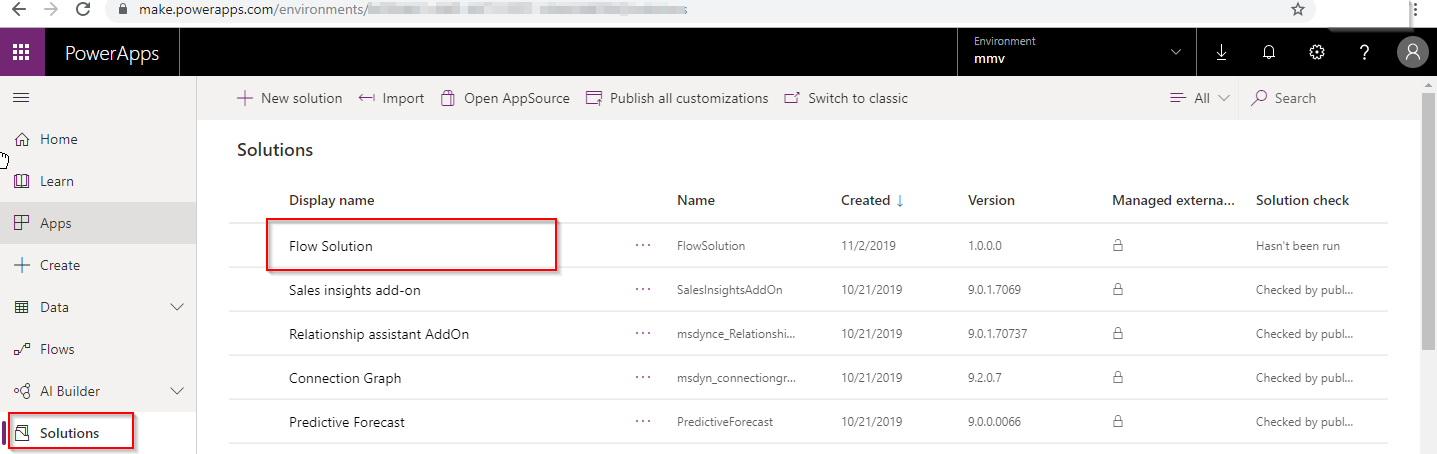
1. Create a solution in https://make.powerapps.com/ where you have to add your Power Automate (Ms Flow) which we are going to use to call Actions.

Call an Action through Power Automate

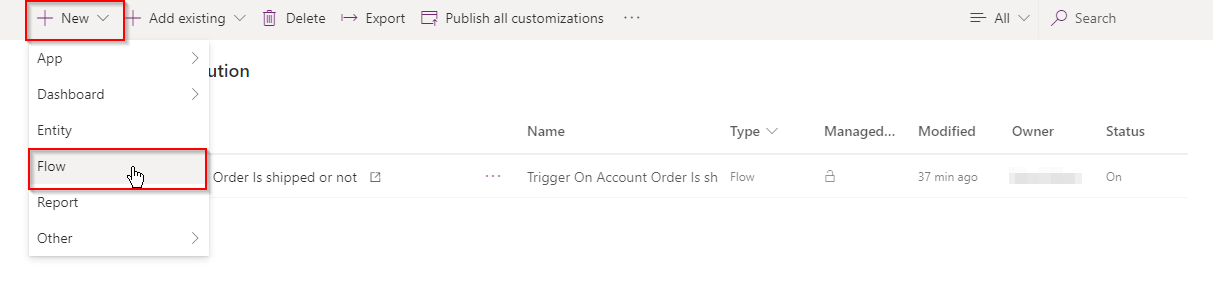
2. In the solution click on new button & select Flow as shown in below image. Apparently it will redirect you to Power Automate (MS Flow) window as shown in the following image.

Call an Action through Power Automate

Power Automate

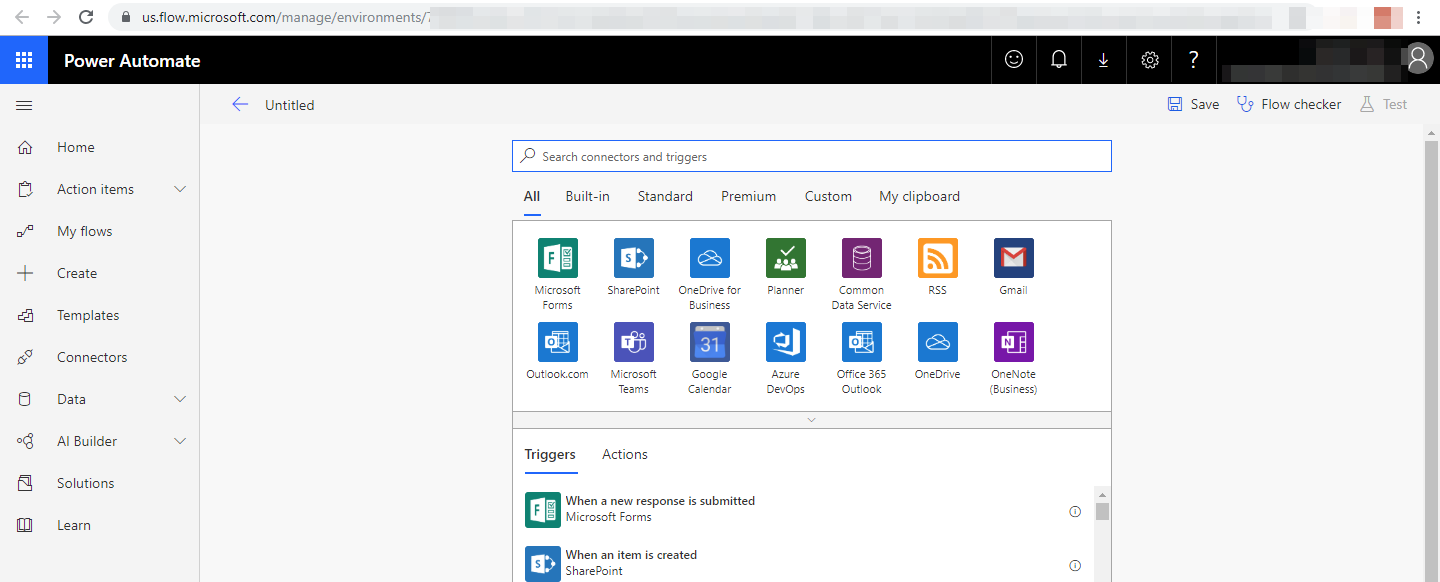
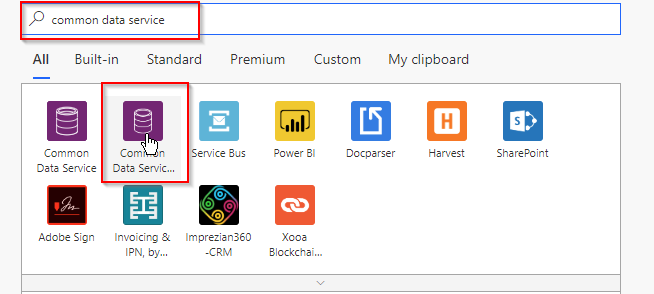
3. Now we have to Search for Common Data Service Trigger point in our newly created Flow & from the search result select the Common Data Service (Current Environment).
Select the trigger conditions as per requirements such as Create, Create or update, Delete, Update etc.

Call an Action through Power Automate

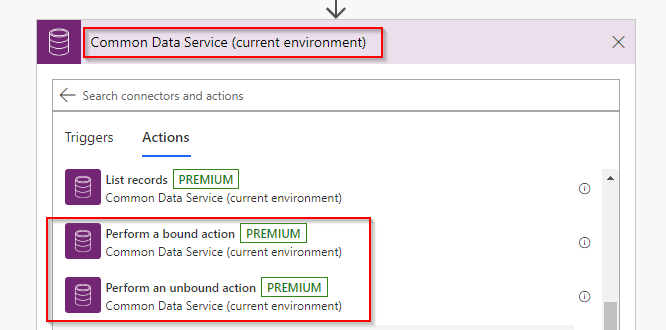
4. Now in the next step we have to search for the action & select the Common Data Service (Current Environment). You will get many new action points in the results from that we have to select Bound/Unbound Action.

Call an Action through Power Automate

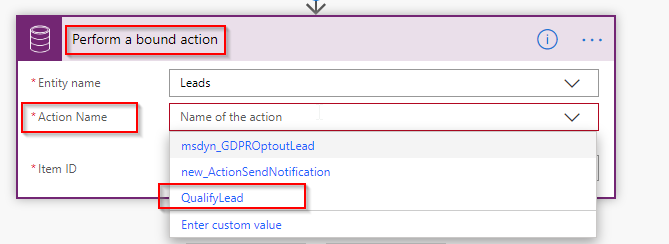
For the bound action you will see the Action step as shown in below image. In my case I have selected the QualifyLead action which is bounded with the Lead entity.

Call an Action through Power Automate

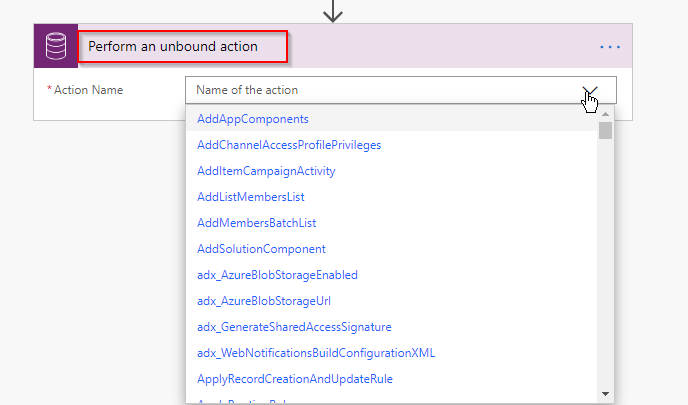
And for unbound step you will get to see the below window in which you can call your global action or the action which is not bounded with the any entity which will be listed in the unbound action.

Call an Action through Power Automate

Note: – You will find this Bound & Unbound action trigger steps when you create a Power Automate (MS flow) from the https://make.powerapps.com/ platform.

Conclusion

As illustrated above, you can now directly call an Action through Power Automate (MS Flow).

  1. Craig

    So how can we use perform bound actions with a scheduled flow?

    Starting a flow from change triggers is very restrictive.

    1. Inogic

      Step 1: To use Bound Action in scheduled flow your first step of Flow will be to Schedule.
      Step 2: After this your next step will be to retrieve the list of records on which you want to perform Bound Action and based on your conditions you can add filter query.
      Step 3: Now your final step is Bound Action where you have to pass the Item ID. You can pass the id which you have retrieved in 2nd step of flow.

      Hope this helps.

      Thanks!

  2. rthompson

    This is great!

    Do not need to update something in Power Automate.

    I’m not seeing the “perform a bound action”. I am only seeing create, update or delete for the common data service.

    Did you have to activate something?

    1. Inogic

      You need to use the Common Data Service (Current) connector for Bound Action trigger. And you will get this action trigger when you create a flow from within solution. Please follow the steps mentioned in the blog.

      Hope this helps.

      Thanks!

  3. Mustaque

    Hi,

    I am not seeing any action listed in the Perform Bound Block.
    I am trying to invoke a custom Send SMS action / process / workflow defined in Dynamics 365 and would like to invoke that action from Flow.

    What needs to be done to call the custom actions?

    1. Inogic

      Bound Actions run under a specific entity. To perform a Bound Action in Power Automate (MS Flow) you need to create an action specified to the entity.

      MS FLOW

      Can you please check whether the custom action which you have created is a Bound Action (Entity Related) or Unbound Action (Global Action) as based on that you have to use the connector in Power Automate i.e. ‘Perform a bound action’ or ‘Perform an unbound action’ in Common data Service (current connector).

      Use the below step to execute Bound Action (Entity Related) in Power Automate (MS Flow):

      MS FLOW

      Use the below step to execute Unbound Action (Global Action) in Power Automate (MS Flow):

      MS FLOW

      We look forward to your reply.

      Thanks!

Tuesday, 11 June 2024

Errors in powers automate : The 'inputs.parameters' of workflow operation 'Add_a_new_row' of type 'OpenApiConnection' is not valid. Error details: input parameter


Here the input formula or the filed value is not in the expected format. 

Here the Flow is expecting either a String value or Date-time value. 

You can declare a string at beginning of flow and use append to string to store and pass the value. 

or use formula to convert it into specific date format by using the below formula : 

addDays('01/01/1900',sub(int(items('Apply_to_each_2')?['Date field name']),2),'dd/MM/yyyy')


Another Error : 


The input body for trigger 'manual' of type 'Request' did not match its schema definition. Error details: 'Invalid type. Expected Integer but got String.'.


Sometime the flow may give this error after a long time or when it is run by other user: 
Just duplicate the flow and make it as main flow fixed this issue. 


Plural name in Power automate flows and currency entity

 We need to enter the plural name in Power automate flows. 


Tuesday, 28 May 2024

Set Dataverse Choices/Option set in Power Automate dynamically - without a switch statement


Set Dataverse Choices in Power Automate dynamically - without a switch statement

Choices are hard, especially when it comes to setting the value of a Dataverse choice option set or choices multi-select option set column field in Power Automate.

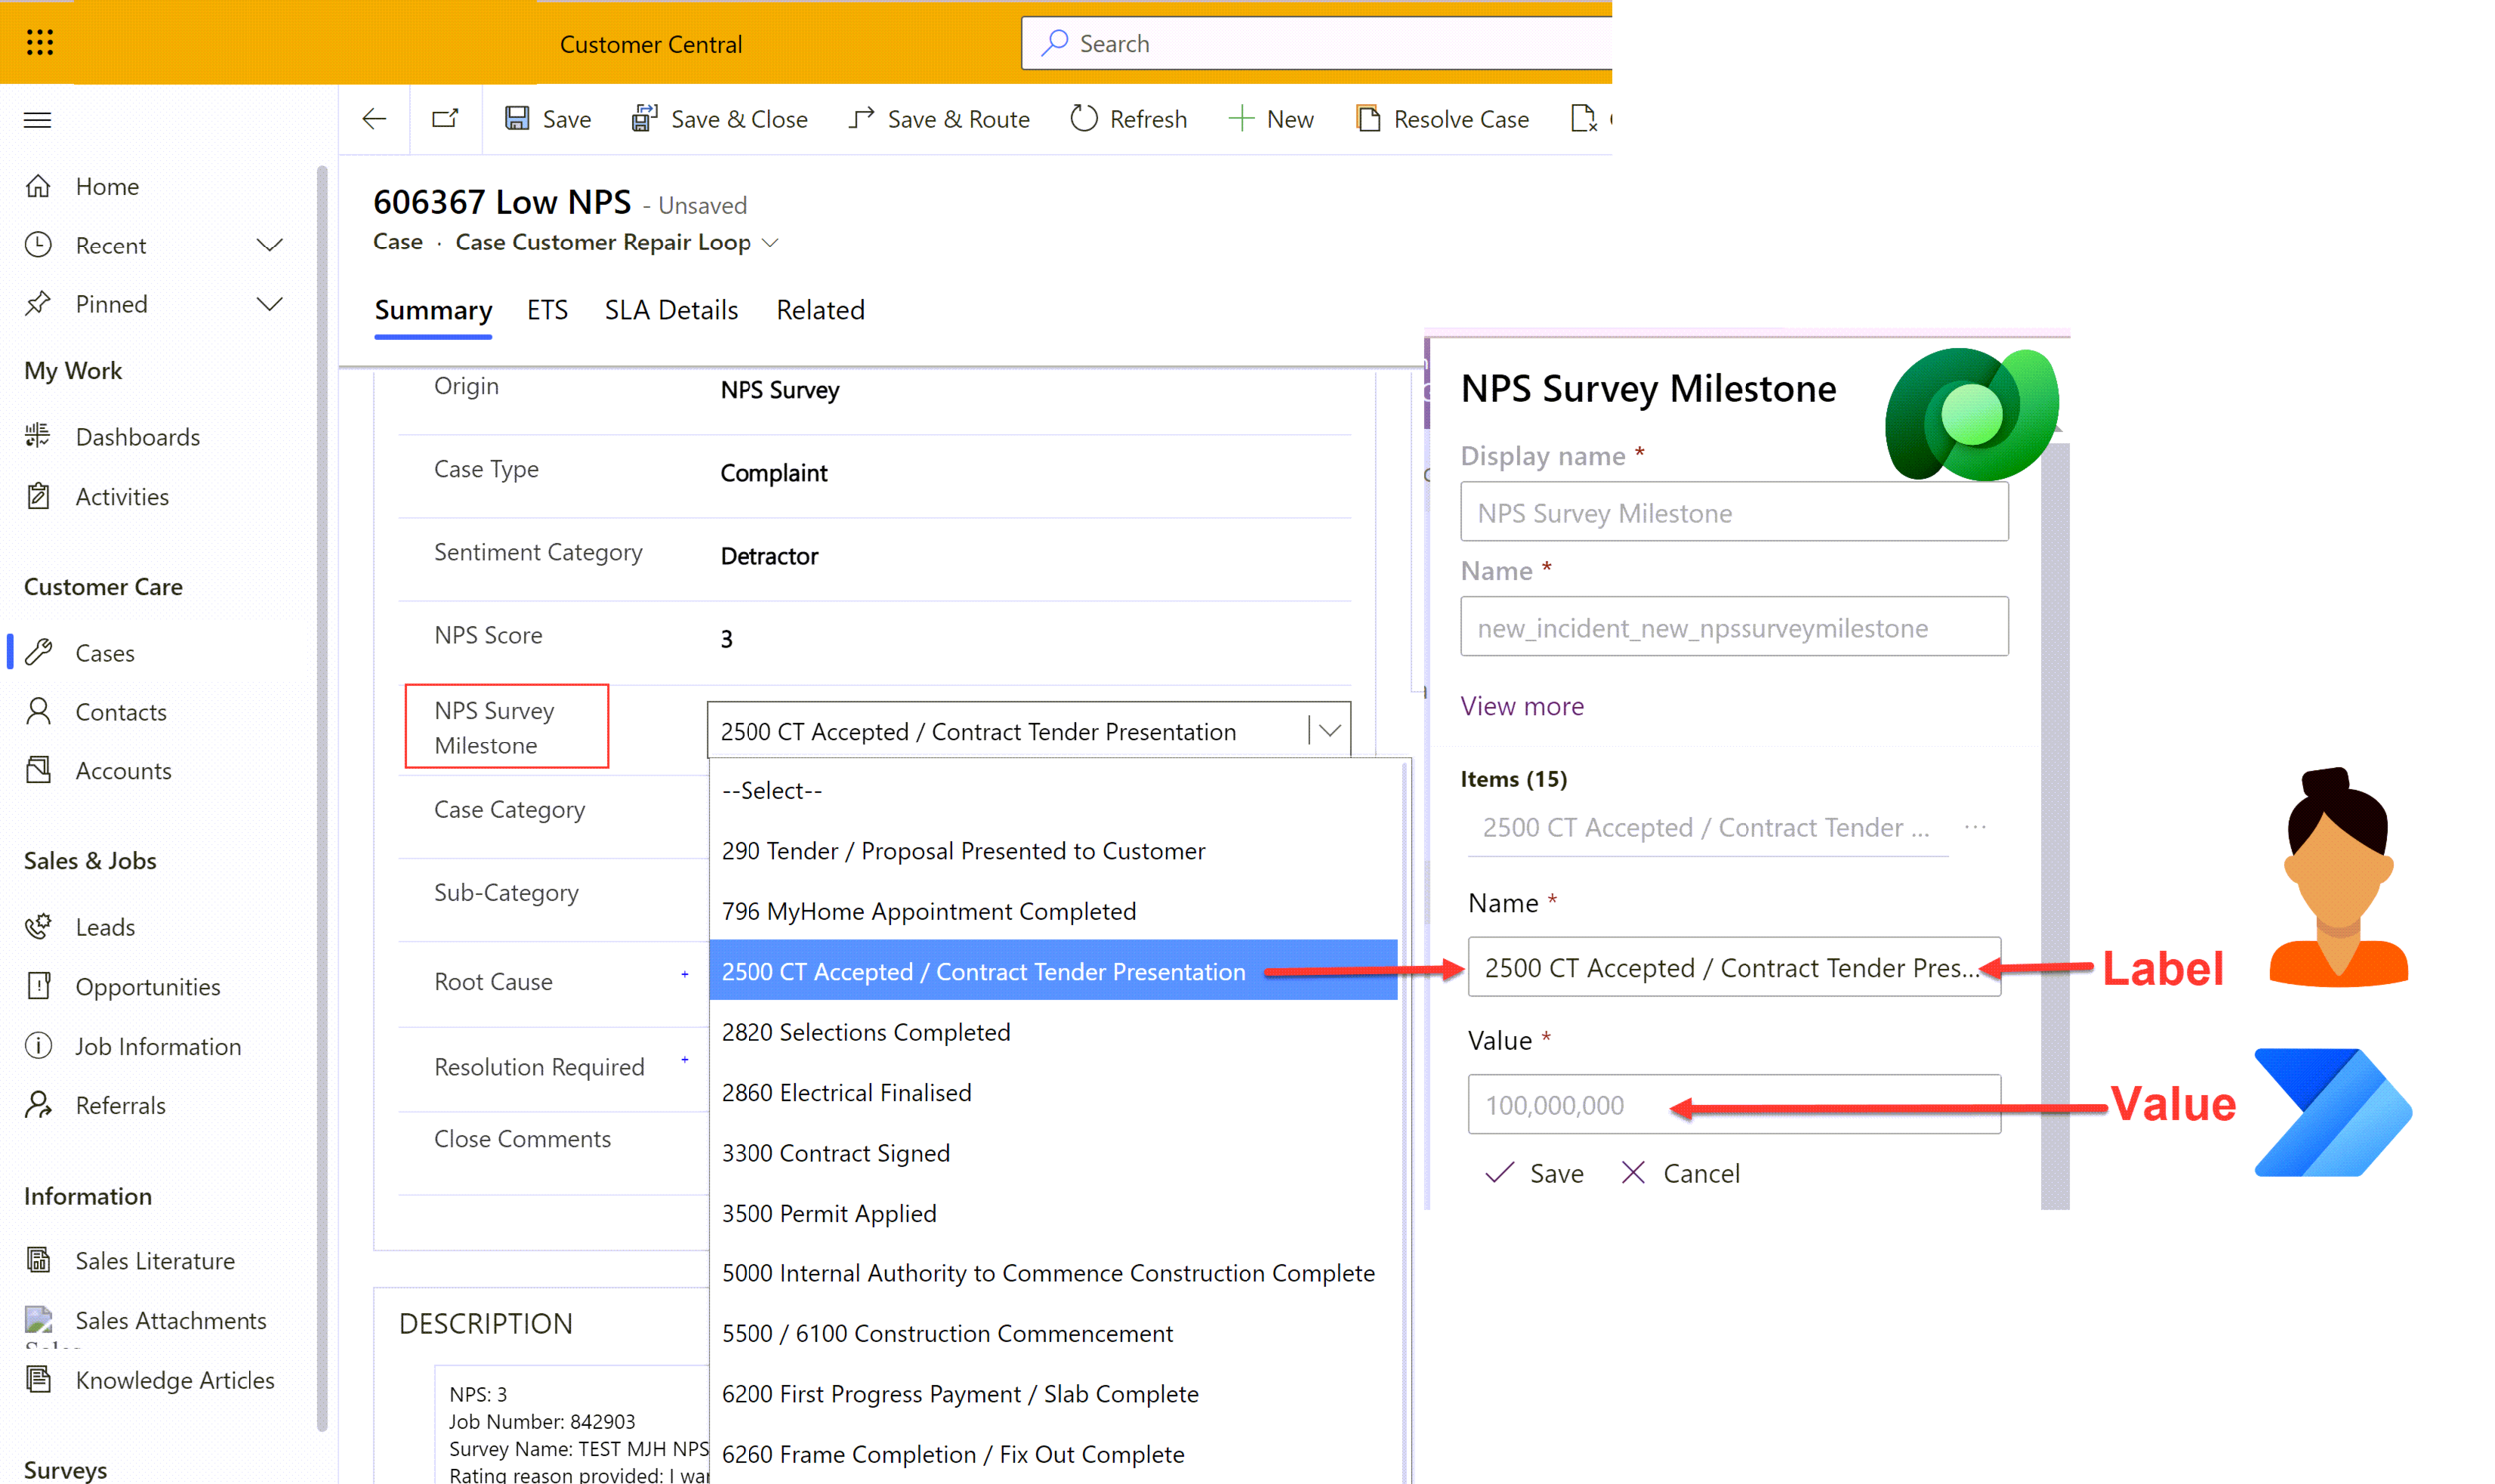
In your Dynamics 365 or Model-driven app you see a list of labels, but behind the scenes each label has an integer ‘Value’ assigned. If you are using power automate to set a choice/choices value in a create or update row action you have the option to choose a static value from the human readable list or if the value is dynamic, maybe based on inputs from a previous action or trigger then you can enter a ‘custom value’. In this case the flow expects the choice ‘Value’ rather than the ‘Label’.

Disclaimer: I am not responsible for creating the column with the prefix new_. I die inside a little bit every time I see it, I hope it doesn’t cause you too much distress. My advice is that every time you see new_ read it as ROOKIE-ERROR_.

Option 1: Switch Statement

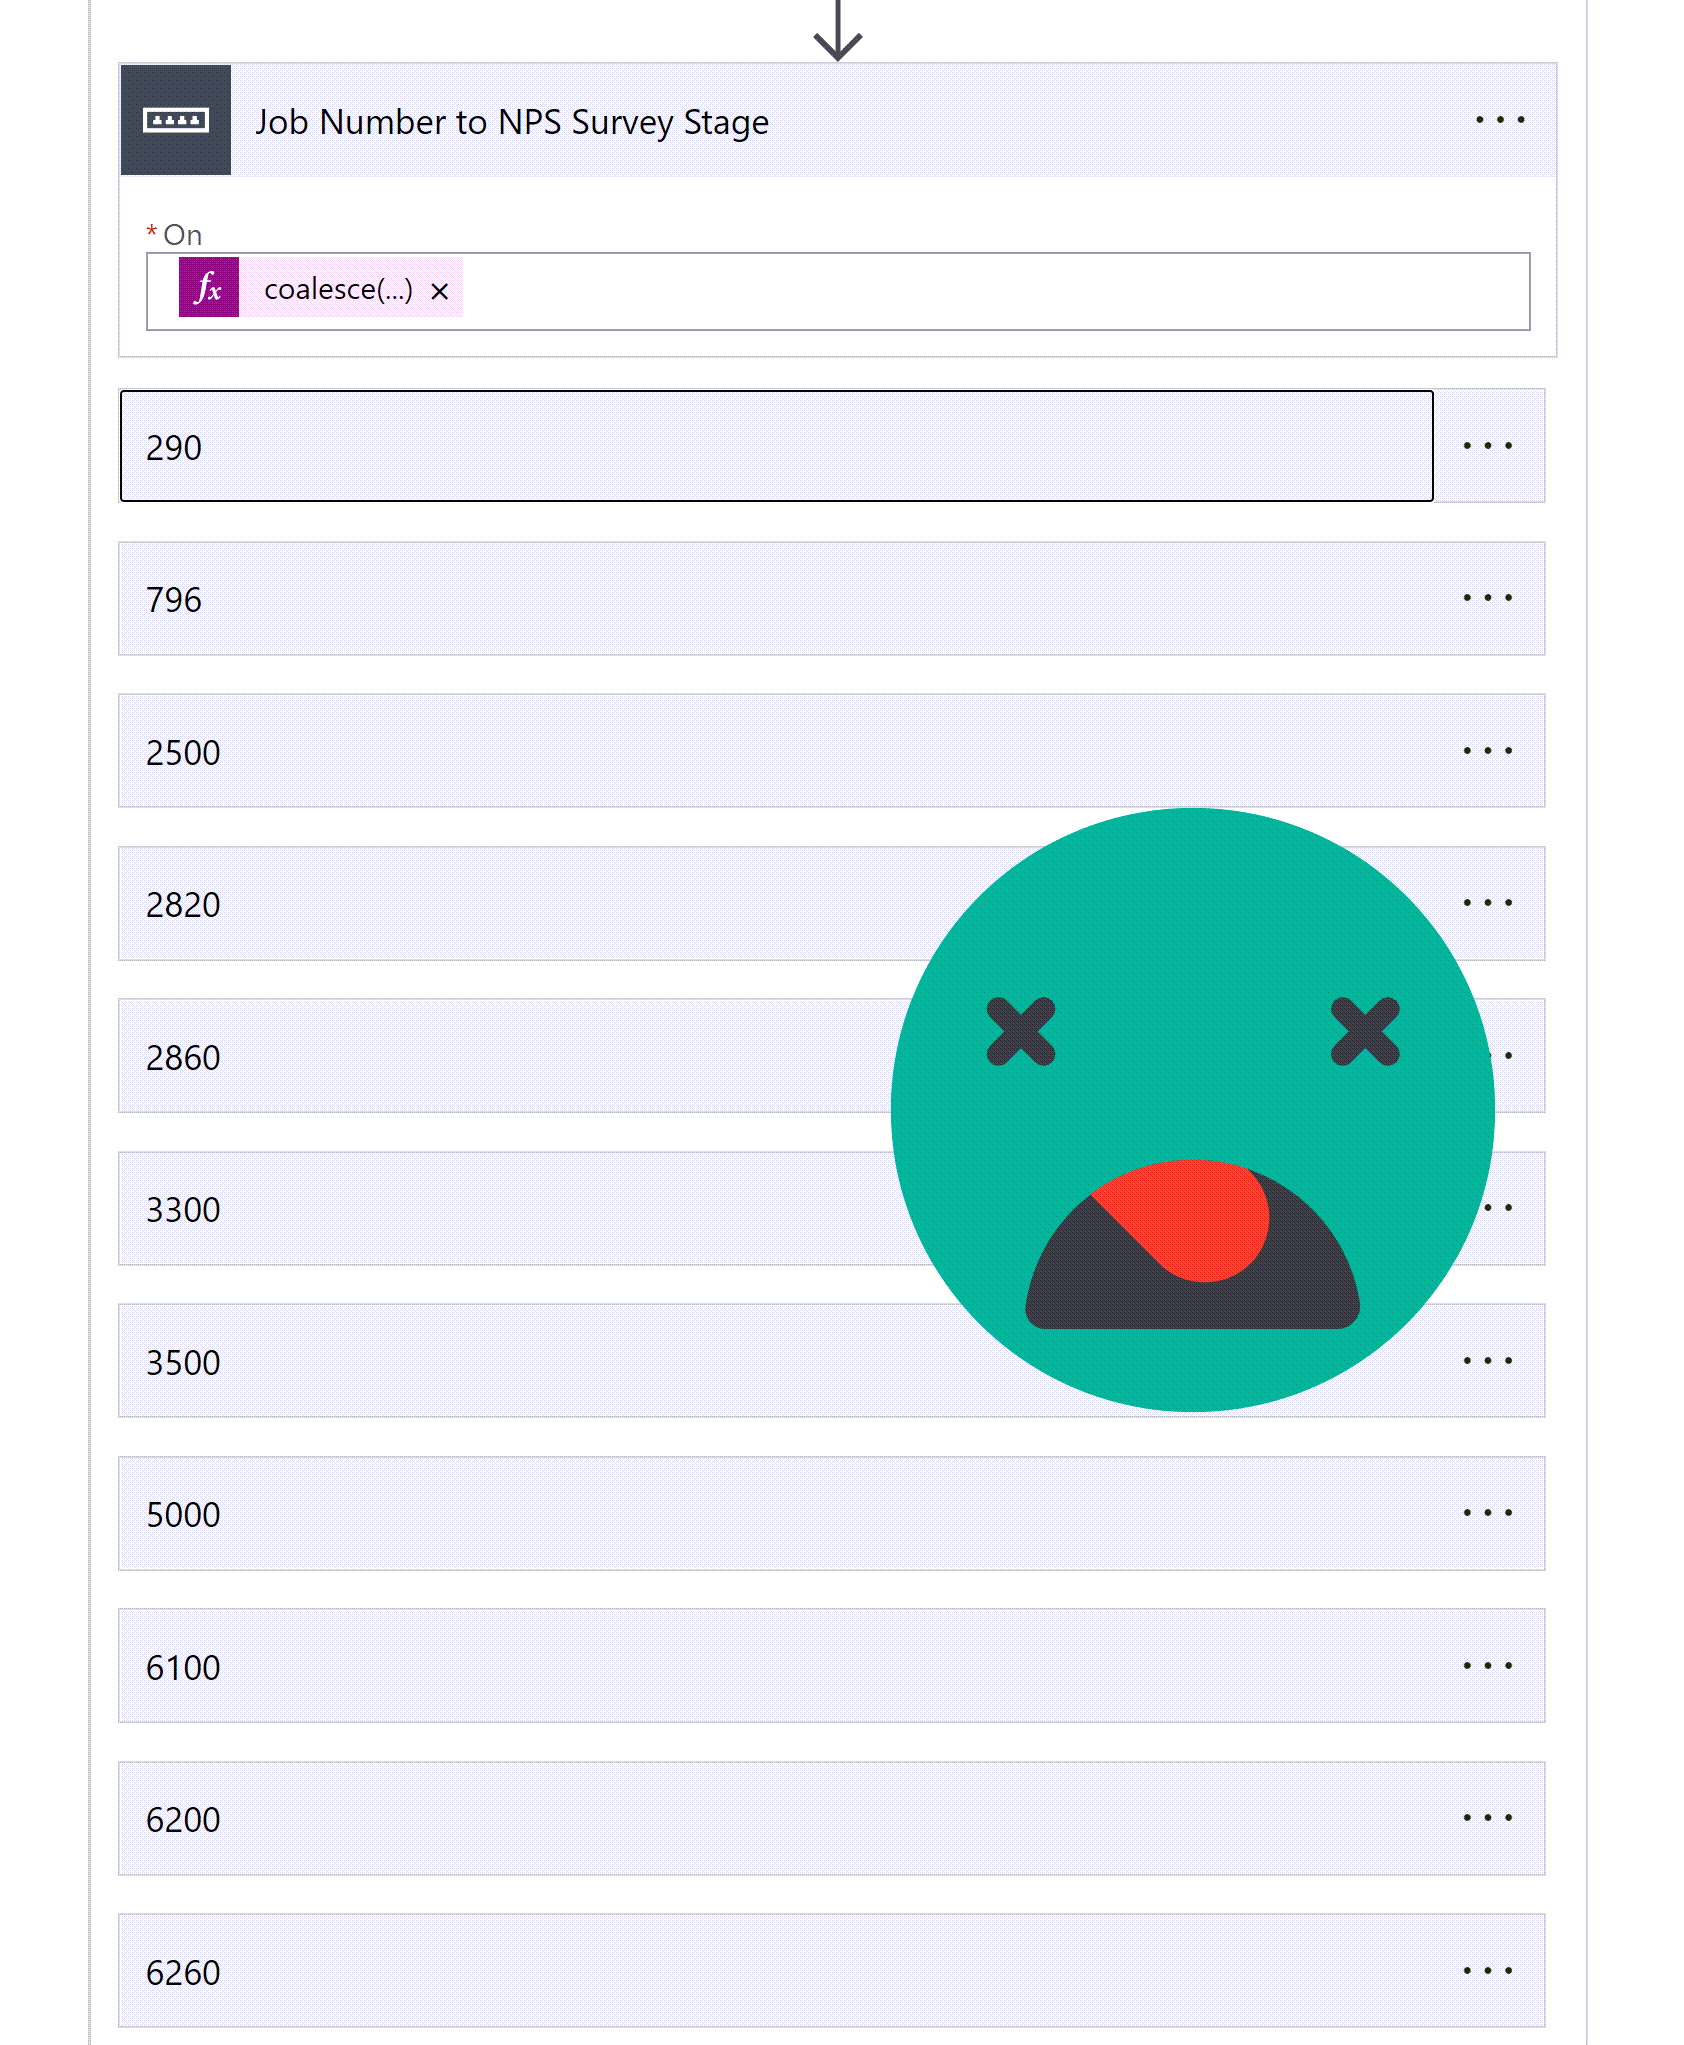
Nothing new or novel here and a method I have used often in the past. Example here -> https://d365demystified.com/2020/04/29/switch-case-in-a-flow-power-automate/ plus also make sure you implement coalesce() as seen here -> https://sharepains.com/2018/05/29/switches-coalesce-power-automate/ to handle null values more gracefully.

It works nicely for smaller choice sets but it’s the kind of ‘hard-coding’ that makes me feel a little bit dirty every time I do it. I don’t really like switch statements they are hard to work with and such flaky little creatures. When I came across a choice scenario with 10+ options, I decided there MUST be an easier way to do this!?

Option 2: GET the choice values

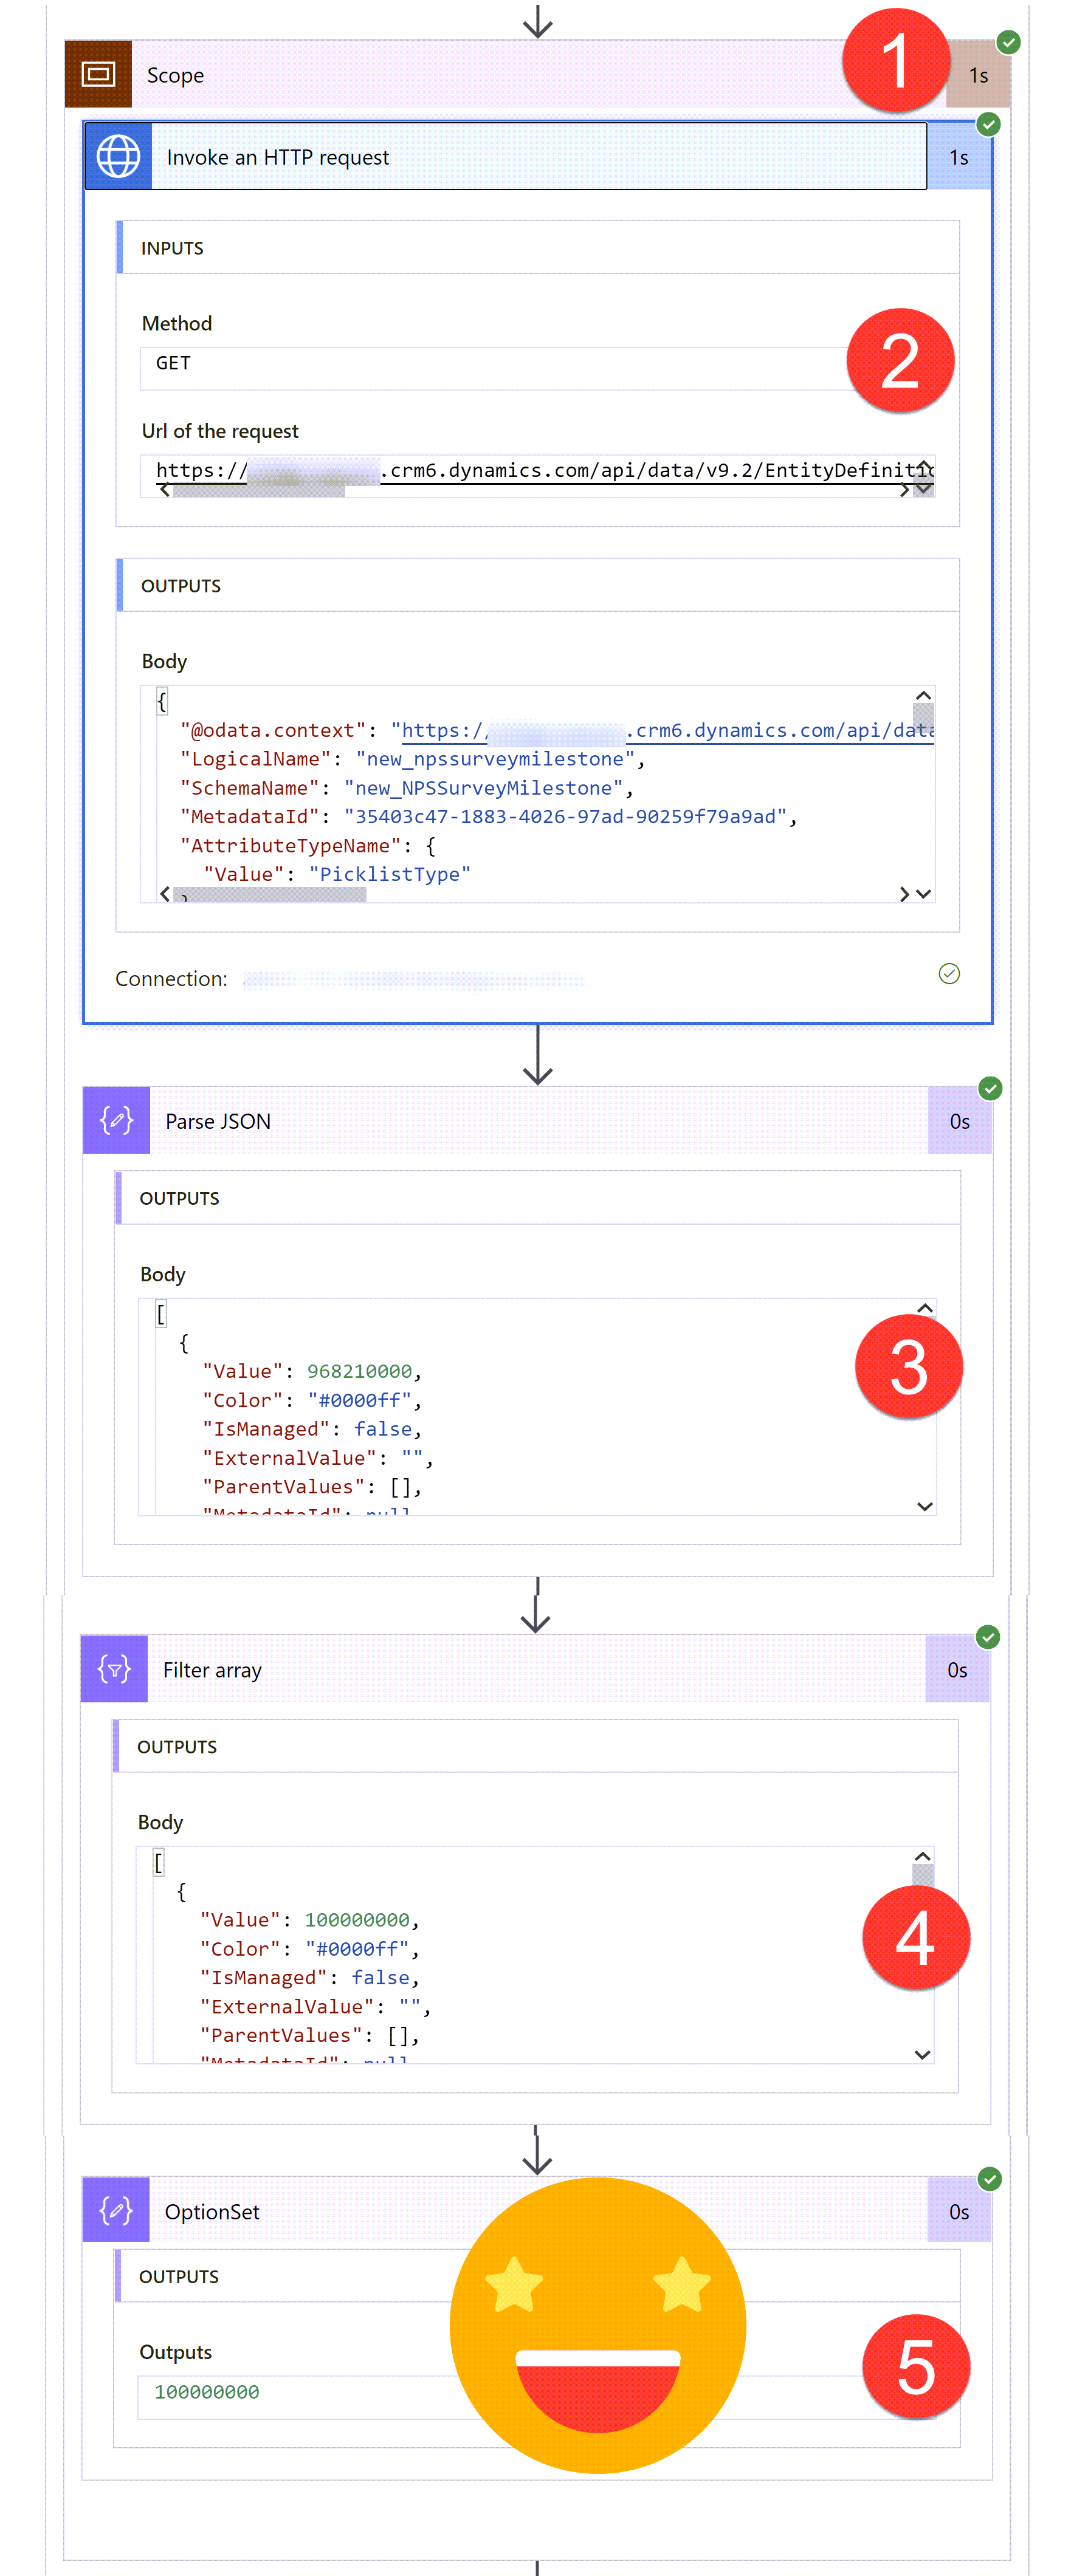
Enter ‘The Enabler’ George Doubinski - he’s not scared of a HTTP Request and big, long, complicated URLs. I take no credit for this solution, I am simply the inspiration, awkward question asker and pretty picture drawer. We are going to create the following flow, scroll on down for step by step instructions.

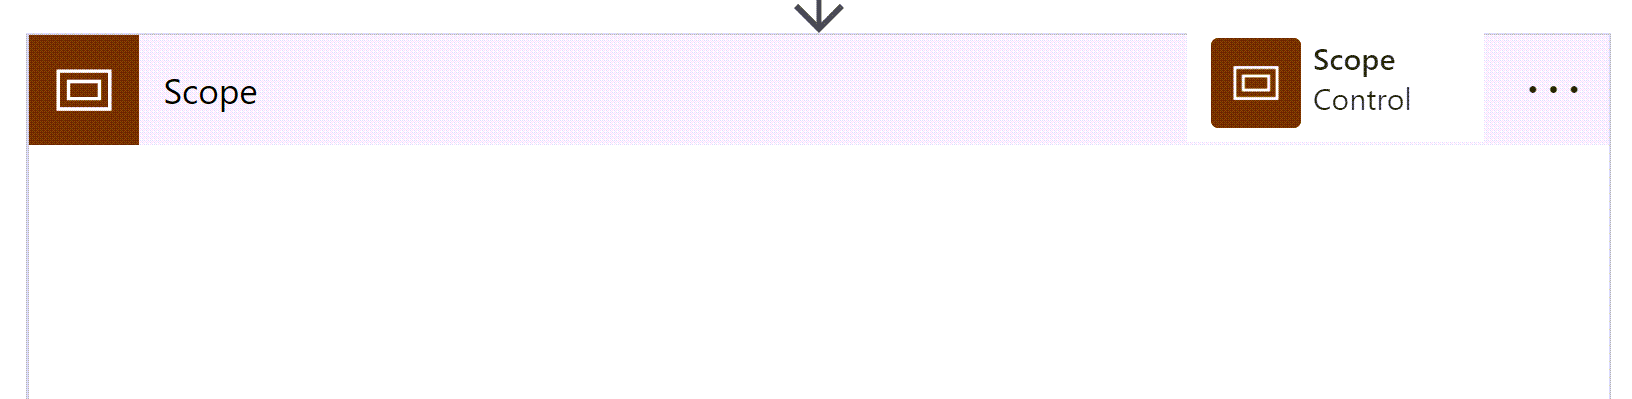
1) Scope It

All the following steps will live in a ‘Scope’ as they are a set of steps that relate to getting the choice value. Completely optional but apparently it makes things look a bit tidier and seems like good practice https://www.blueshiftco.com/blog/keep-your-flows-organized-using-scopes-in-power-automate

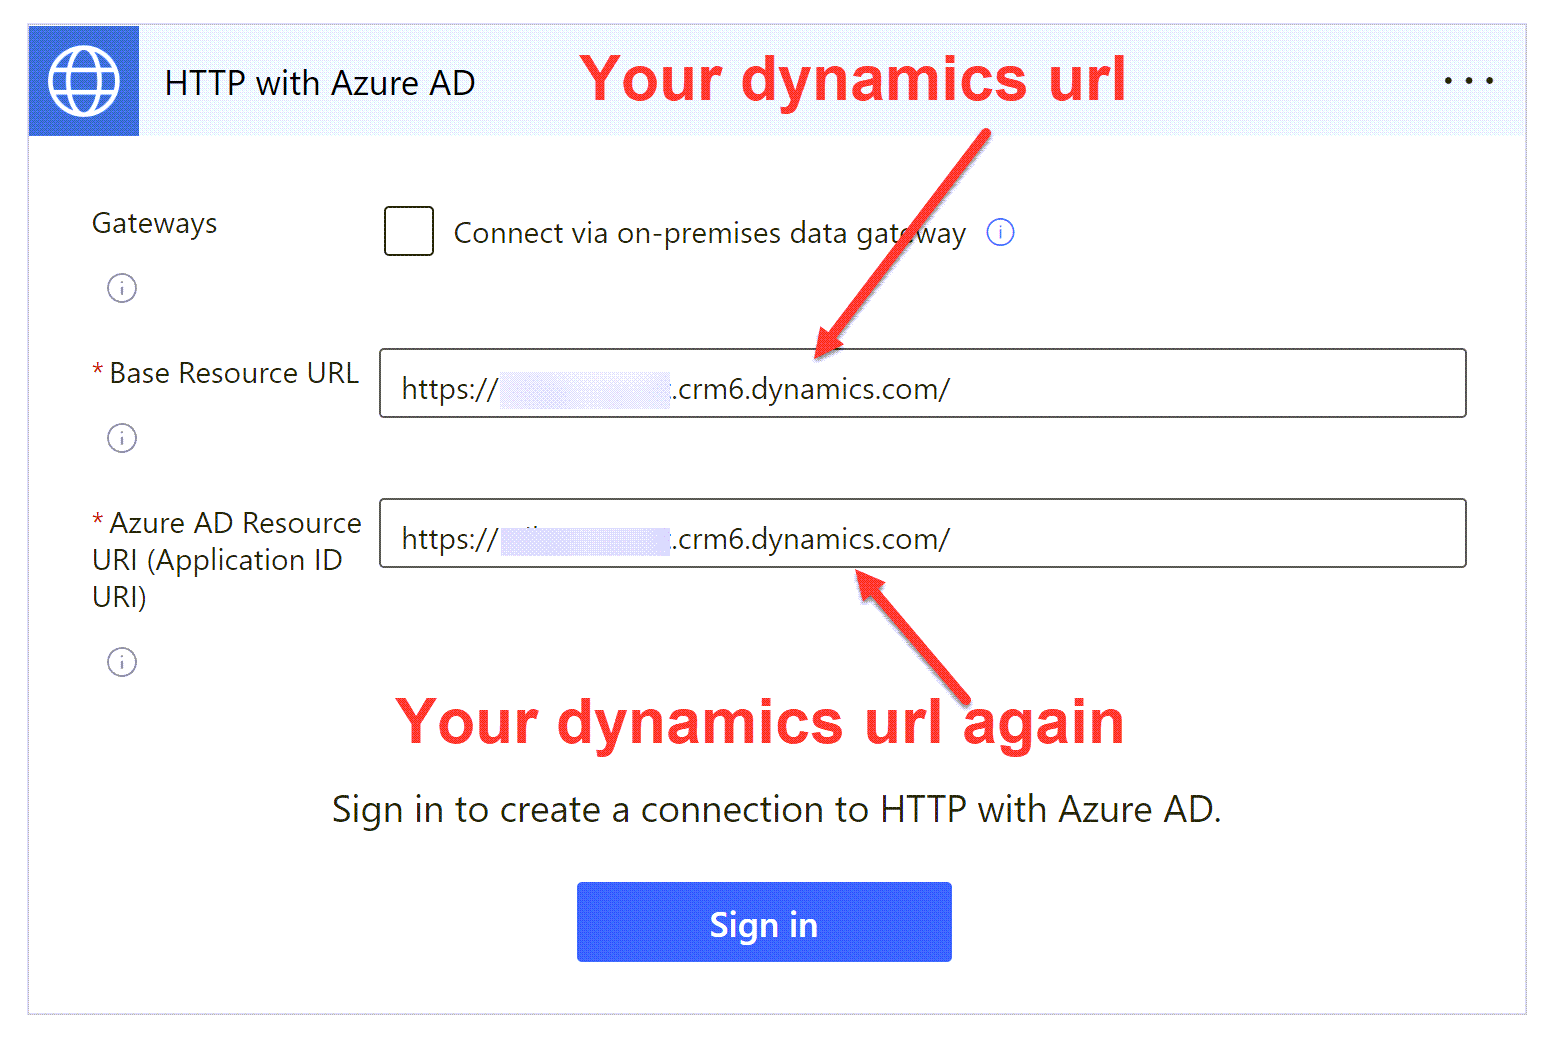
2a) Connect to HTTP with Azure AD

Don’t panic - you do not need to create an Azure App or anything else - just use your Dynamics/Power Apps URL for both the ‘Base Resource URL’ and the “Azure AD Resource URI’

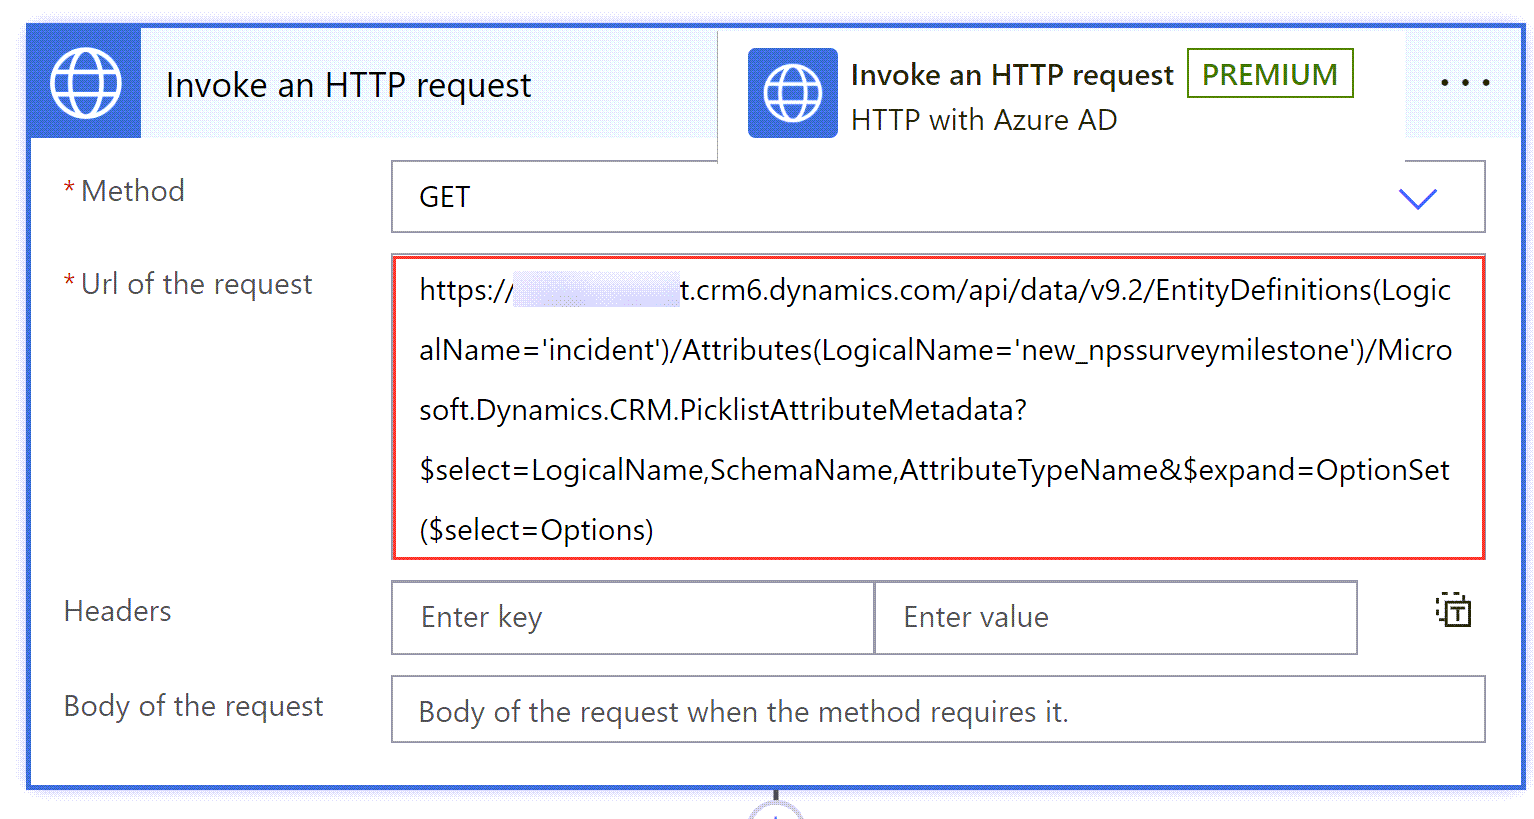
2b) HTTP GET Request

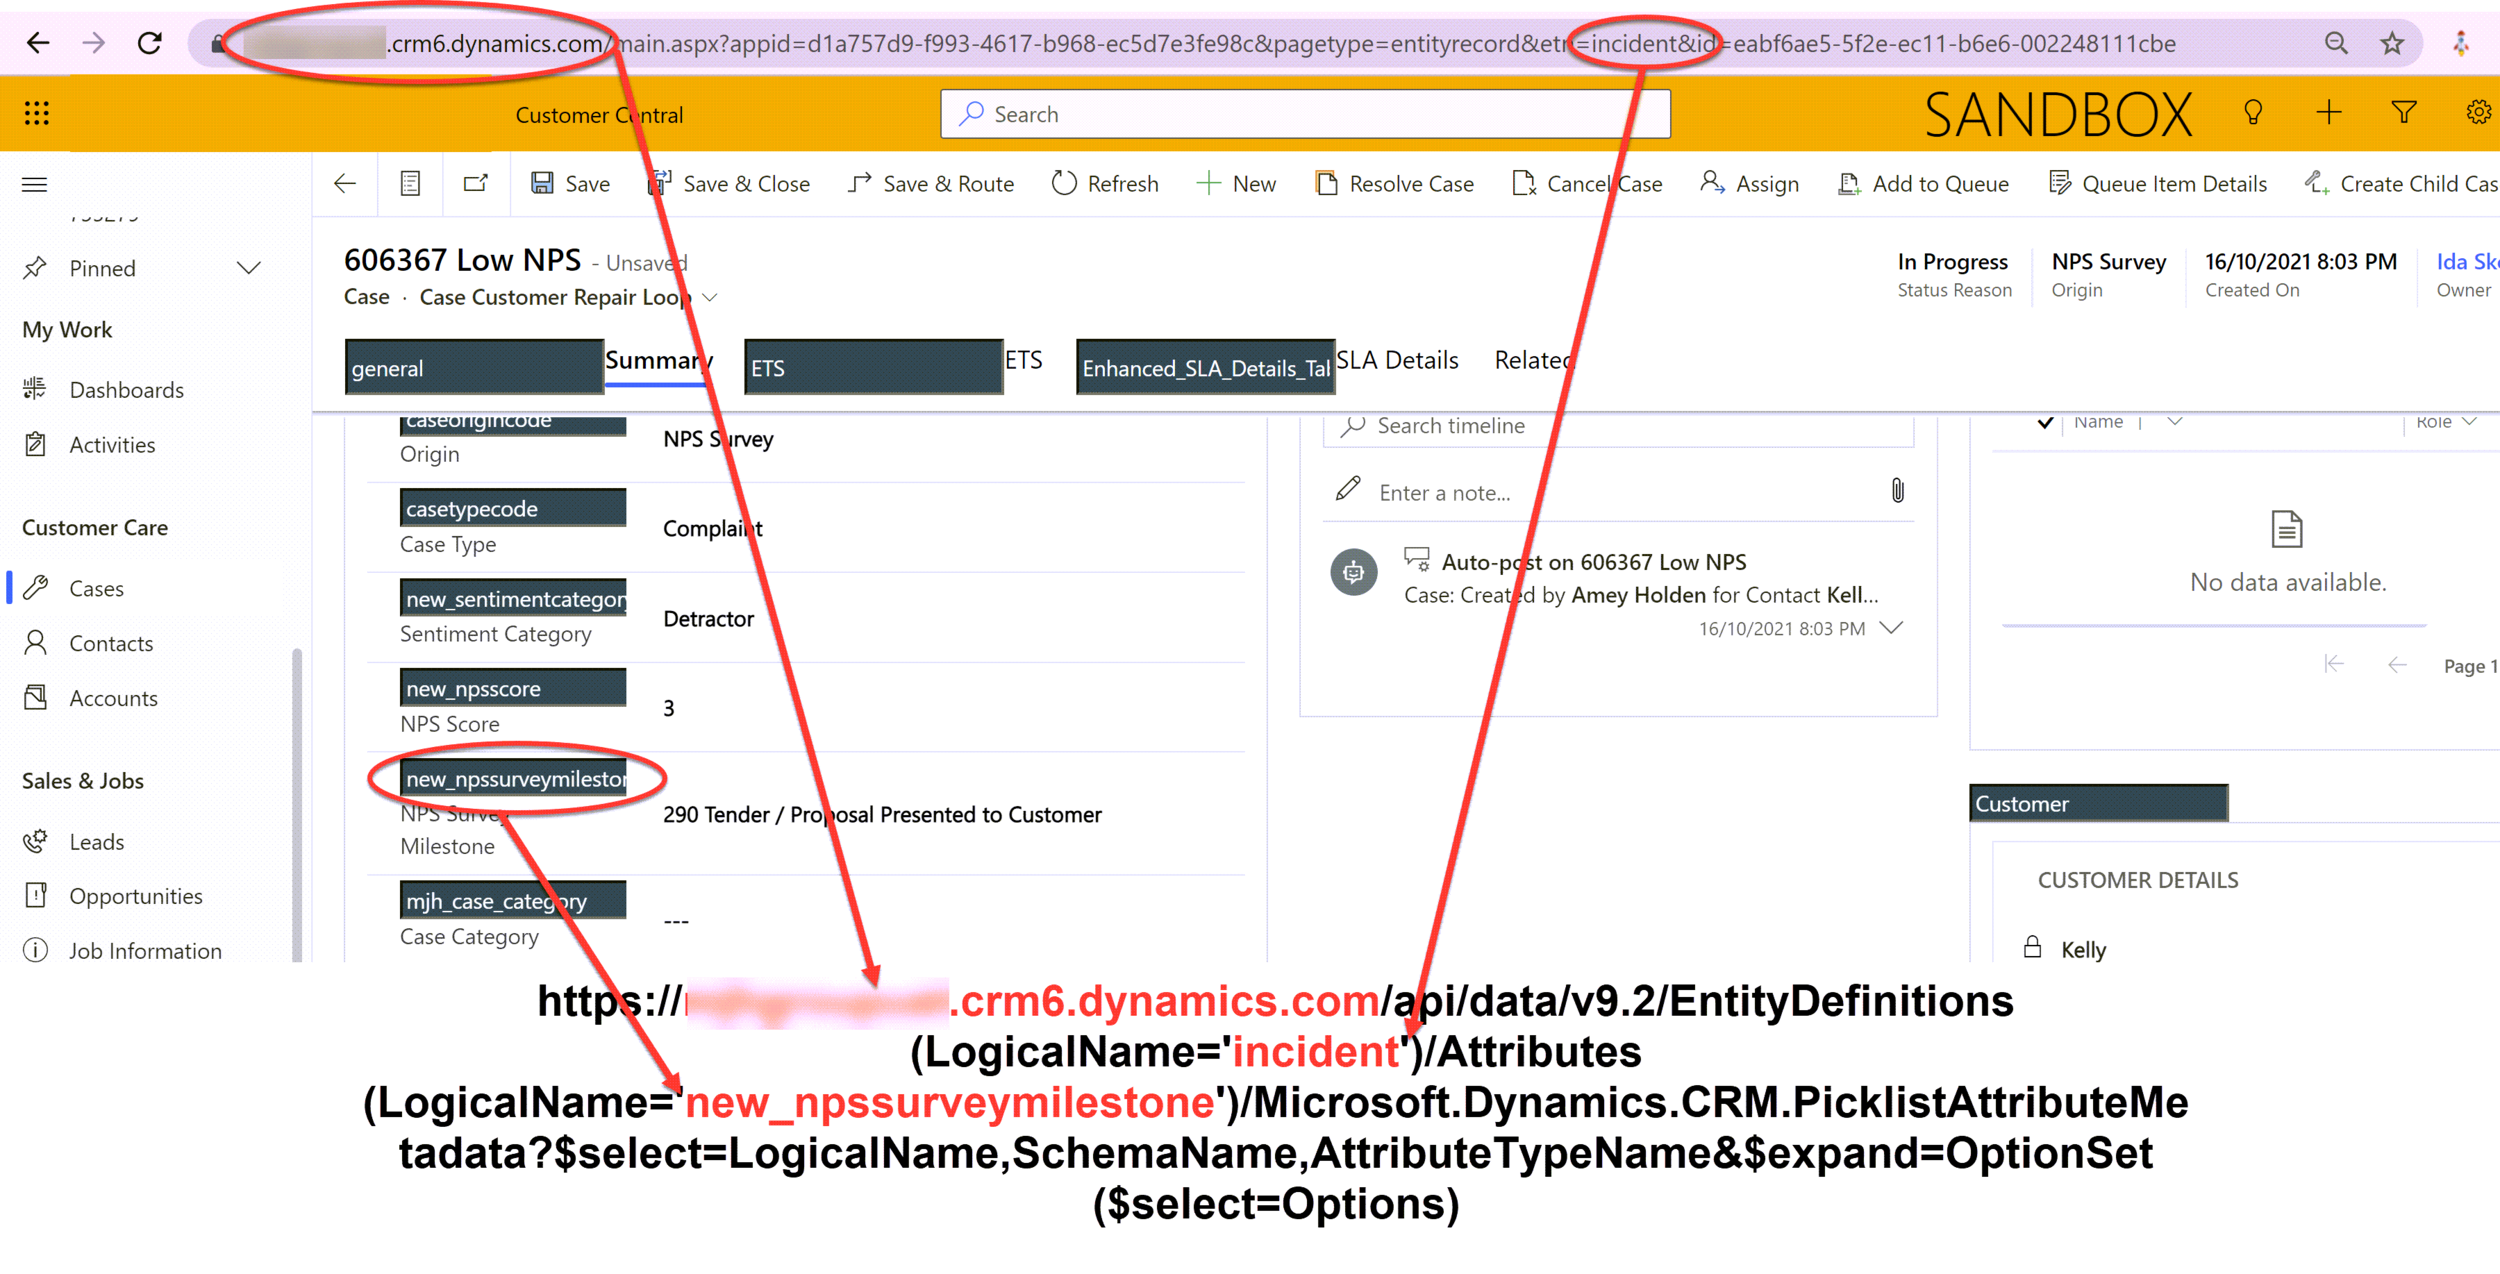
The Method is GET then you need to use this lovely big long scary URL. Most of it you can leave ‘as is’, but you do need to update it in three places to add your Dynamics/Power Apps URL, the table name and the column name of the choice column you want to get values from.

https://YOUR-DYNAMICS-URL.crmX.dynamics.com/api/data/v9.2/EntityDefinitions(LogicalName='TABLE-NAME')/Attributes(LogicalName='COLUMN-NAME')/Microsoft.Dynamics.CRM.PicklistAttributeMetadata?$select=LogicalName,SchemaName,AttributeTypeName&$expand=OptionSet($select=Options)

Copy the above snippet and update the section in red below + guidance on how to easily find them. You can check it’s right by running the flow, if the action is unsuccessful - it will let you know why.

3) Parse JSON

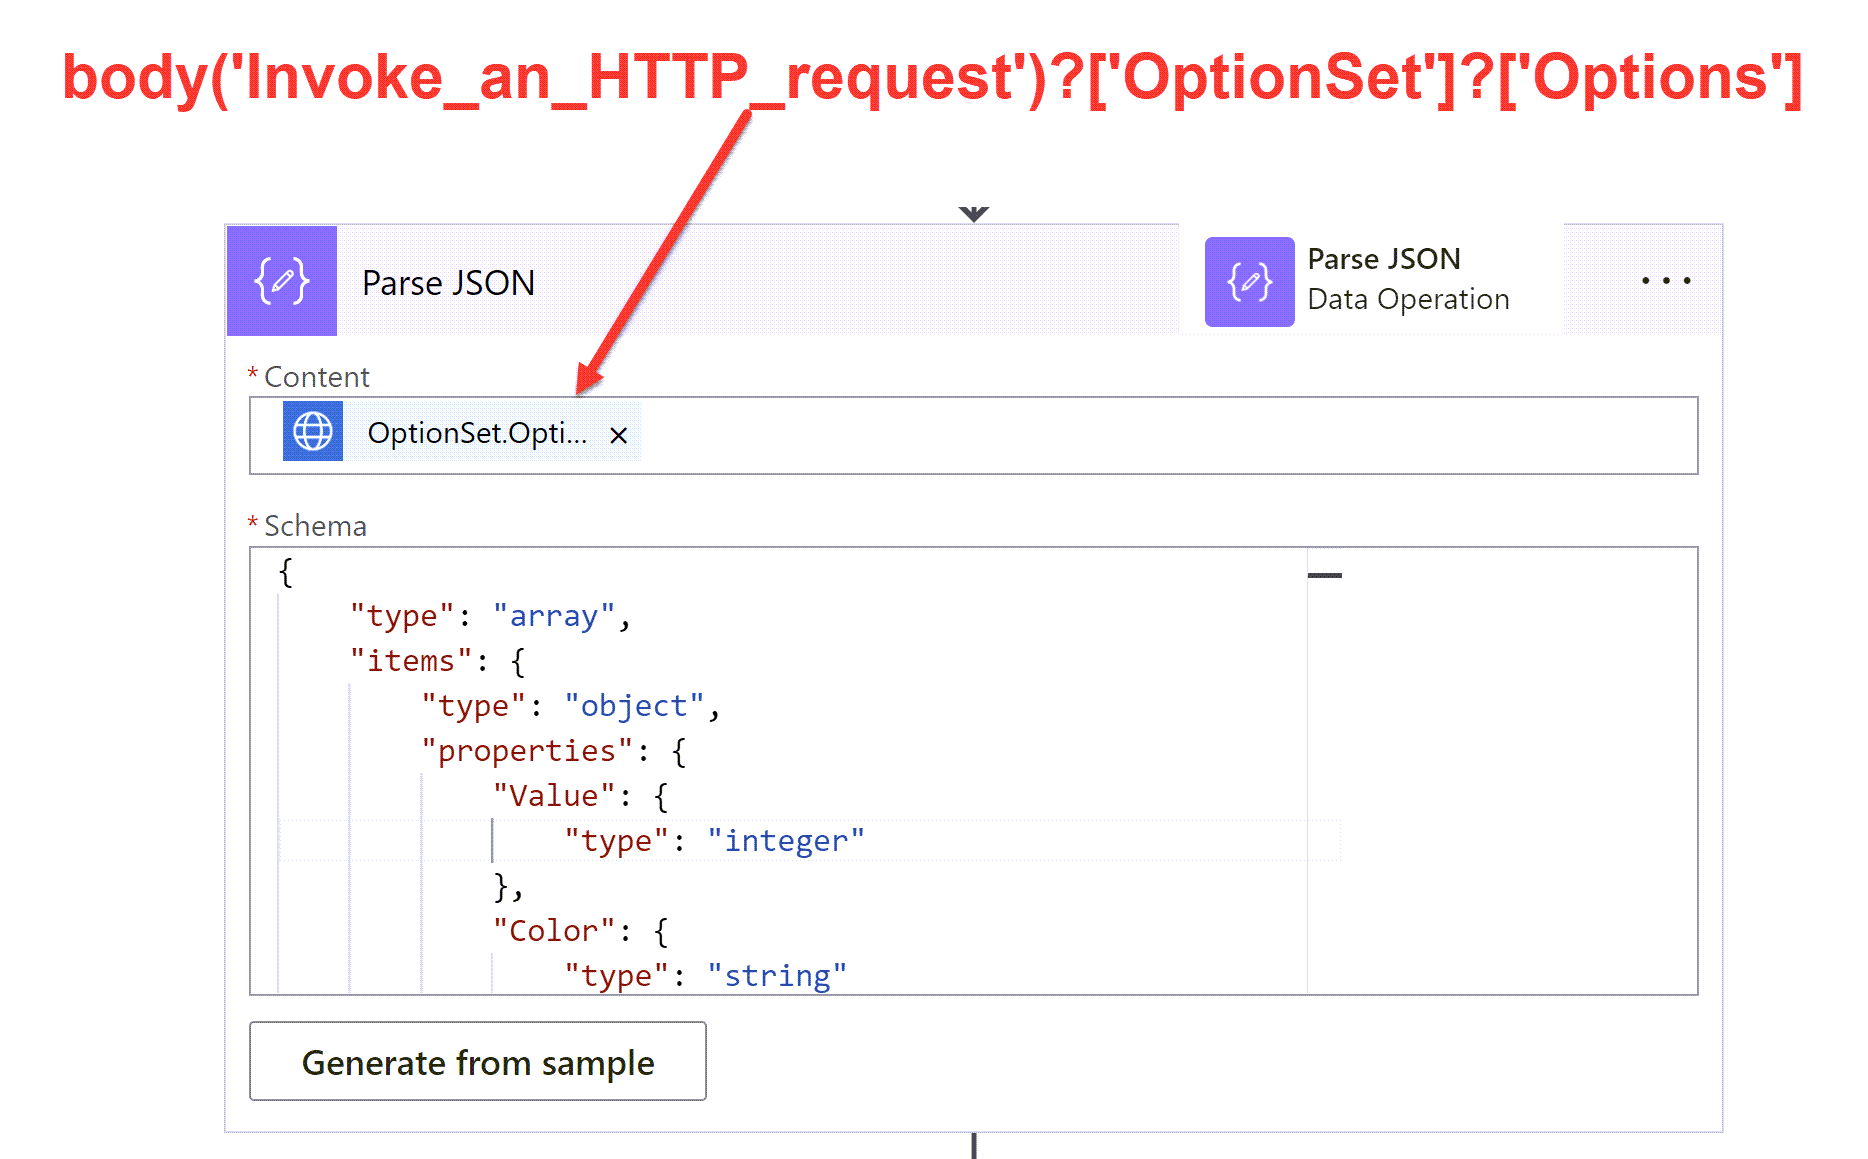
We are going to use a ‘Parse JSON’ action to make some sense of our HTTP GET request. The content selects just the ‘Options’ from what was returned, we don’t need the rest. Scroll down to the bottom of this post for the Schema snippet.

body('Invoke_an_HTTP_request')?['OptionSet']?['Options']

Filter the array & get the choice value

4) Filter Array

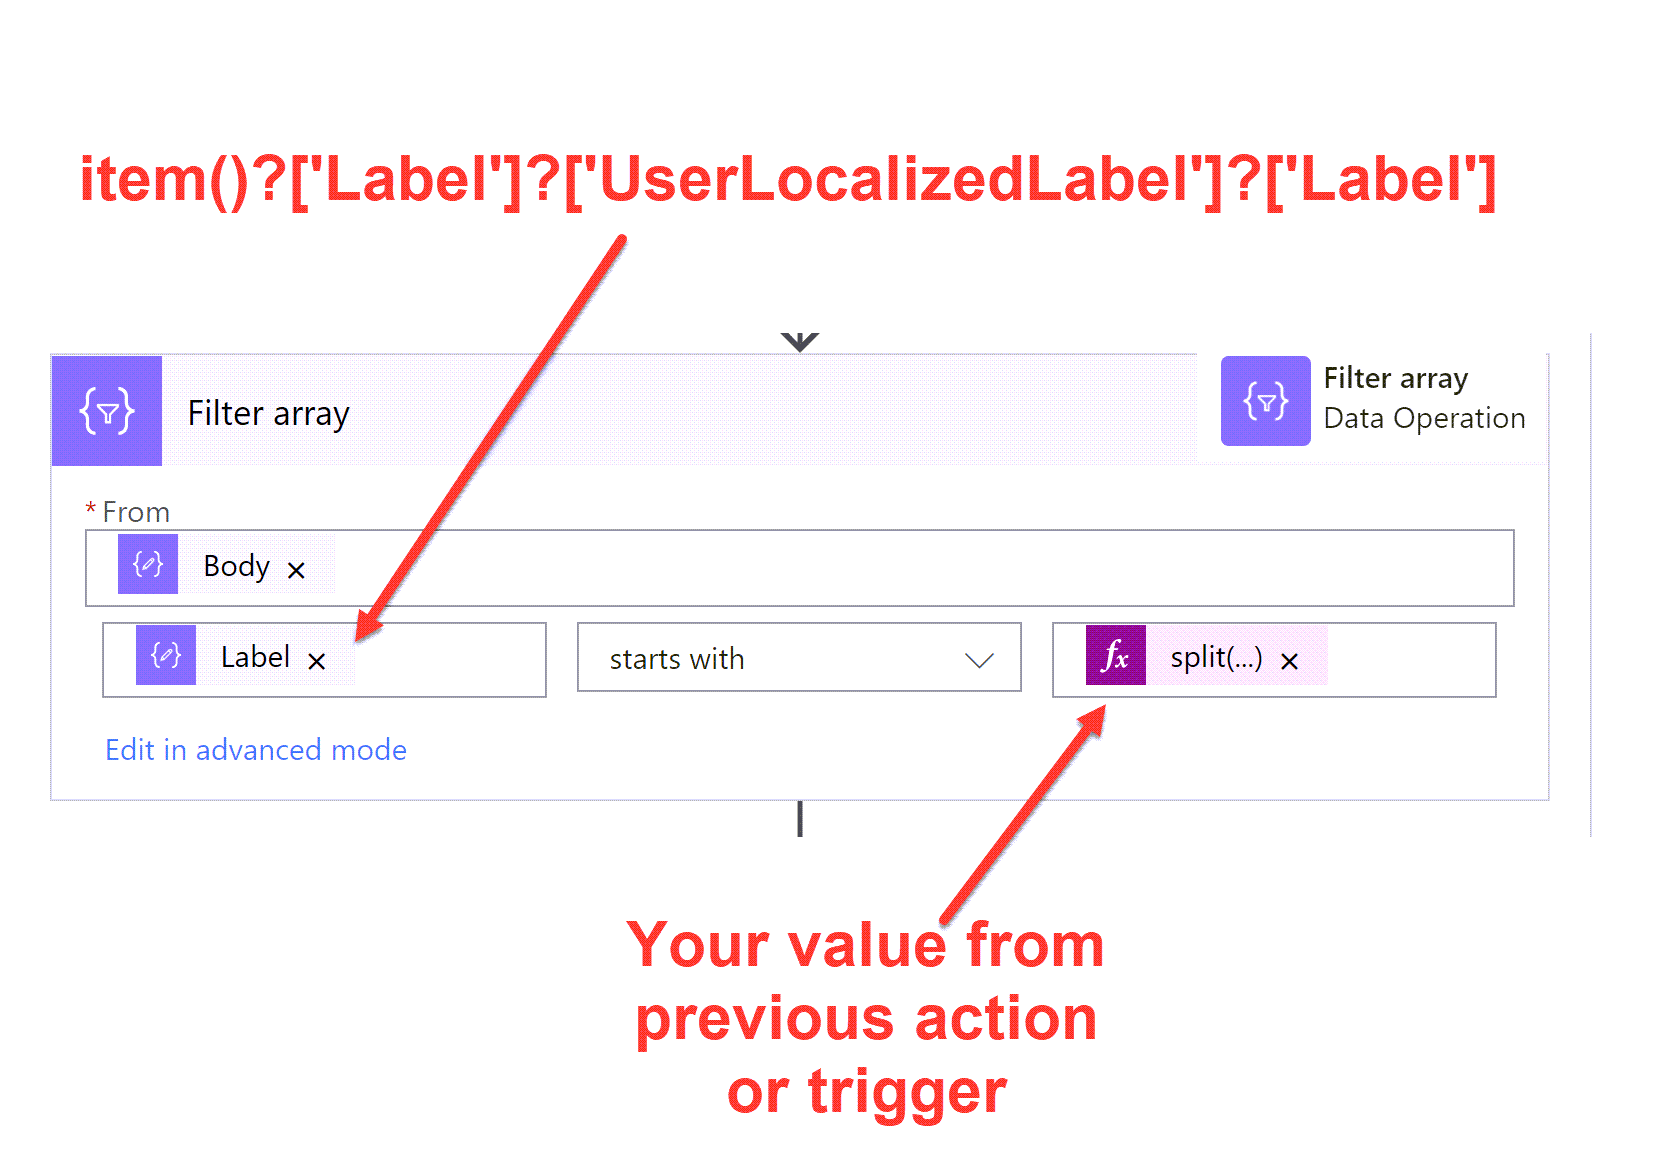
The outputs from the Parse JSON contains all of the choice labels and values + lots of other stuff, so now we need to filter it down to get the value we want. This is where you will use a value from a previous action/trigger in your flow. Using any of the standard condition statements such as ‘equals’ or ‘starts with’. In this case I have the start of the label to match.

item()?['Label']?['UserLocalizedLabel']?['Label']
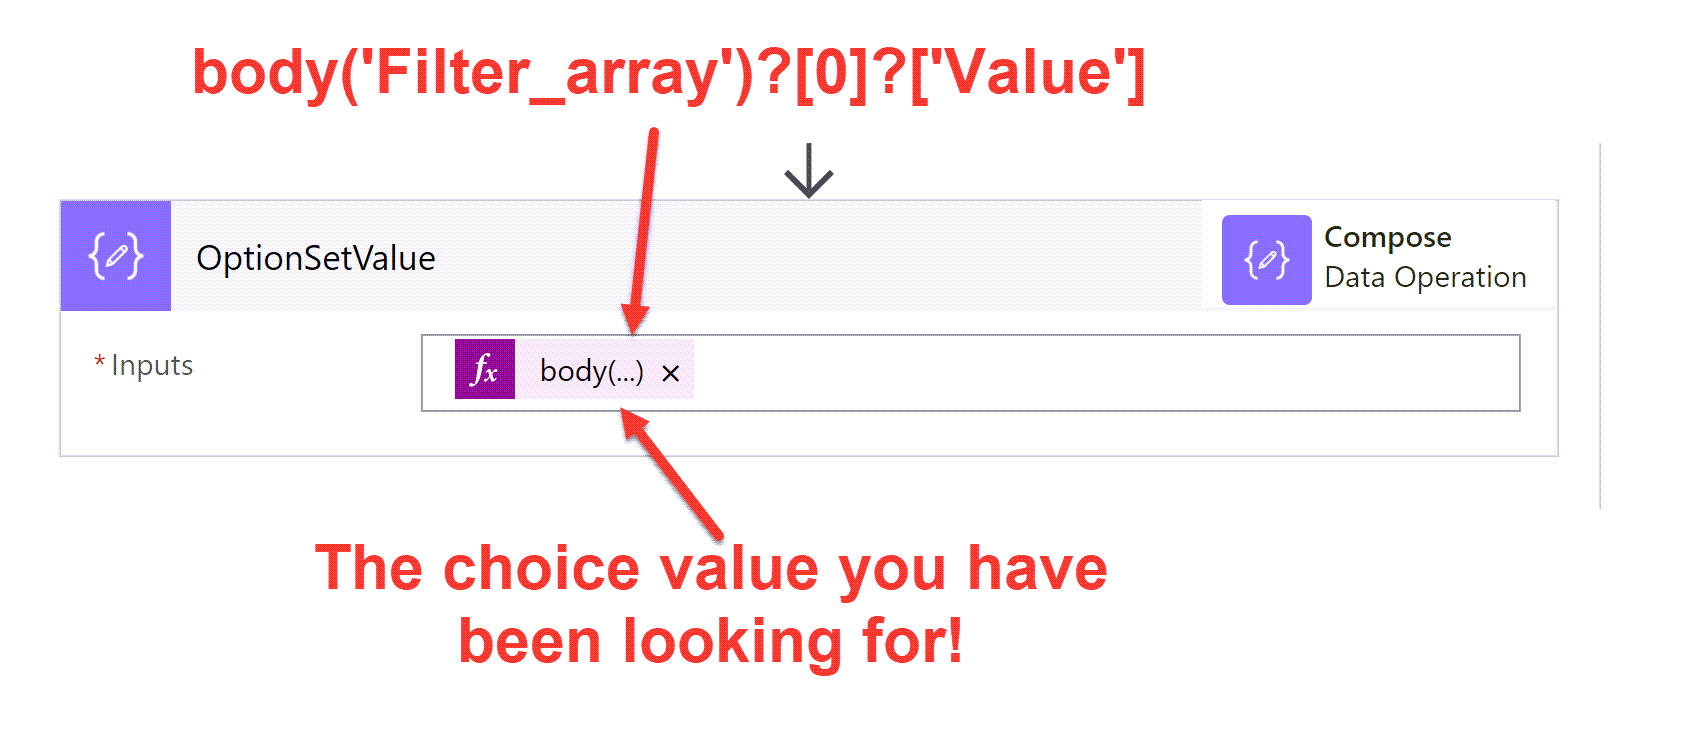
body('Filter_array')?[0]?['Value']

5) Get Choice Value

Even though we have filtered the array to only one value, it is still an array so if you just take the ‘Value’ as a variable you will get sucked into another unwanted loop. instead we can use the [0] action to get the first item in the array then ask for the specific part of the array item - the ‘Value’.

NOTE: I am making the assumption that I will only get one match because the filter I passed will always match to a single choice, if this is not the case - create some better filter conditions 😉

I never thought I would be so happy to see a number rather than words but my flow is happy and I’m free from the rusty chains of a Switch statement. Happy choice making!

If you would rather watch a video and listen to the angelic voice of George Doubinski with occasional interruptions from me, feast your eyes on this episode of Citizen Can -> https://youtu.be/AHB03NV73aE

{
    "type": "array",
    "items": {
        "type": "object",
        "properties": {
            "Value": {
                "type": "integer"
            },
            "Label": {
                "type": "object",
                "properties": {
                    "LocalizedLabels": {
                        "type": "array",
                        "items": {
                            "type": "object",
                            "properties": {
                                "Label": {
                                    "type": "string"
                                }
                            }
                        }
                    },
                    "UserLocalizedLabel": {
                        "type": "object",
                        "properties": {
                            "Label": {
                                "type": "string"
                            }
                        }
                    }
                }
            },
            "Description": {
                "type": "object",
                "properties": {
                    "LocalizedLabels": {
                        "type": "array"
                    },
                    "UserLocalizedLabel": {}
                }
            }
        }
    }
}


******************************************************************

One approach could be to embed an array with the labels and ids in your flow. You can use a filter array to get the correct id and use an expression in the add row action.


Below is an example of that approach. 

Drawback of this approach is that you need to maintain the optionset values in your flow. Alternatively, you could dynamically retrieve the optionset values via an HTTP action instead of the initialize variable action.


1. Add an Initialize variable of type array. 


2. Add a Filter Array. Filter the array on the label field value.

addresstype_array.png

3. Use an expression to retrieve the correct id of the corresponding label:


body('Filter_array')[0]['Value']


addresstype_array02.png


Hope this helps a bit? 


Identify all the cloudflows on a particular entity along with its messages

  The easiest way to identify the flows that trigger on a particular entity with its messages is to run a SQL query using the sql4cds tool i...