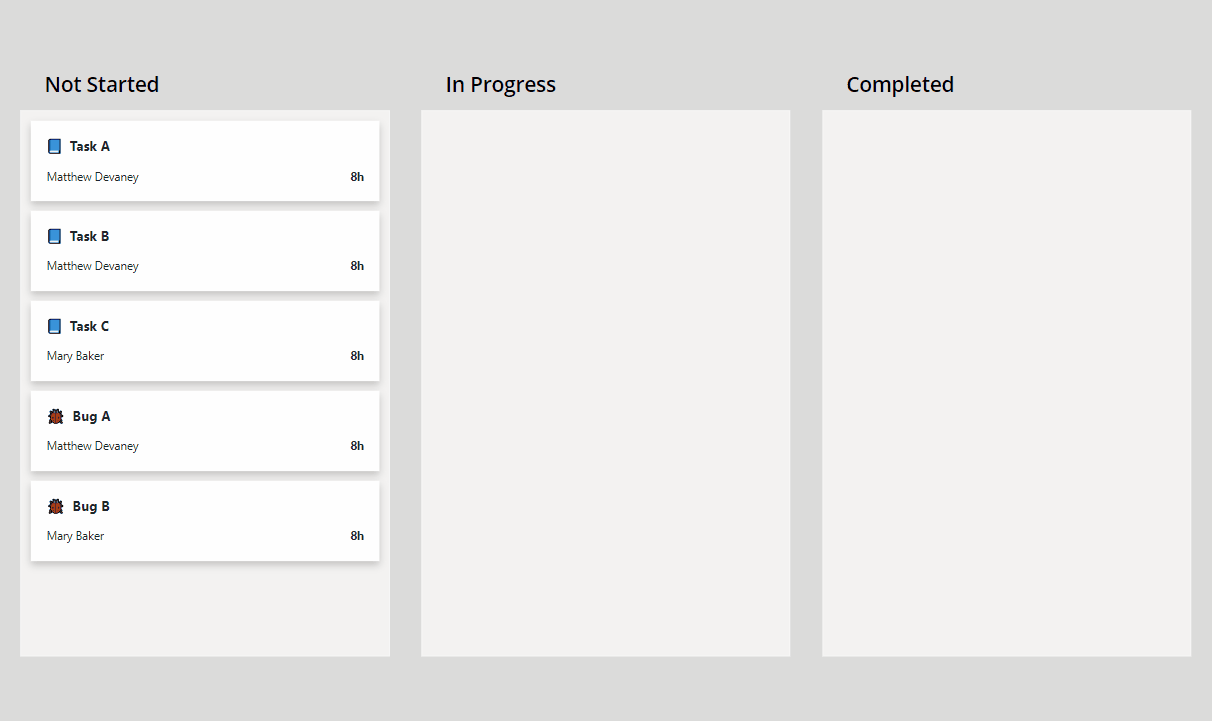
Introduction: The Kanban Board App
Developers at a software company use the Kanban board to show their progress on development tasks and bug fixes. When a developer starts a new task, they drag it from Not Started to In Progress. When work on the item is done they drag and drop it into the Completed section.
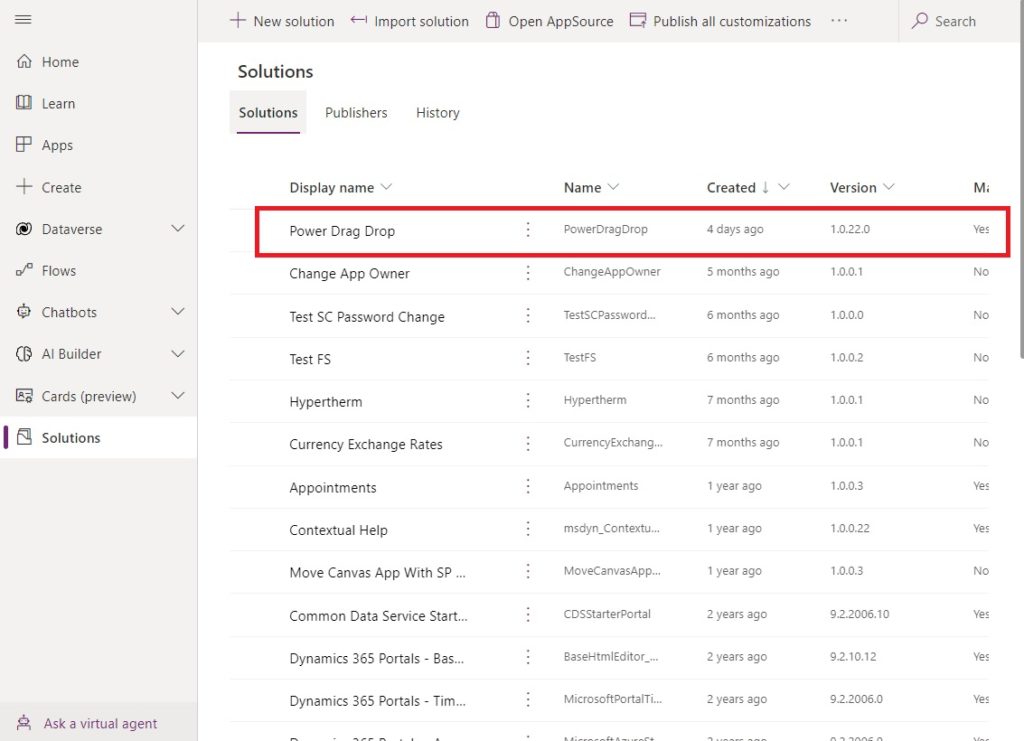
Install The Power Apps Drag And Drop Managed Solution
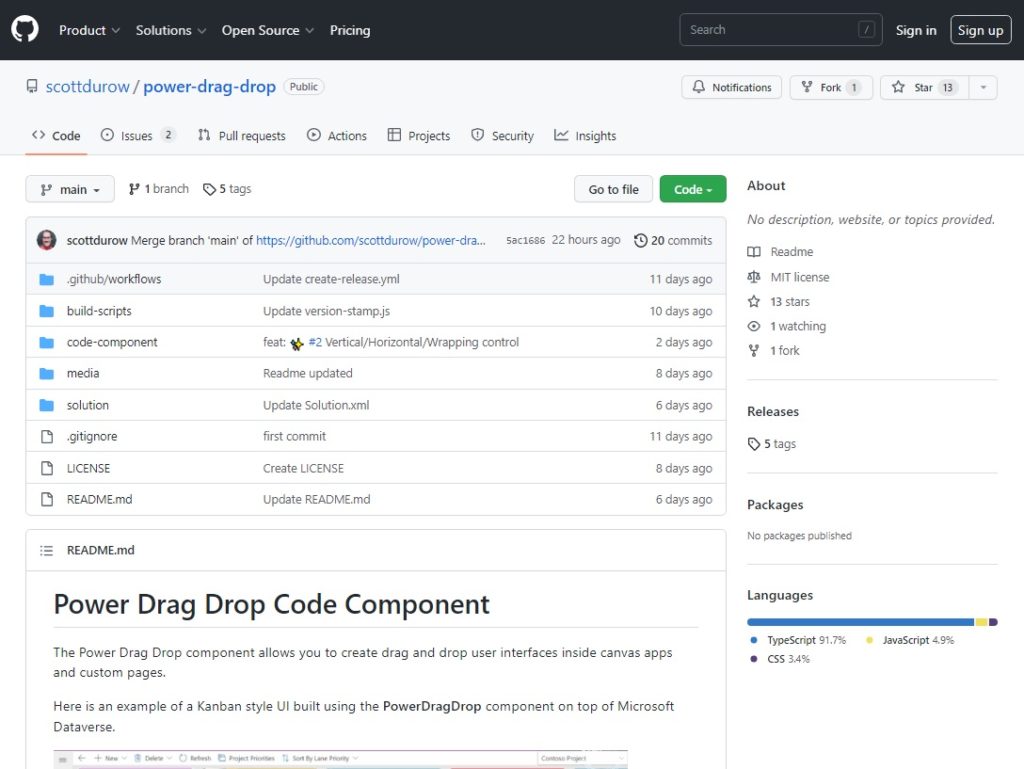
Drag and drop functionality is not included in Power Apps out-of-the box. We must download it and install it. Launch a web browser and navigate to the Power Apps drag and drop repository owned by Scott Durow.
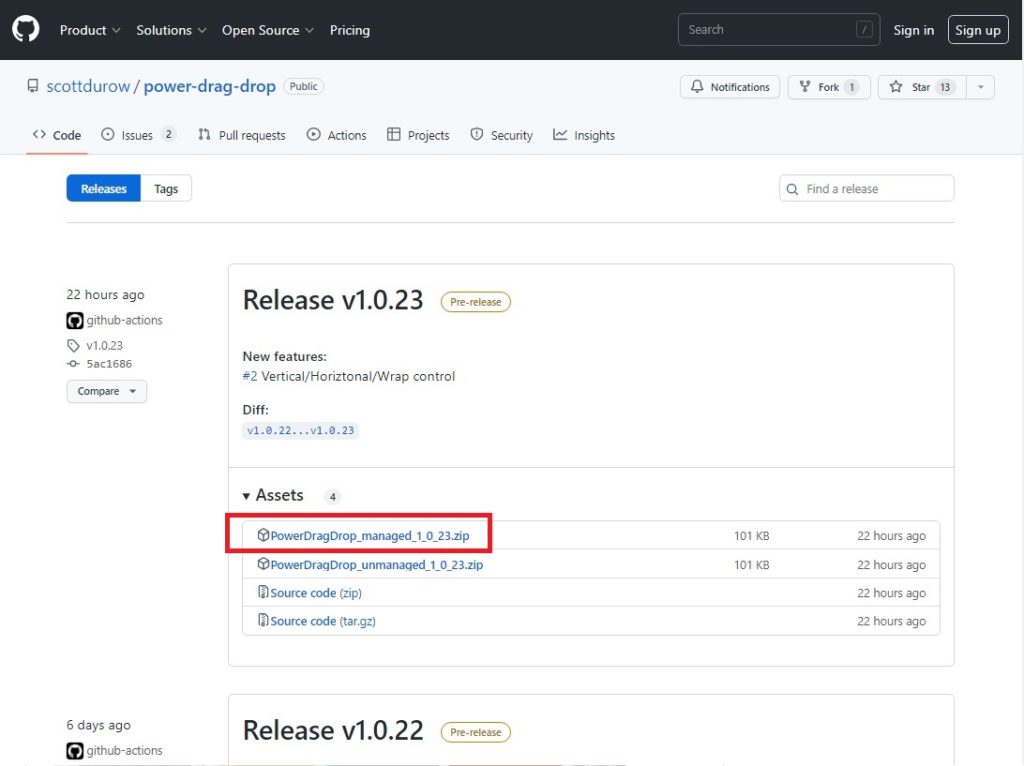
Go to the Power Apps drag and drop releases page and download the latest managed solution zip file.
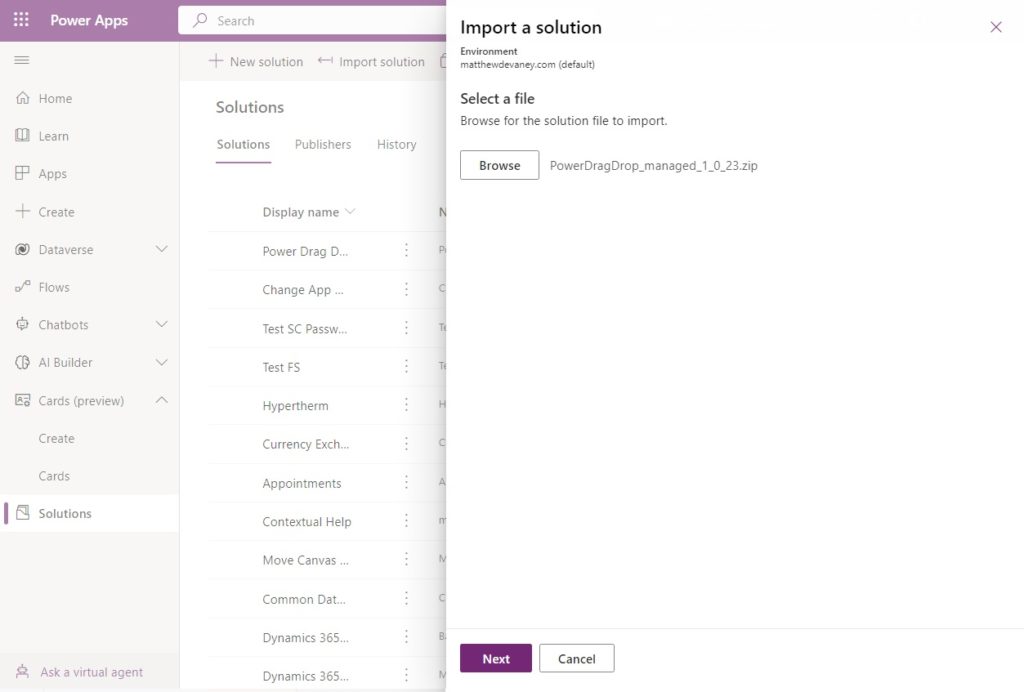
Then open make.powerapps.com. Go to the Solutions menu. Then choose Import Solution. Browse and select the Power Apps Drag and Drop managed solution we just downloaded. Click next the Next button then the import button.
After a few minutes of waiting the Power Apps Drag And Drop component will successfully install and appear in the Solutions menu.
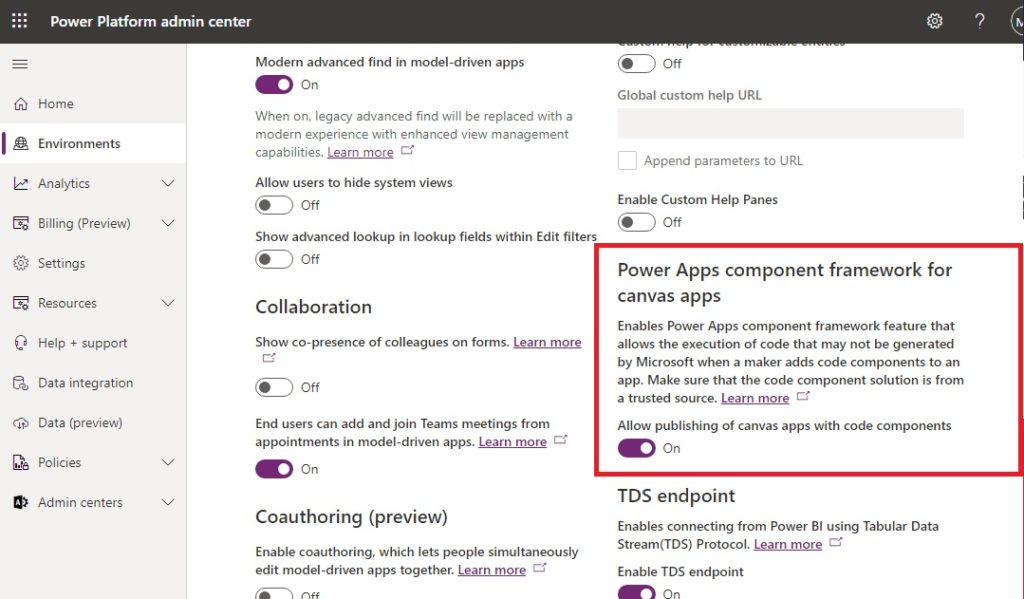
Enable Power Apps Component Framework In Admin Center
The drag and drop functionality we installed was built using the Power Apps component framework (PCF). To use it in a canvas app, we need to enable the PCF in our environment. Go to the Power Platform admin center, open the environments menu and select the environment where drag and drop was installed. Then open the settings page and choose the features.
Toggle on the Power Apps component framework for canvas apps setting. Now we are ready to start building our kanban board app.
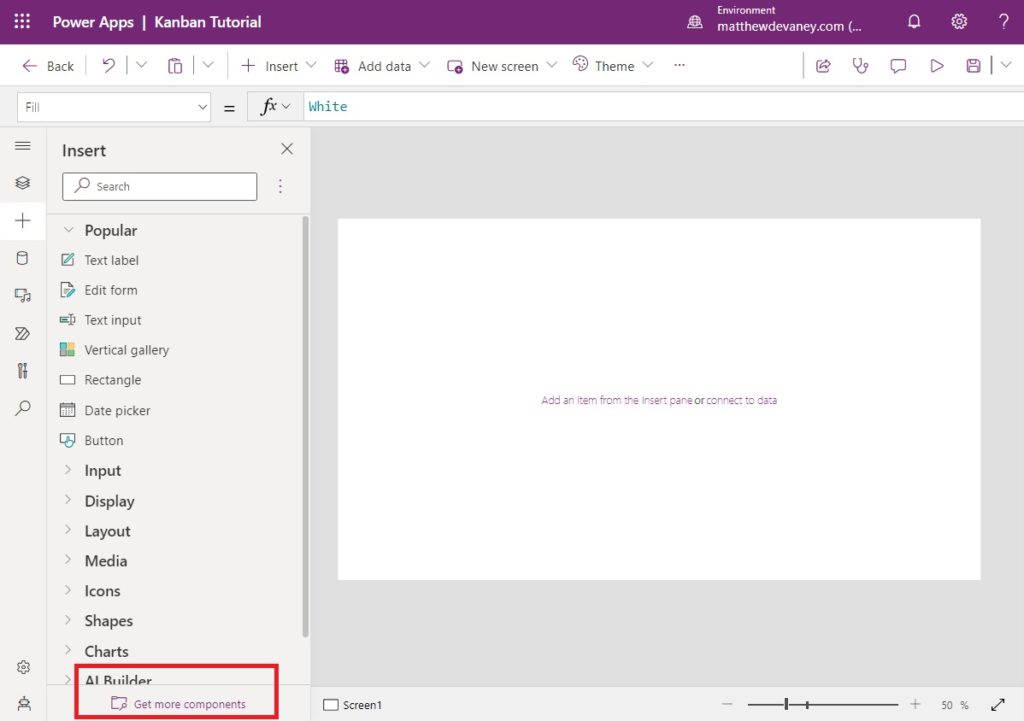
Add The Drag And Drop Component To A Canvas App
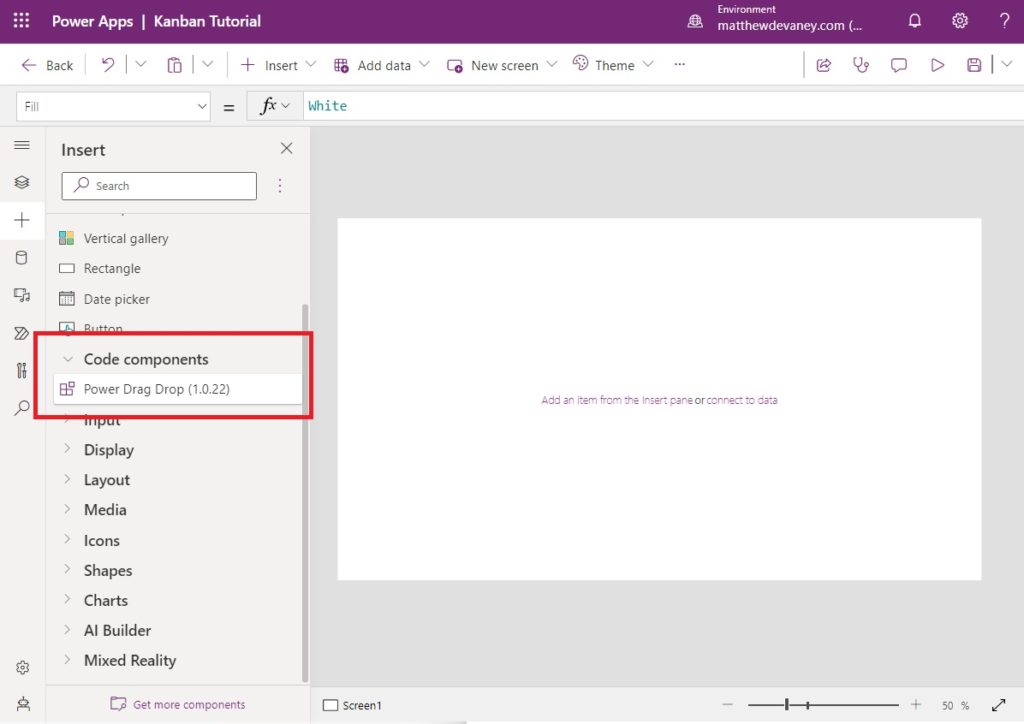
Open make.powerapps.com and create a new canvas app from blank. Go to the Insert menu and select Get more components from the bottom.
The Power Apps drag and drop component is a code component. Select the code tab and choose it from the list. Then click Import.
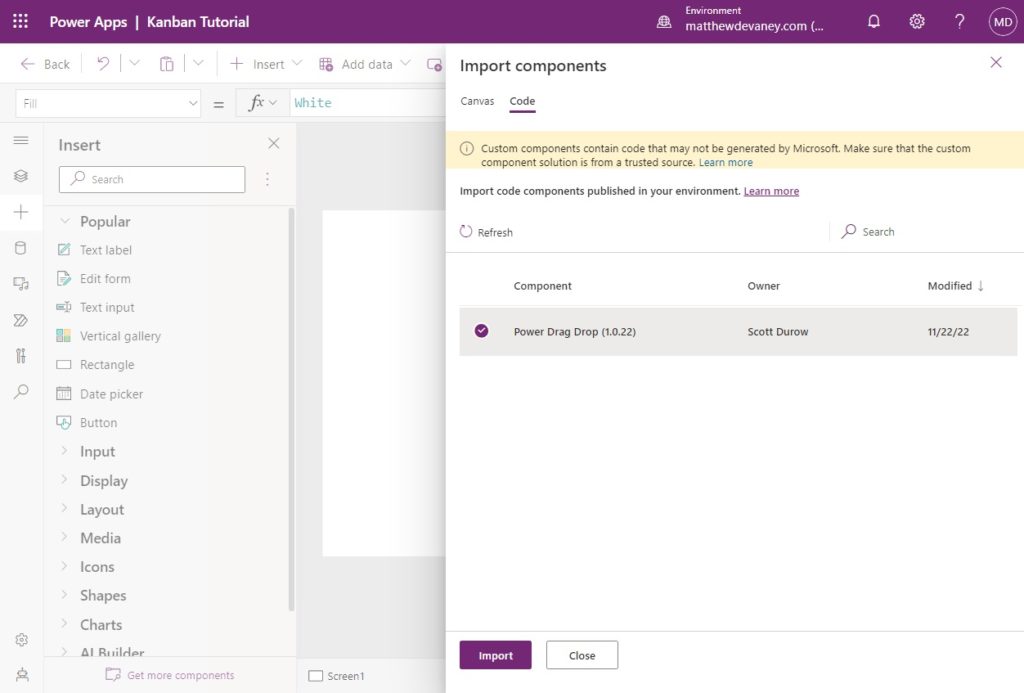
The Power Apps drag and drop component will now appear in the the Insert menu under the heading code components.
Populate The Kanbans With Items From A Collection
Place two drag and drop components on the screen and name them pcf_NotStarted and pcf_Completed. Tasks with the status Not Started will appear on the left and tasks with the status Completed will appear on the right. Then insert a new button onto the screen to create a collection of items that will appear in the kanbans.
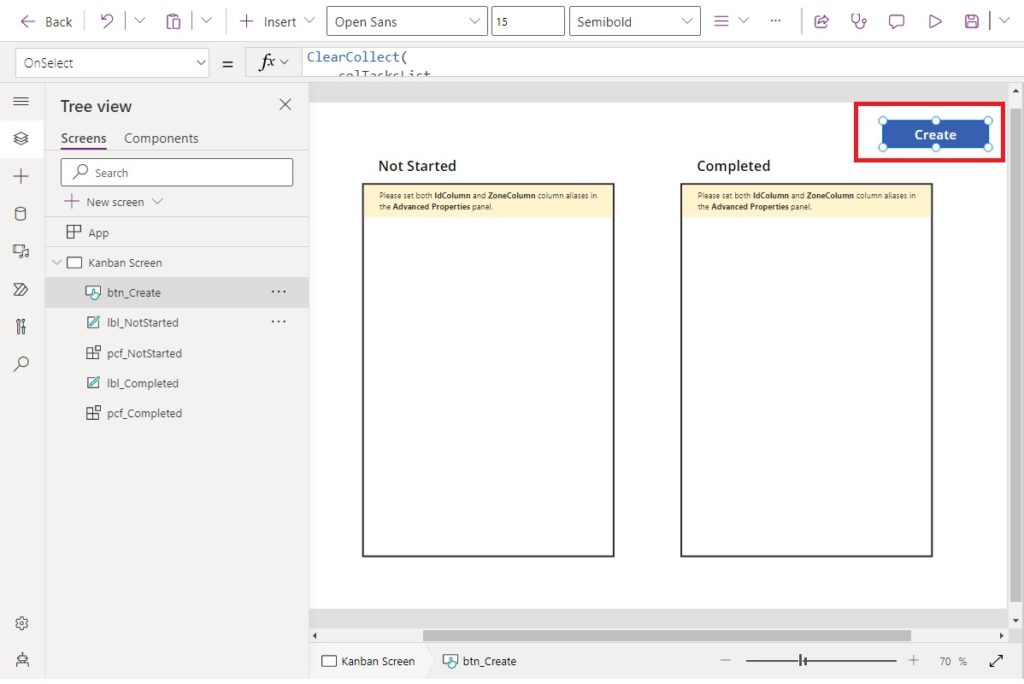
Use this code in the OnSelect property of the button to generate a collection named colTasksList.
ClearCollect(
    colTasksList,
    Table(
        {
            ID: 1,
            Title: "Task A",
            Description: "Ipsum Lorem Facto",
            Status: "Not Started",
            DisplayOrder: 1,
            Type: "Task",
            TypeIcon: "📘",
            AssignedTo: "Matthew Devaney"
        },
        {
            ID: 2,
            Title: "Task B",
            Description: "Ipsum Lorem Facto",
            Status: "Not Started",
            DisplayOrder: 2,
            Type: "Task",
            TypeIcon: "📘",
            AssignedTo: "Matthew Devaney"
        },
        {
            ID: 3,
            Title: "Task C",
            Description: "Ipsum Lorem Facto",
            Status: "Not Started",
            DisplayOrder: 3,
            Type: "Task",
            TypeIcon: "📘",
            AssignedTo: "Mary Baker"
        },
        {
            ID: 4,
            Title: "Bug A",
            Description: "Ipsum Lorem Facto",
            Status: "Not Started",
            DisplayOrder: 4,
            Type: "Bug",
            TypeIcon: "🐞",
            AssignedTo: "Matthew Devaney"
        },
        {
            ID: 5,
            Title: "Bug B",
            Description: "Ipsum Lorem Facto",
            Status: "Not Started",
            DisplayOrder: 5,
            Type: "Bug",
            TypeIcon: "🐞",
            AssignedTo: "Mary Baker"
        }
    )
)
Click the Not Started drag and drop component and select colTasksList as the datasource.
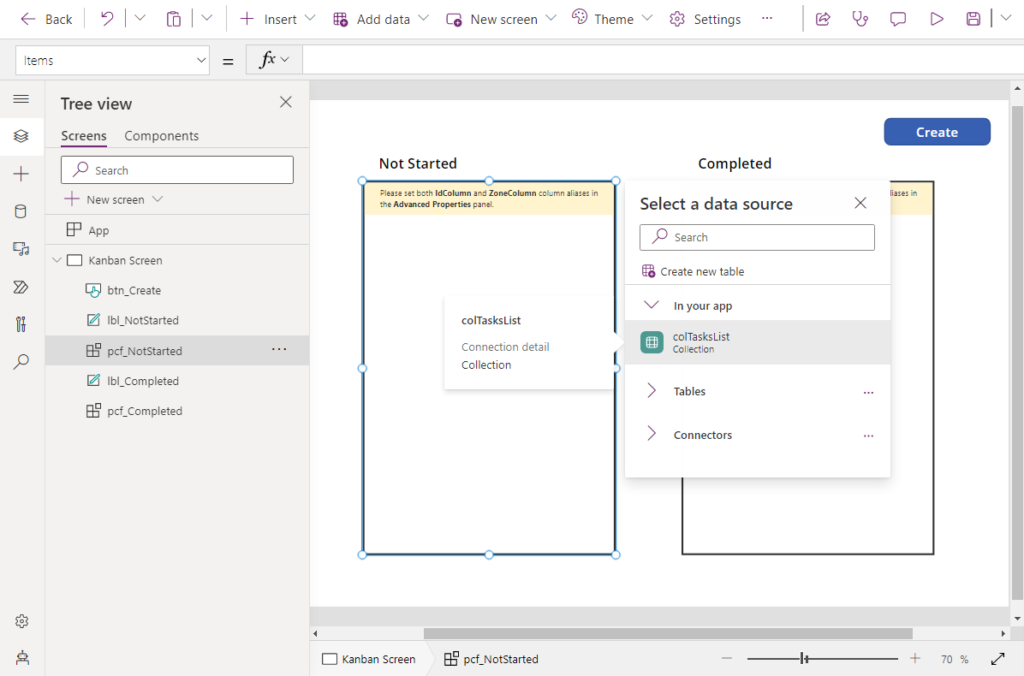
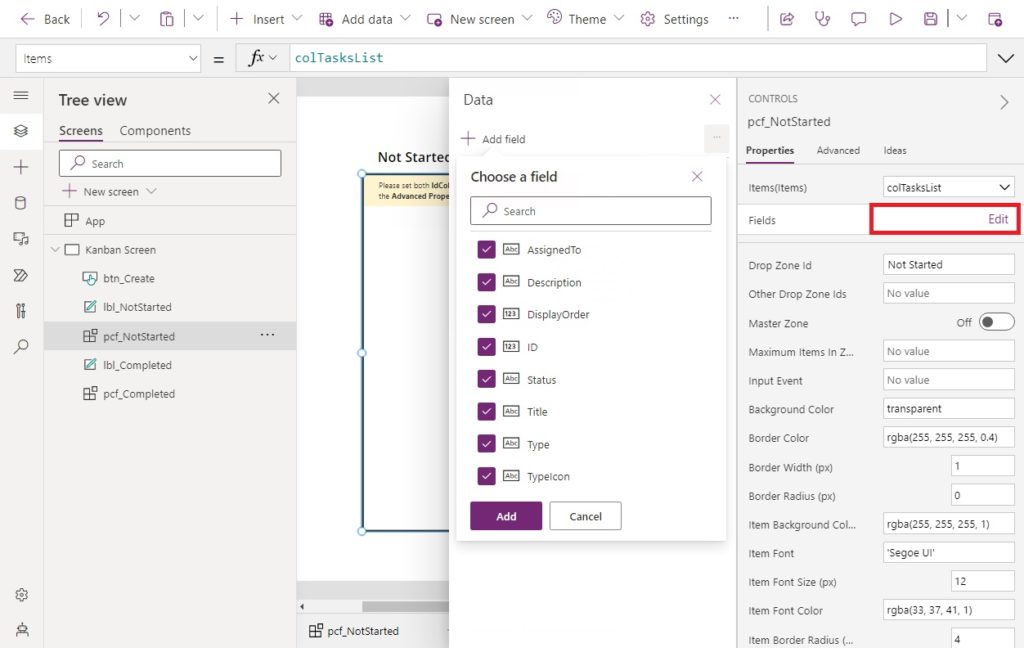
Then Edit its fields, check every field shown in the menu and click Add. No items will appear in the component just yet. We must do a few more actions first.
Repeat these same steps to select a datasource and add fields for the Completed drag and drop component.
Define The Drop Zone IDs
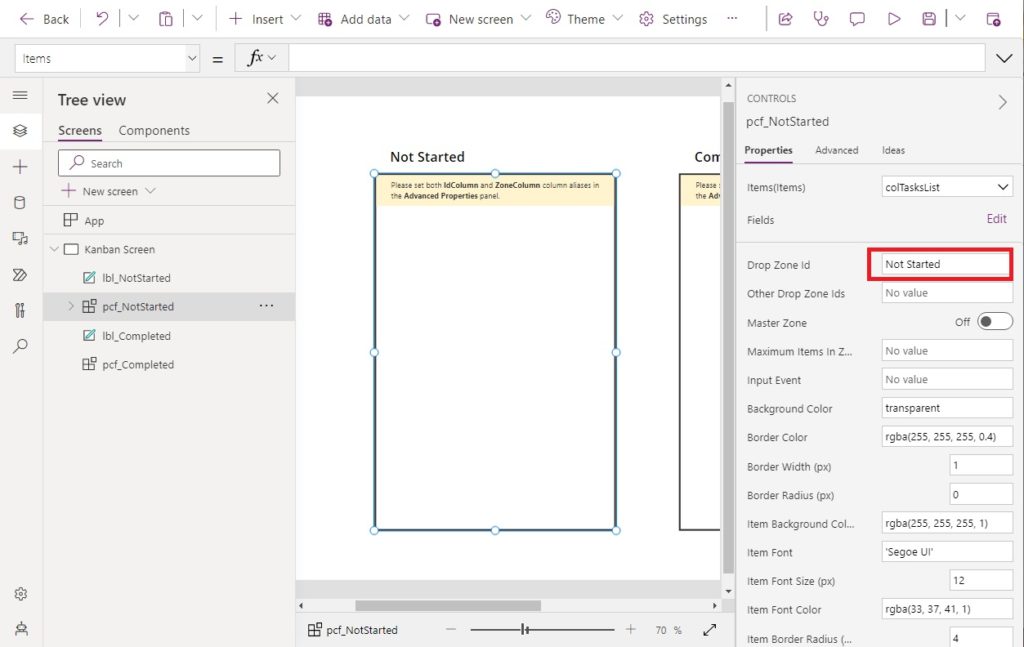
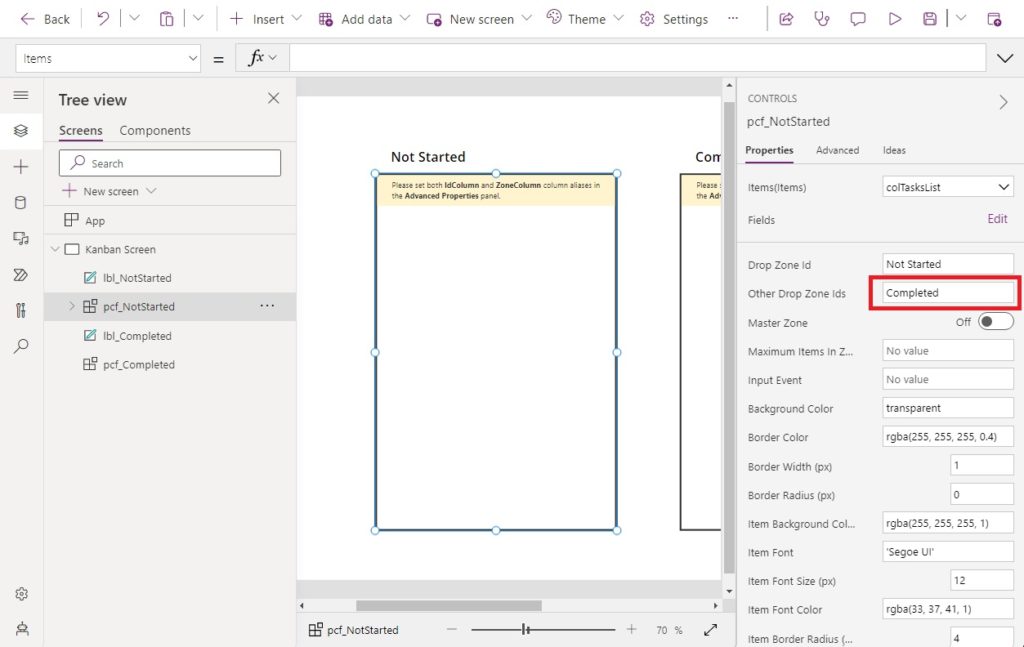
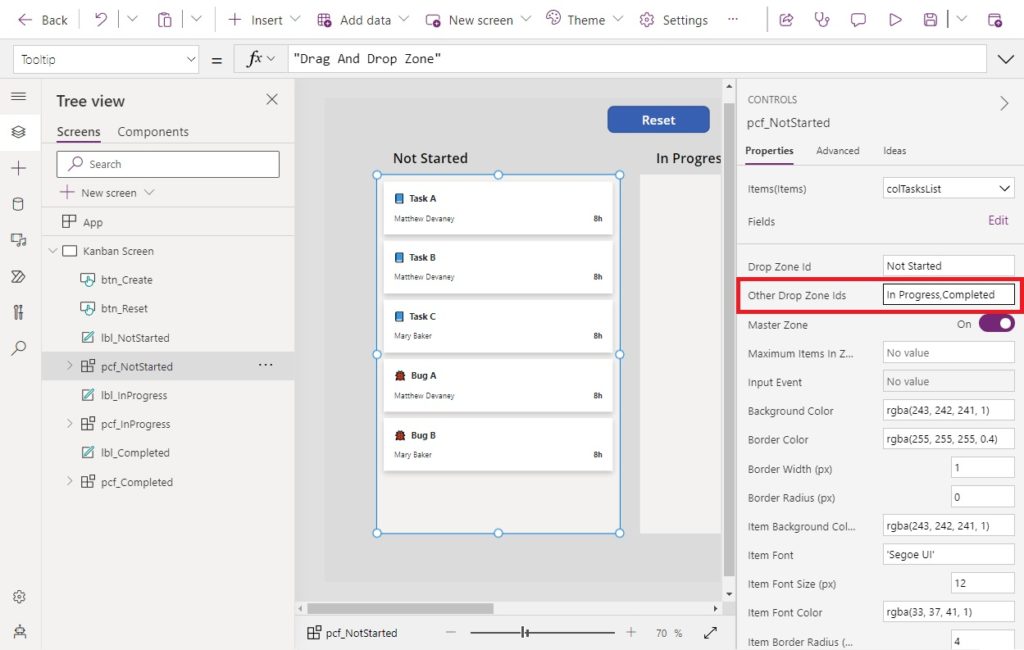
Each drag and drop component requires a drop zone id. A drop zone id is a unique name which identifies the component. Use the drop zone id Not Started for the component pcf_NotStarted.
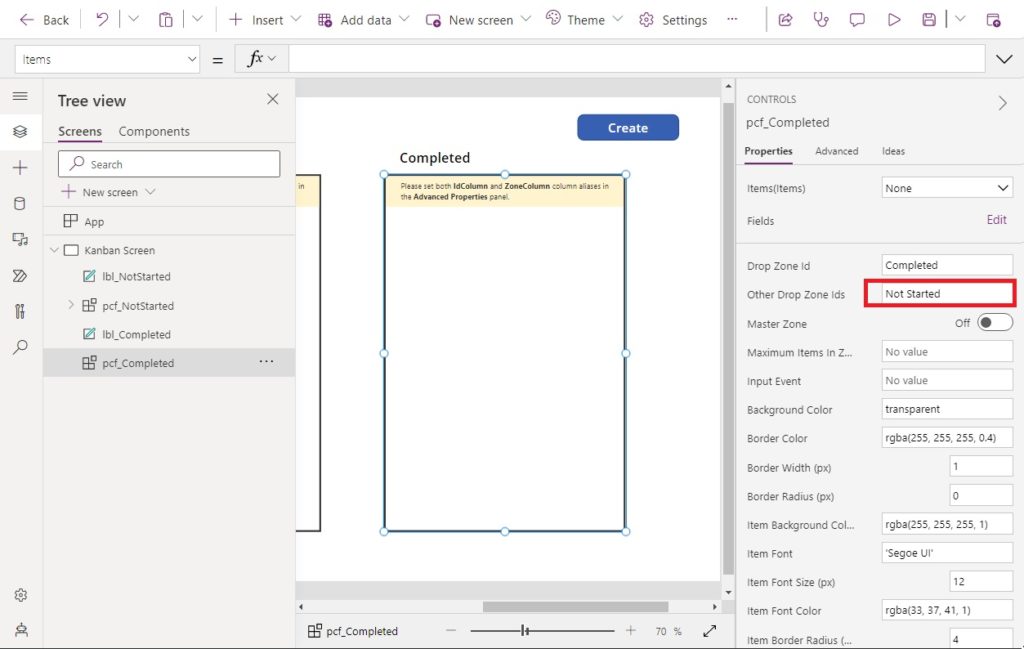
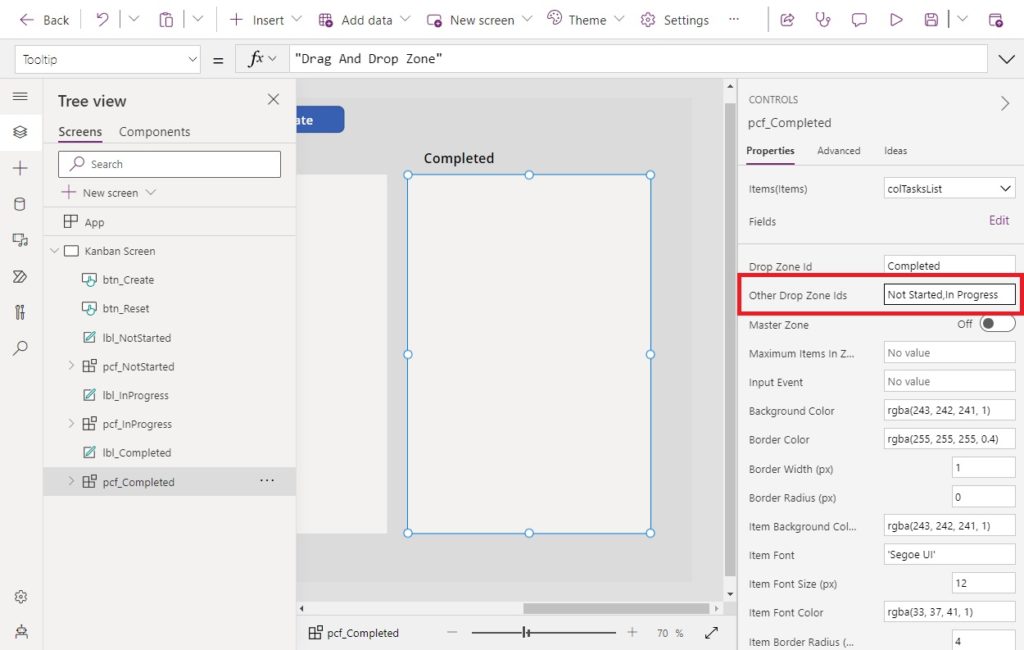
Similarly, use the drop zone id Completed for the component named pcf_Completed.

There is another property called other drop zone ids which controls the drag and drop components that may interact with one another. Define the other drop zone id property as Completed for pcf_NotStarted.
Oppositely, write Not Started into the other drop zone id of pcf_Completed.
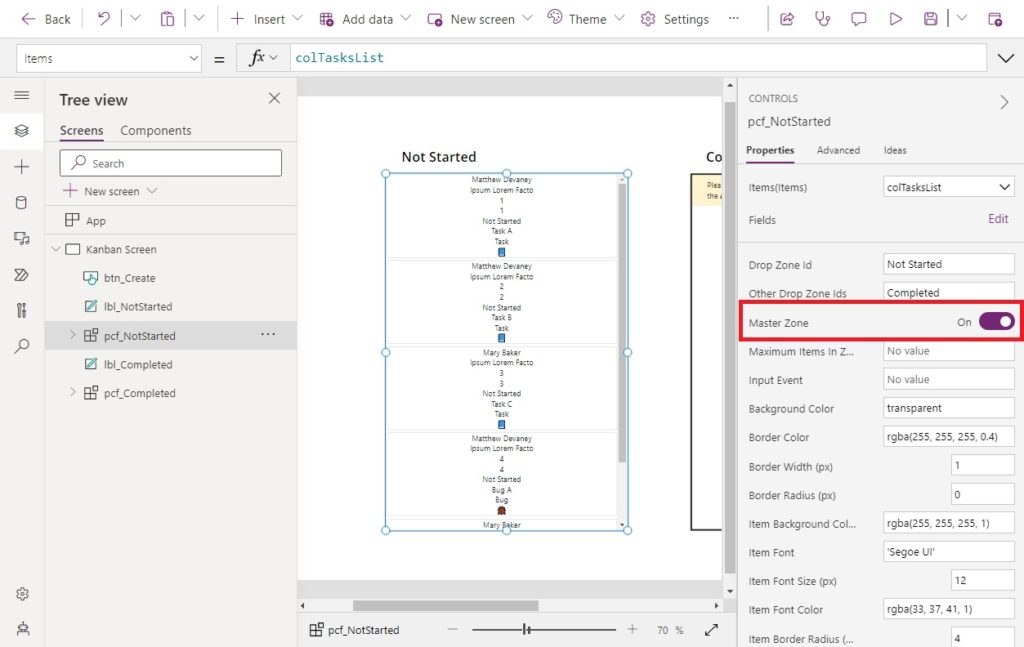
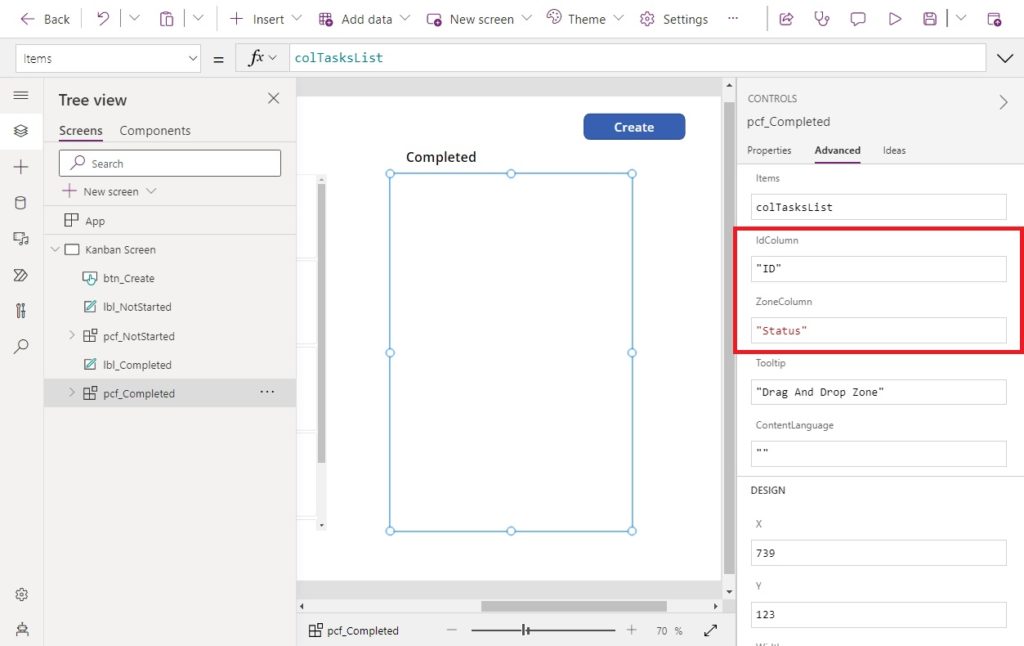
Setup The IdColumn, ZoneColumn And MasterZone
Once we setup the IdColumn and ZoneColumn properties of the drag and drop component we will finally see some items inside of it. The IdColumn must be set to the unique id of the records in colTasksLists. The ZoneColumn needs to match the record’s field that corresponds to which kanban it’s currently displayed in.
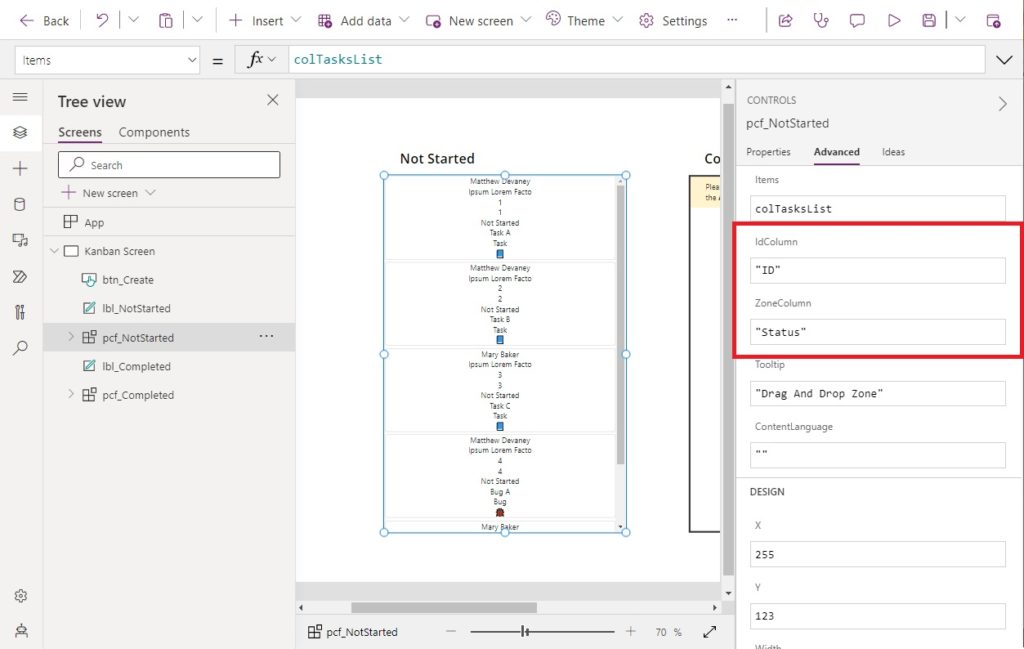
Select the pcf_NotStarted component and use this code in the IdColumn property.
"ID"
Write this code in the ZoneColumn property. Once this code is input we see tasks appear in the component. But we cannot drag and drop them yet.
"Status"
Toggle on the MasterZone property of pcf_NotStarted. There must always be one MasterZone in each group drag and drop components to orchestrate their actions. Now tasks inside the kanban can be re-ordered by dragging and dropping.
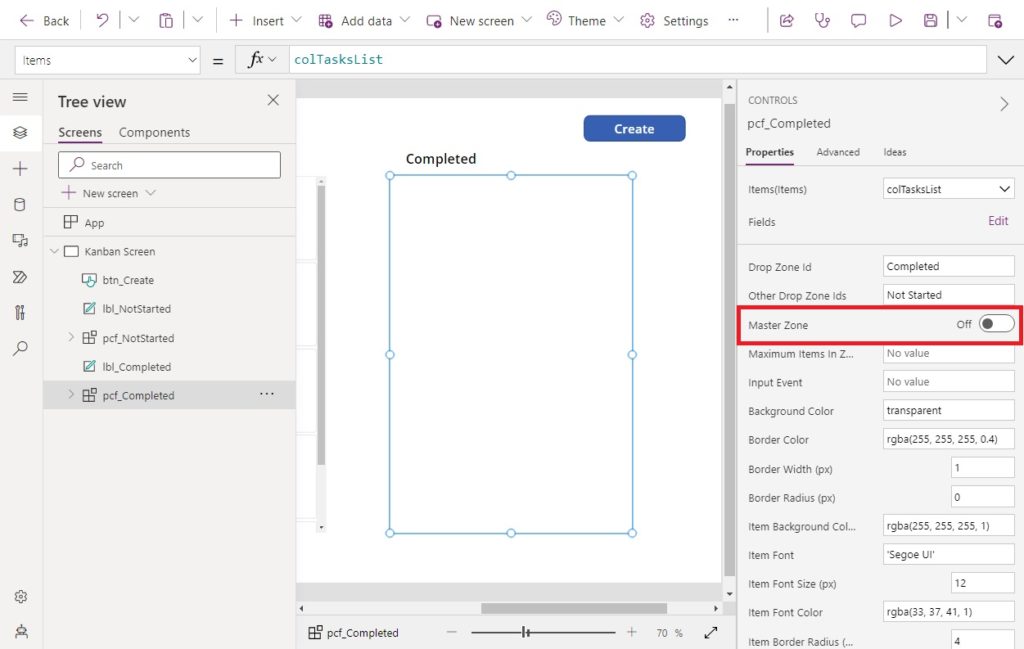
We must also set the same values for the IdColumn and ZoneColumn for pcf_Completed.
But the MasterZone property of pcf_Completed should be toggled off.
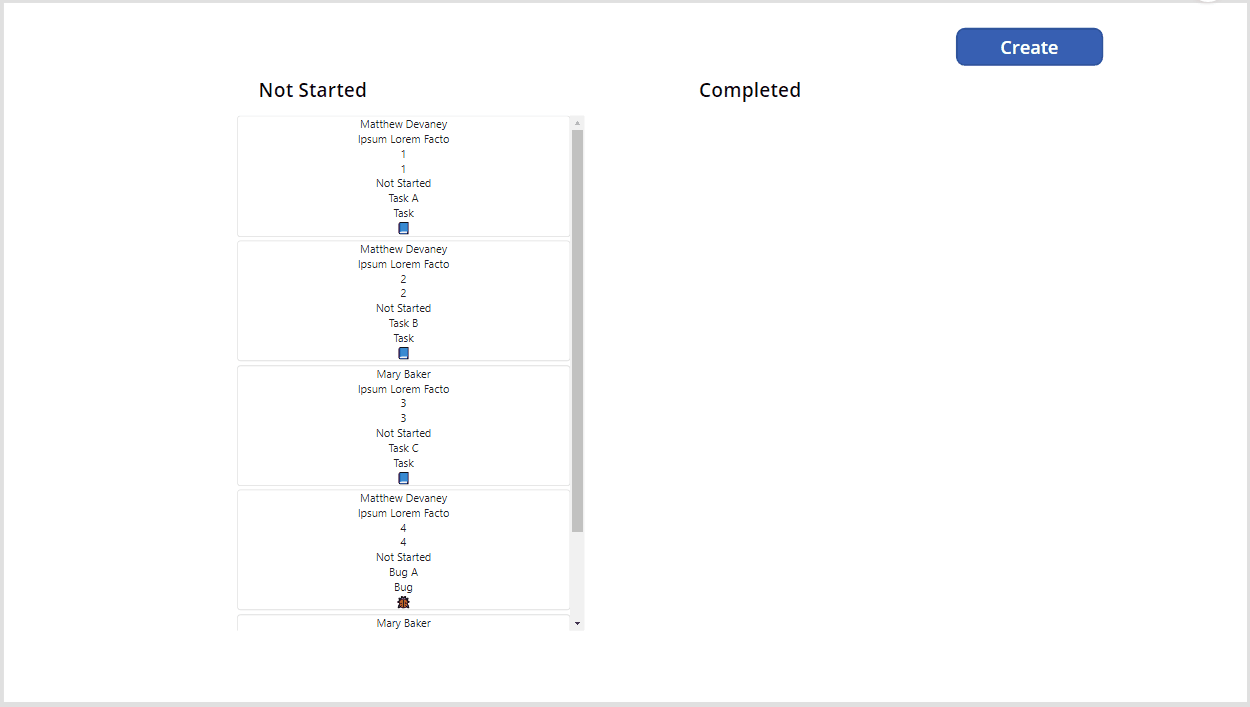
Test The “Not Started” And “Completed” Kanbans
Put the app in preview mode and give it a try. We can now reorder items inside a drag and drop component and move them to another drag and drop component. Super cool!
Reset The Drag And Drop Component
To return the kanbans to their initial state we can reset the drag and drop component. The component does not have a Reset property like most Power Apps controls. We must do this a different way.
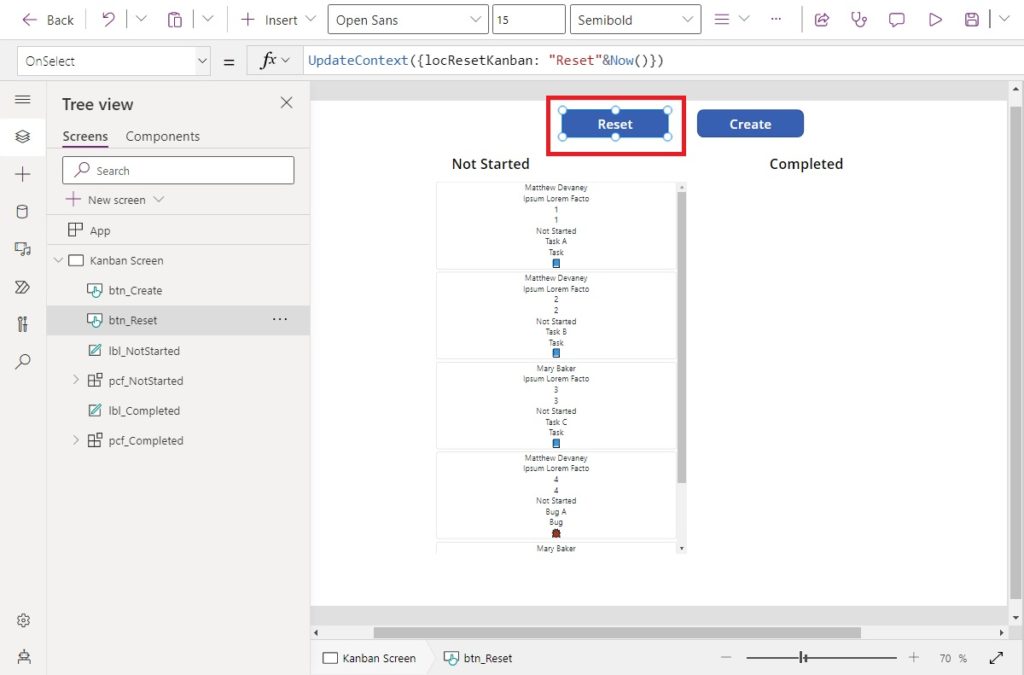
Create a button and write this code in the OnSelect property. The word Reset will be used to identify what action to take. The Now function is added at the end to generate a unique value that will ensure the control is reset.
UpdateContext({locResetKanban: "Reset"&Now()})
Then select the pcf_NotStarted control.
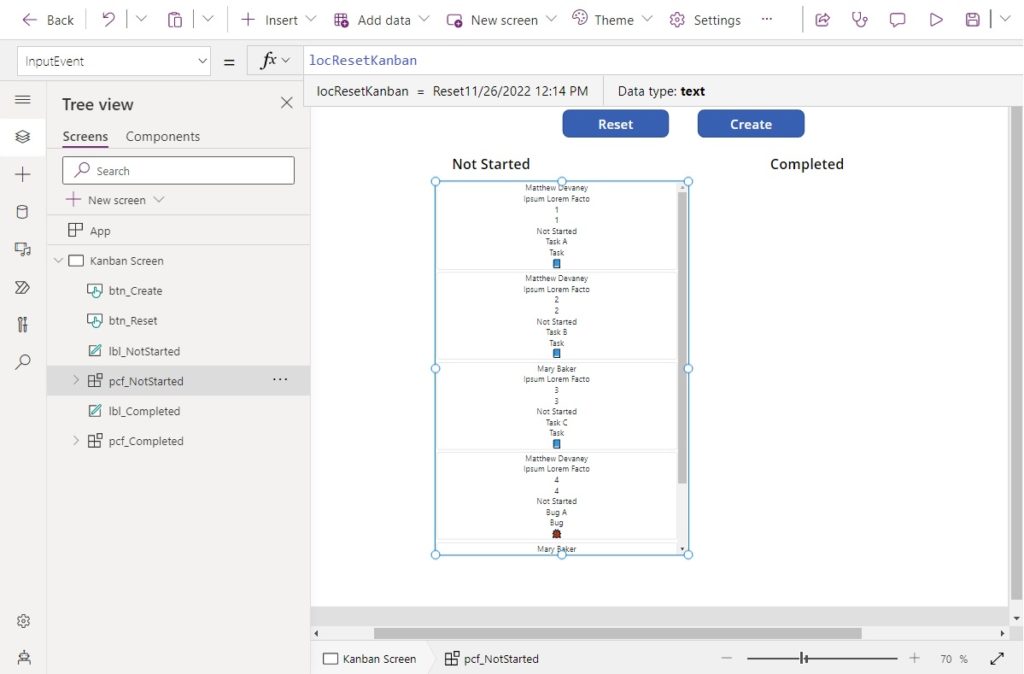
Write the variable name in the InputEvent property of the control. Do the same thing for pcf_Completed.
locResetKanban
Now when the reset button is clicked items will move back into their original positions inside the drag and drop components.
Formatting Items In The Drag And Drop Component
We can control which values from colTasksList appear inside the drag and drop component using the ItemTemplate property and some HTML code. Formatting can also be applied using a combination of HTML and inline-CSS. I highly suggest using the Live Preview extension in VS Code demoed by Scott Durow to perfect your code.
This simple example shows how to display the task name in bold.
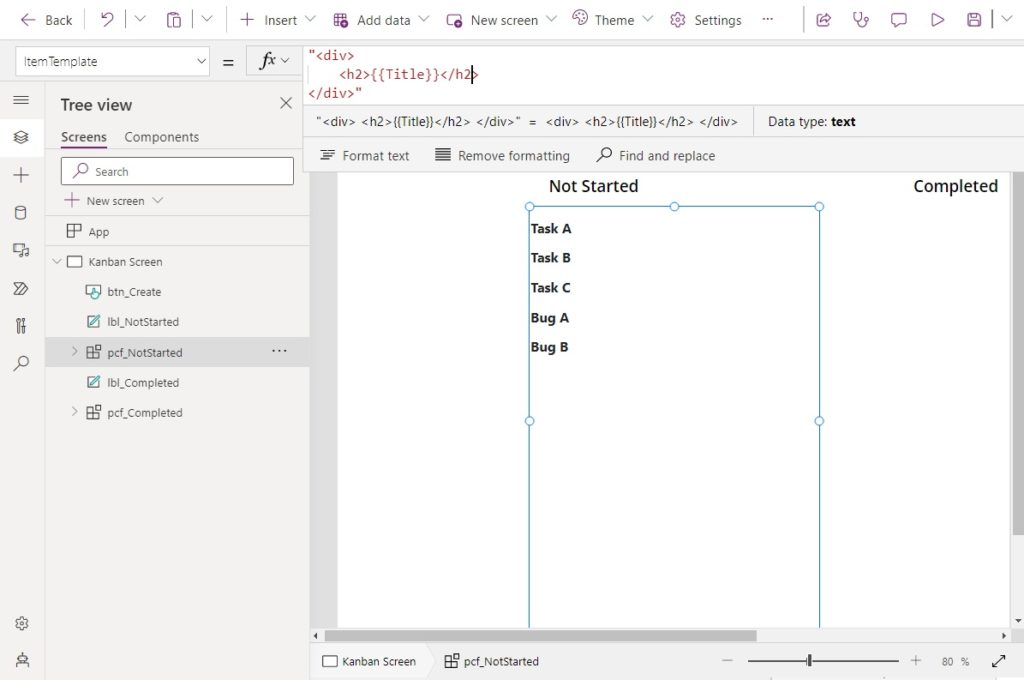
Write this code in the ItemTempate property of both the pcf_NotStarted and pcf_Completed components. Note that fields from colTasksList can be included by placing them between a set of squigglybrackets {{ }}.
"<div>
    <h2>{{Title}}</h2>
</div>"
In this next example, the a bolded title showing the task name appears above a description of the task.
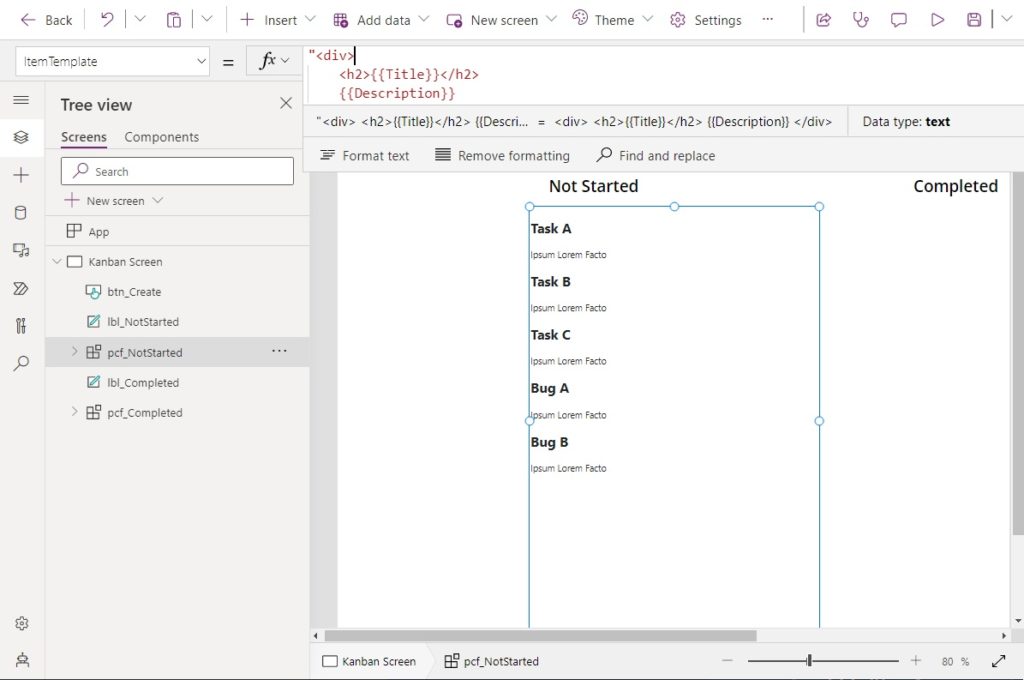
Use this code in the ItemTempate property of both the pcf_NotStarted and pcf_Completed components.
"<div>
    <h2>{{Title}}</h2>
    {{Description}}
</div>"
If you want to get really fancy (like me) you can use drop shadows on the item borders to make them look like card elements. I’ve also used CSS flexbox to make the template responsive and emojis (hotkey: [Windows] + [Period]) to make cool looking icons.
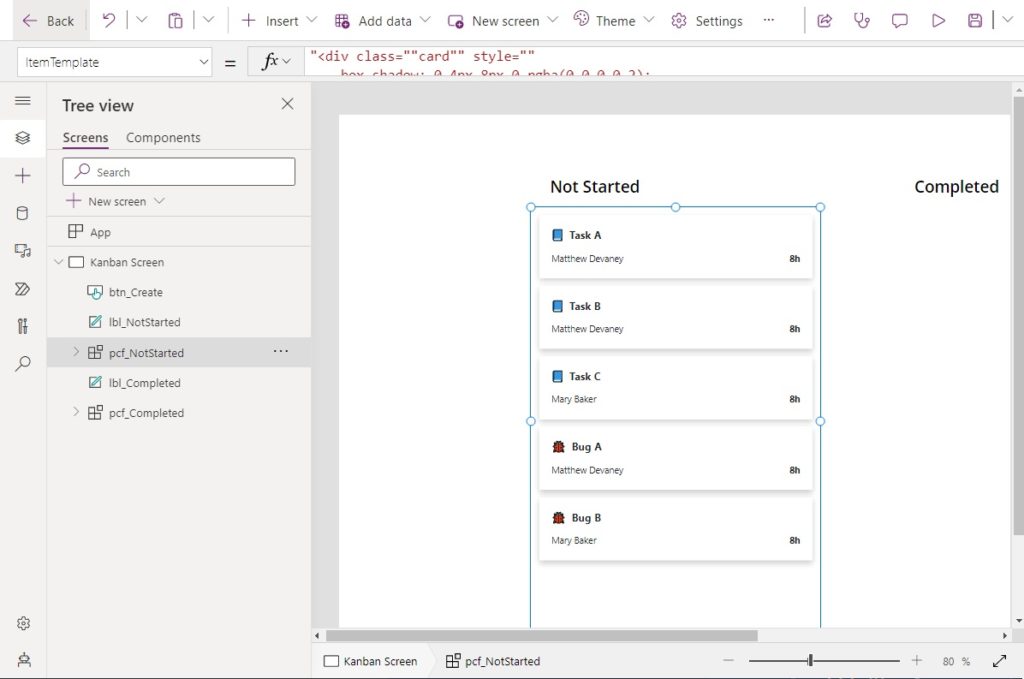
Apply this code to ItemTemplate for pcf_NotStarted and pcf_Completed to make them look very stylish indeed. 😀
"<div class=""card"" style=""
box-shadow: 0 4px 8px 0 rgba(0,0,0,0.2);
margin: 10px;
"">
<div class=""container"" style=""
background-color: white;
padding: 2px 16px;
"">
<h3>{{TypeIcon}} {{Title}}</h3>
<div class=""flex-container"" style=""
display: flex;
padding: 0 0 16px
"">
<div class=""flex-child"" style=""
flex: 4;
margin: 0px;""
>
{{AssignedTo}}
</div>
<div class=""flex-child"" style=""
flex: 1;
text-align: right;
"">
<b>8h</b>
</div>
</div>
</div>
</div>"
Style The Kanban Board App
A few more minor improvements are needed to make the app look really awesome.
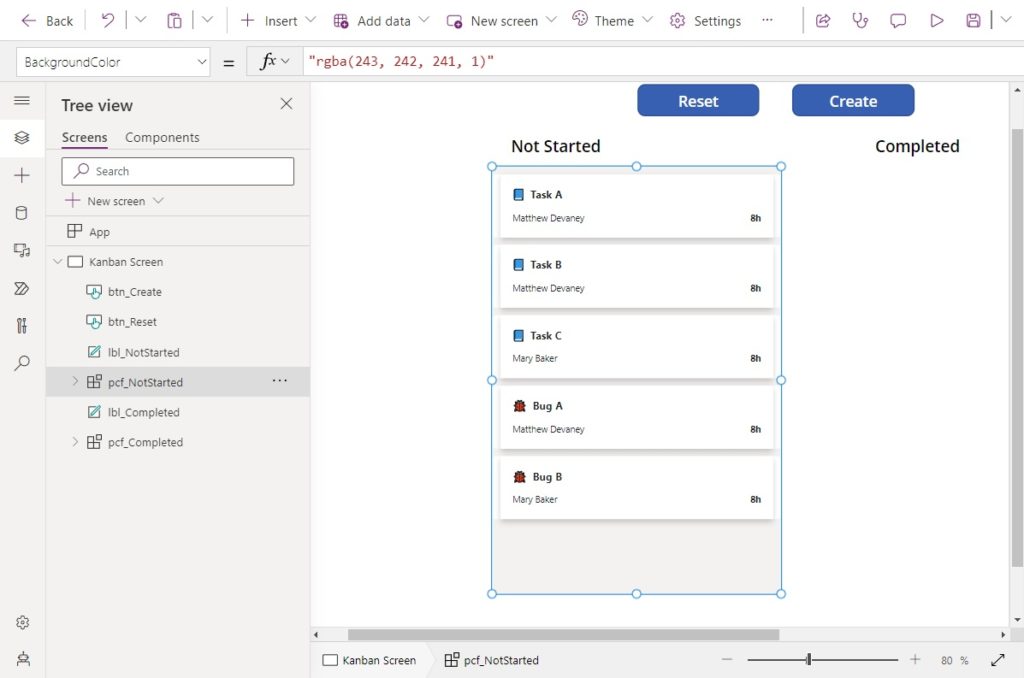
Update the BackgroundColor property of the pcf_NotStarted control to make it appear light gray.
"rgba(243, 242, 241, 1)"
Do the same for the ItemBackgroundColor property.
"rgba(243, 242, 241, 1)"
Then highlight the pcf_Completed control.
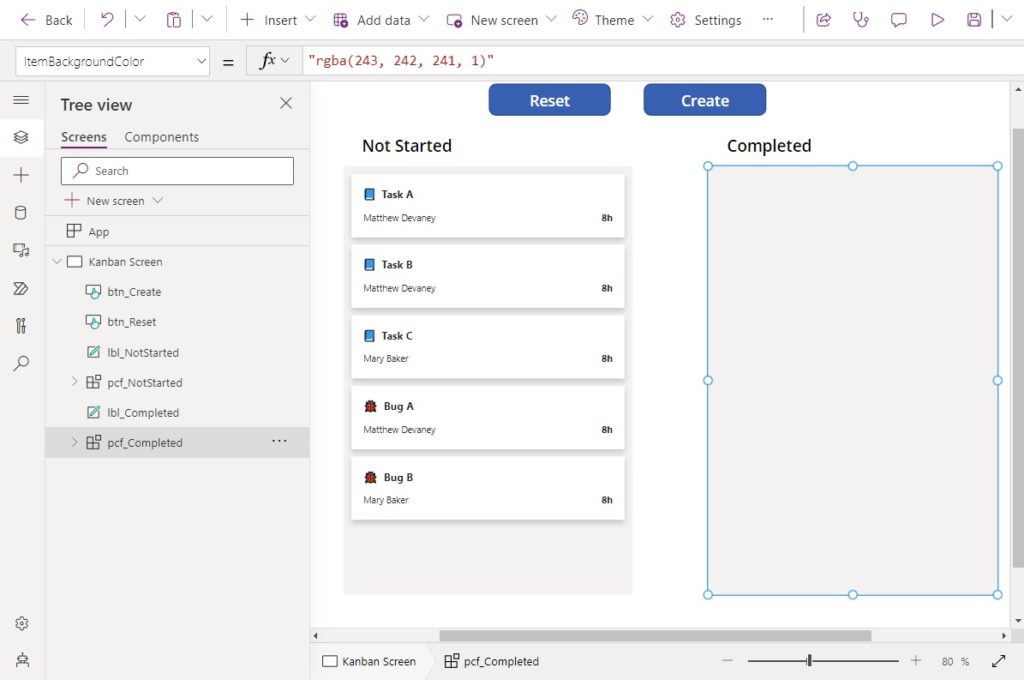
And write the same code for the BackgroundColor and ItemBackgroundColor properties.
"rgba(243, 242, 241, 1)""rgba(243, 242, 241, 1)"
Then make the screen a dark gray to contrast with the light gray of the drag and drop component.
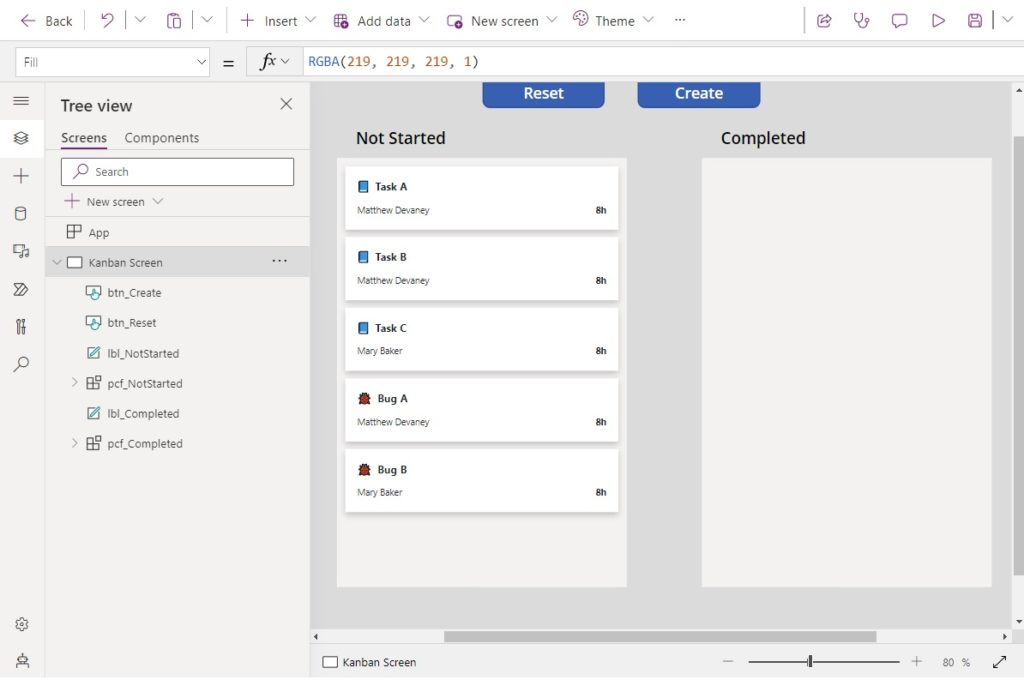
Use this code in the fill property of the screen.
RBGA(219, 219, 219, 1)
Make An “In Progress” Kanban
The app should actually have 3 kanbans: Not Started, In Progress and Completed. So let’s go ahead and setup the missing In Progress kanban. Copy the Completed drag and drop component and paste it between Not Started and Completed.
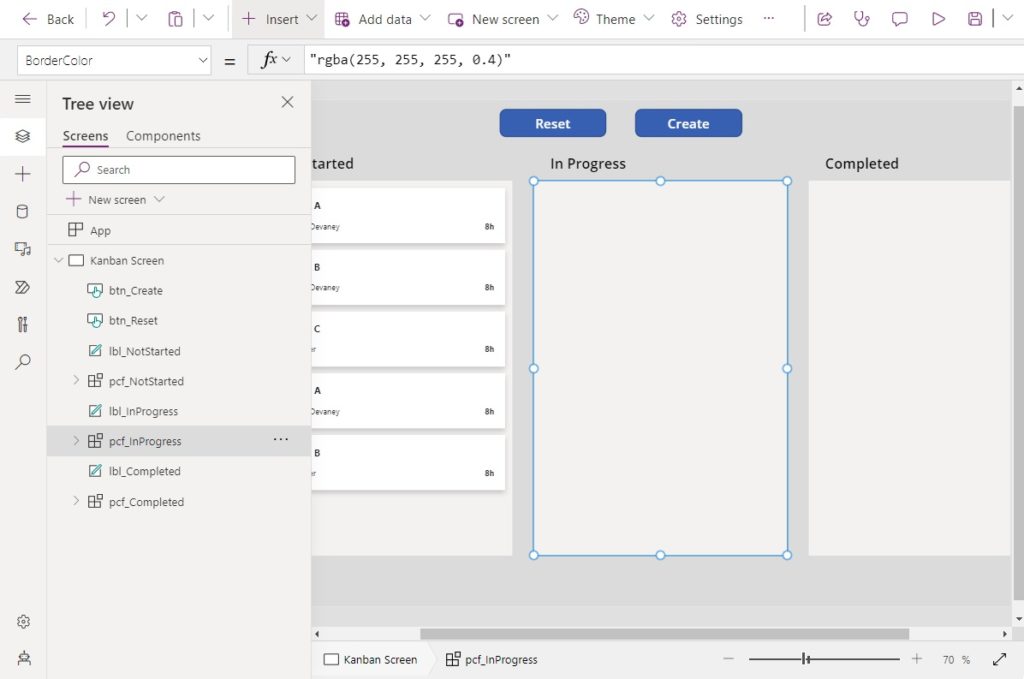
Set the drop zone id to In Progress and the other drop zone ids to Not Started,Completed.
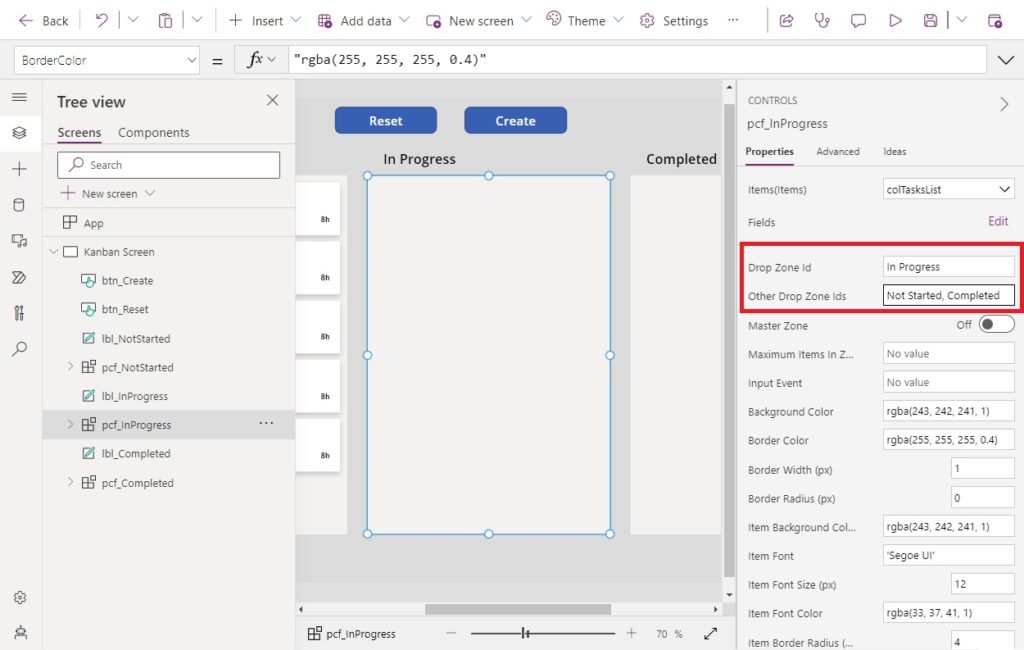
Change the other drop zone ids property to In Progress,Completed for pcf_NotStarted.
And update the other drop zone ids property for pcf_Completed to NotStarted, In Progress.
Test The “Not Started”, “In Progress” And “Completed” Kanbans
That’s all folks. We’re done. Play the app in preview mode and give the drag and drop functionality a try for all 3 kanbans.


