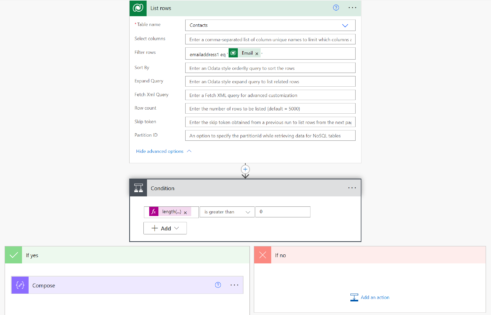
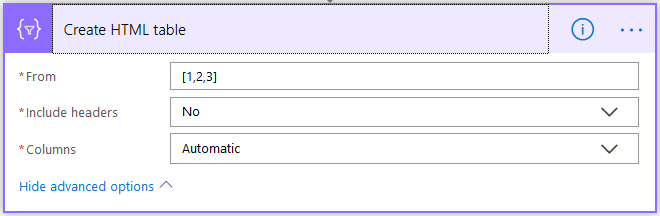
I built an HTML table in Flow and now I want to change its style. I want to add CSS style to the table rows. If we look at the Data Operations – Create HTML table action, adding CSS is not supported:
My method is a bit complicated, I would think, because it involves more than a few actions to do something that's supposed to be easy and straightforward. I can't insert a CSS <style>…</style> element because I don't have access to the email's <head>…</head> element so I will use inline CSS. I want to discuss this method because I believe it will also give you an idea about how powerful Flow can be, especially when it comes to manipulating data.
So below is my data. I want to get an email with all the contracts due to expire in 30 days from now and I want the high-value contracts highlighted in orange and the low-value contracts in yellow. Weird choice of colors, I know 🙂 This is demo data, of course:

To do this I start my flow with a Schedule – Recurrence trigger. I've set the interval to 1 day because I want to get this report daily:

I then continue with an Initialize variable action. I use this to initialize a JSON object where I will store my CSS style. My JSON object looks like this (note that I used \" to escape the "):
{
   "tableStyle": "style=\"border-collapse: collapse;\"",
   "headerStyle": "style=\"font-family: Helvetica; padding: 5px; border: 1px solid black;\"",
   "cellStyle": "style=\"font-family: Calibri; padding: 5px; border: 1px solid black;\"",
   "rowStyleHighValues": "style=\"font-size:110%;background-color:#ff9c33\"",
   "rowStyleLowValues": "style=\"background-color:#fcff33;\""
 }
If you look at the structure, you will notice that I created 5 separate styles:
- tableStyle for the table <table> element
- headerStyle for header <th> element
- cellStyle for the cell <td> element
- rowStyleHighValues for the row <tr> element containing high values
- rowStyleLowValuesfor the row <tr> element containing low values
So the style for the HTML table will be: style="border-collapse: collapse;".

Next I'm initializing a string variable to store the table header. An HTML table starts with the <table> tag, so I've added that on the first line and will close the table when I'm done, just before sending the email, with a closing </table> tag. For now I have to keep the HTML table element open because I have to add the rows. You'll see below.
Then I've added a row <tr>…</tr> that will contain the header elements </th>…</th>.
To get the table style, I'm drilling in the varStyle JSON object and getting the tableStyle value: variables('varStyle').tableStyle and to get the header style I'm getting the headerStyle value from the same JSON object: variables('varStyle').headerStyle
<table @{variables('varStyle').tableStyle}>
   <tr>
     <th @{variables('varStyle').headerStyle}>ID</th>
     <th @{variables('varStyle').headerStyle}>File Name</th>
     <th @{variables('varStyle').headerStyle}>Contract Name</th>
     <th @{variables('varStyle').headerStyle}>Contract Value</th>
     <th @{variables('varStyle').headerStyle}>Valid From</th>
     <th @{variables('varStyle').headerStyle}>Valid To</th>
   </tr>
Next I've added a Get future time action to get the calculated time 30 days from today. Note that Get future time returns time in UTC.

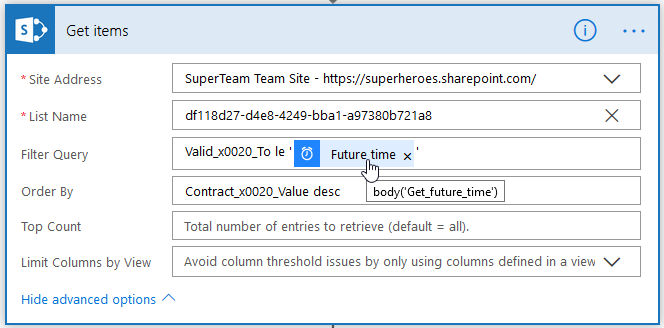
Now that I have added the calculated time in the future, I can use it to get all the items in the contracts folder that match the following Filter Query criteria: Valid_x0020_To le '@{body('Get_future_time')}'. I've also added a descending sort by Contract Value so I can get the most valuable contracts on top: Contract_x0020_Value desc
Note that, for no particular reason, I used Get Items instead of Get Files. Everything in SharePoint in a list, so we can safely use Get Items to get the items in the folder.
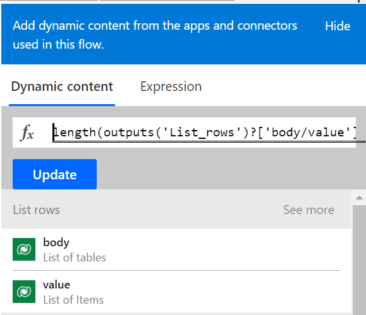
Next I'm a adding a condition to check if the array returned by Get items action is empty or not. So my condition looks like this: empty(body('Get_items')?['value']) is equal to false
If the array is empty, the No condition will be met and the flow will stop because I haven't put anything in the No container.
If the array contains items, I continue with an Apply to each control in the Yes container. The Apply to each will loop through the list of items coming from the Get Items action. This is where the flow does the heavy lifting – it appends each item in the list to the table, row by row.
<tr @{if(greaterOrEquals(items('Apply_to_each_item_in_the_array')?['Contract_x0020_Value'], 150000), variables('varStyle').rowStyleHighValues, variables('varStyle').rowStyleLowValues)}>
     <td @{variables('varStyle').cellStyle}>@{items('Apply_to_each_item_in_the_array')['ID']}</td>
     <td @{variables('varStyle').cellStyle}><a href="@{items('Apply_to_each_item_in_the_array')['{Link}']}">@{items('Apply_to_each_item_in_the_array')['{FilenameWithExtension}']}</a></td>
     <td @{variables('varStyle').cellStyle}>@{items('Apply_to_each_item_in_the_array')['Contract_x0020_Name']}</td>
     <td @{variables('varStyle').cellStyle}>@{items('Apply_to_each_item_in_the_array')['Contract_x0020_Value']}</td>
     <td @{variables('varStyle').cellStyle}>@{items('Apply_to_each_item_in_the_array')['Valid_x0020_From']}</td>
     <td @{variables('varStyle').cellStyle}>@{items('Apply_to_each_item_in_the_array')['Valid_x0020_To']}</td>
</tr>
To get the row <tr> style, I'm drilling in the varStyle JSON object and, depending on the contract value, I'm getting the rowStyleHighValues or the rowStyleLowValues. This is done through this expression: if(greaterOrEquals(items('Apply_to_each_item_in_the_array')?['Contract_x0020_Value'], 150000), variables('varStyle').rowStyleHighValues, variables('varStyle').rowStyleLowValues)
To get the cell <td> style, I'm drilling in the same varStyle JSON object and I'm getting the cellStyle value: variables('varStyle').cellStyle

I'm then stepping outside the Apply to each control and continuing with an action to append the closing </table>

Last step is to send the email. For the subject line I concatenated the text "Contracts due to expire in the next " with an expression that will return the interval and the unit of time: concat(actions('Get_future_time').inputs.interval, ' ', tolower(actions('Get_future_time').inputs.timeunit), 's'). Note that the interval and the unit of time are not available as Dynamic Content items, so I drilled into actions('Get_future_time').inputs object to get the interval and timeunit values

And here is the email with the list containing the 3 contracts due to expire in the next 30 days: