Tuesday, 28 May 2024

Set Dataverse Choices/Option set in Power Automate dynamically - without a switch statement


Set Dataverse Choices in Power Automate dynamically - without a switch statement

Choices are hard, especially when it comes to setting the value of a Dataverse choice option set or choices multi-select option set column field in Power Automate.

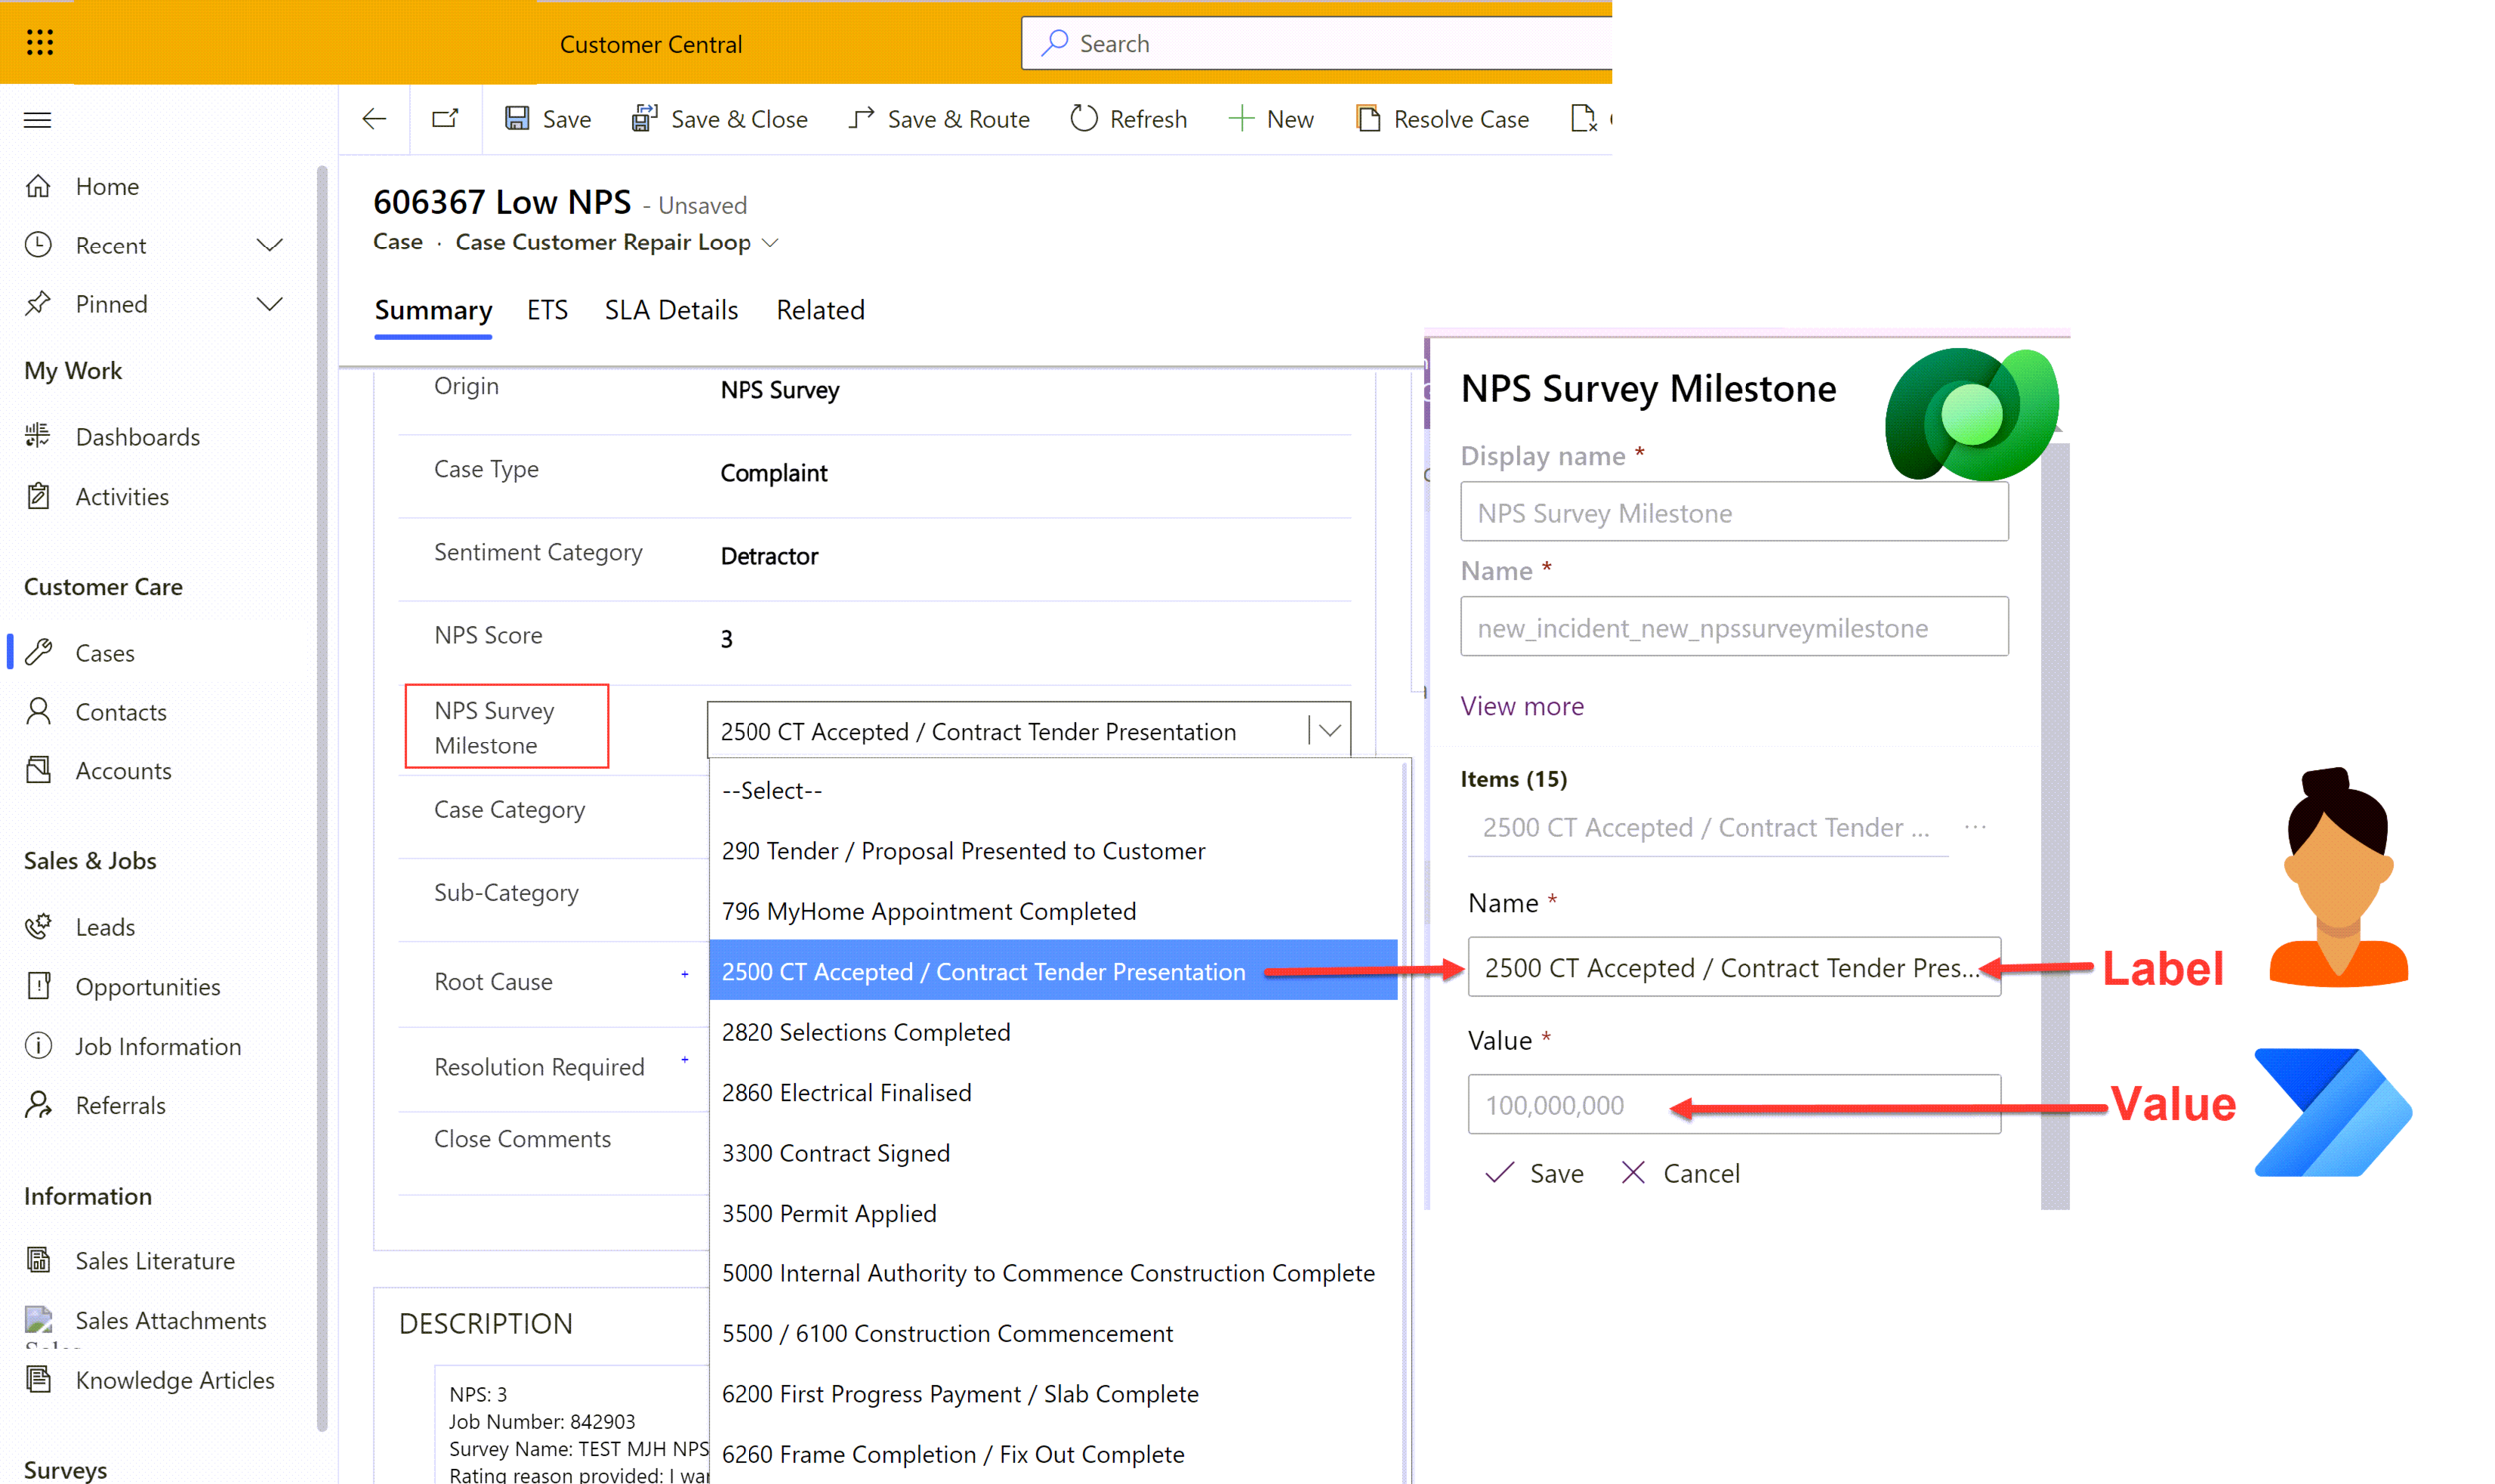
In your Dynamics 365 or Model-driven app you see a list of labels, but behind the scenes each label has an integer ‘Value’ assigned. If you are using power automate to set a choice/choices value in a create or update row action you have the option to choose a static value from the human readable list or if the value is dynamic, maybe based on inputs from a previous action or trigger then you can enter a ‘custom value’. In this case the flow expects the choice ‘Value’ rather than the ‘Label’.

Disclaimer: I am not responsible for creating the column with the prefix new_. I die inside a little bit every time I see it, I hope it doesn’t cause you too much distress. My advice is that every time you see new_ read it as ROOKIE-ERROR_.
Option 1: Switch Statement

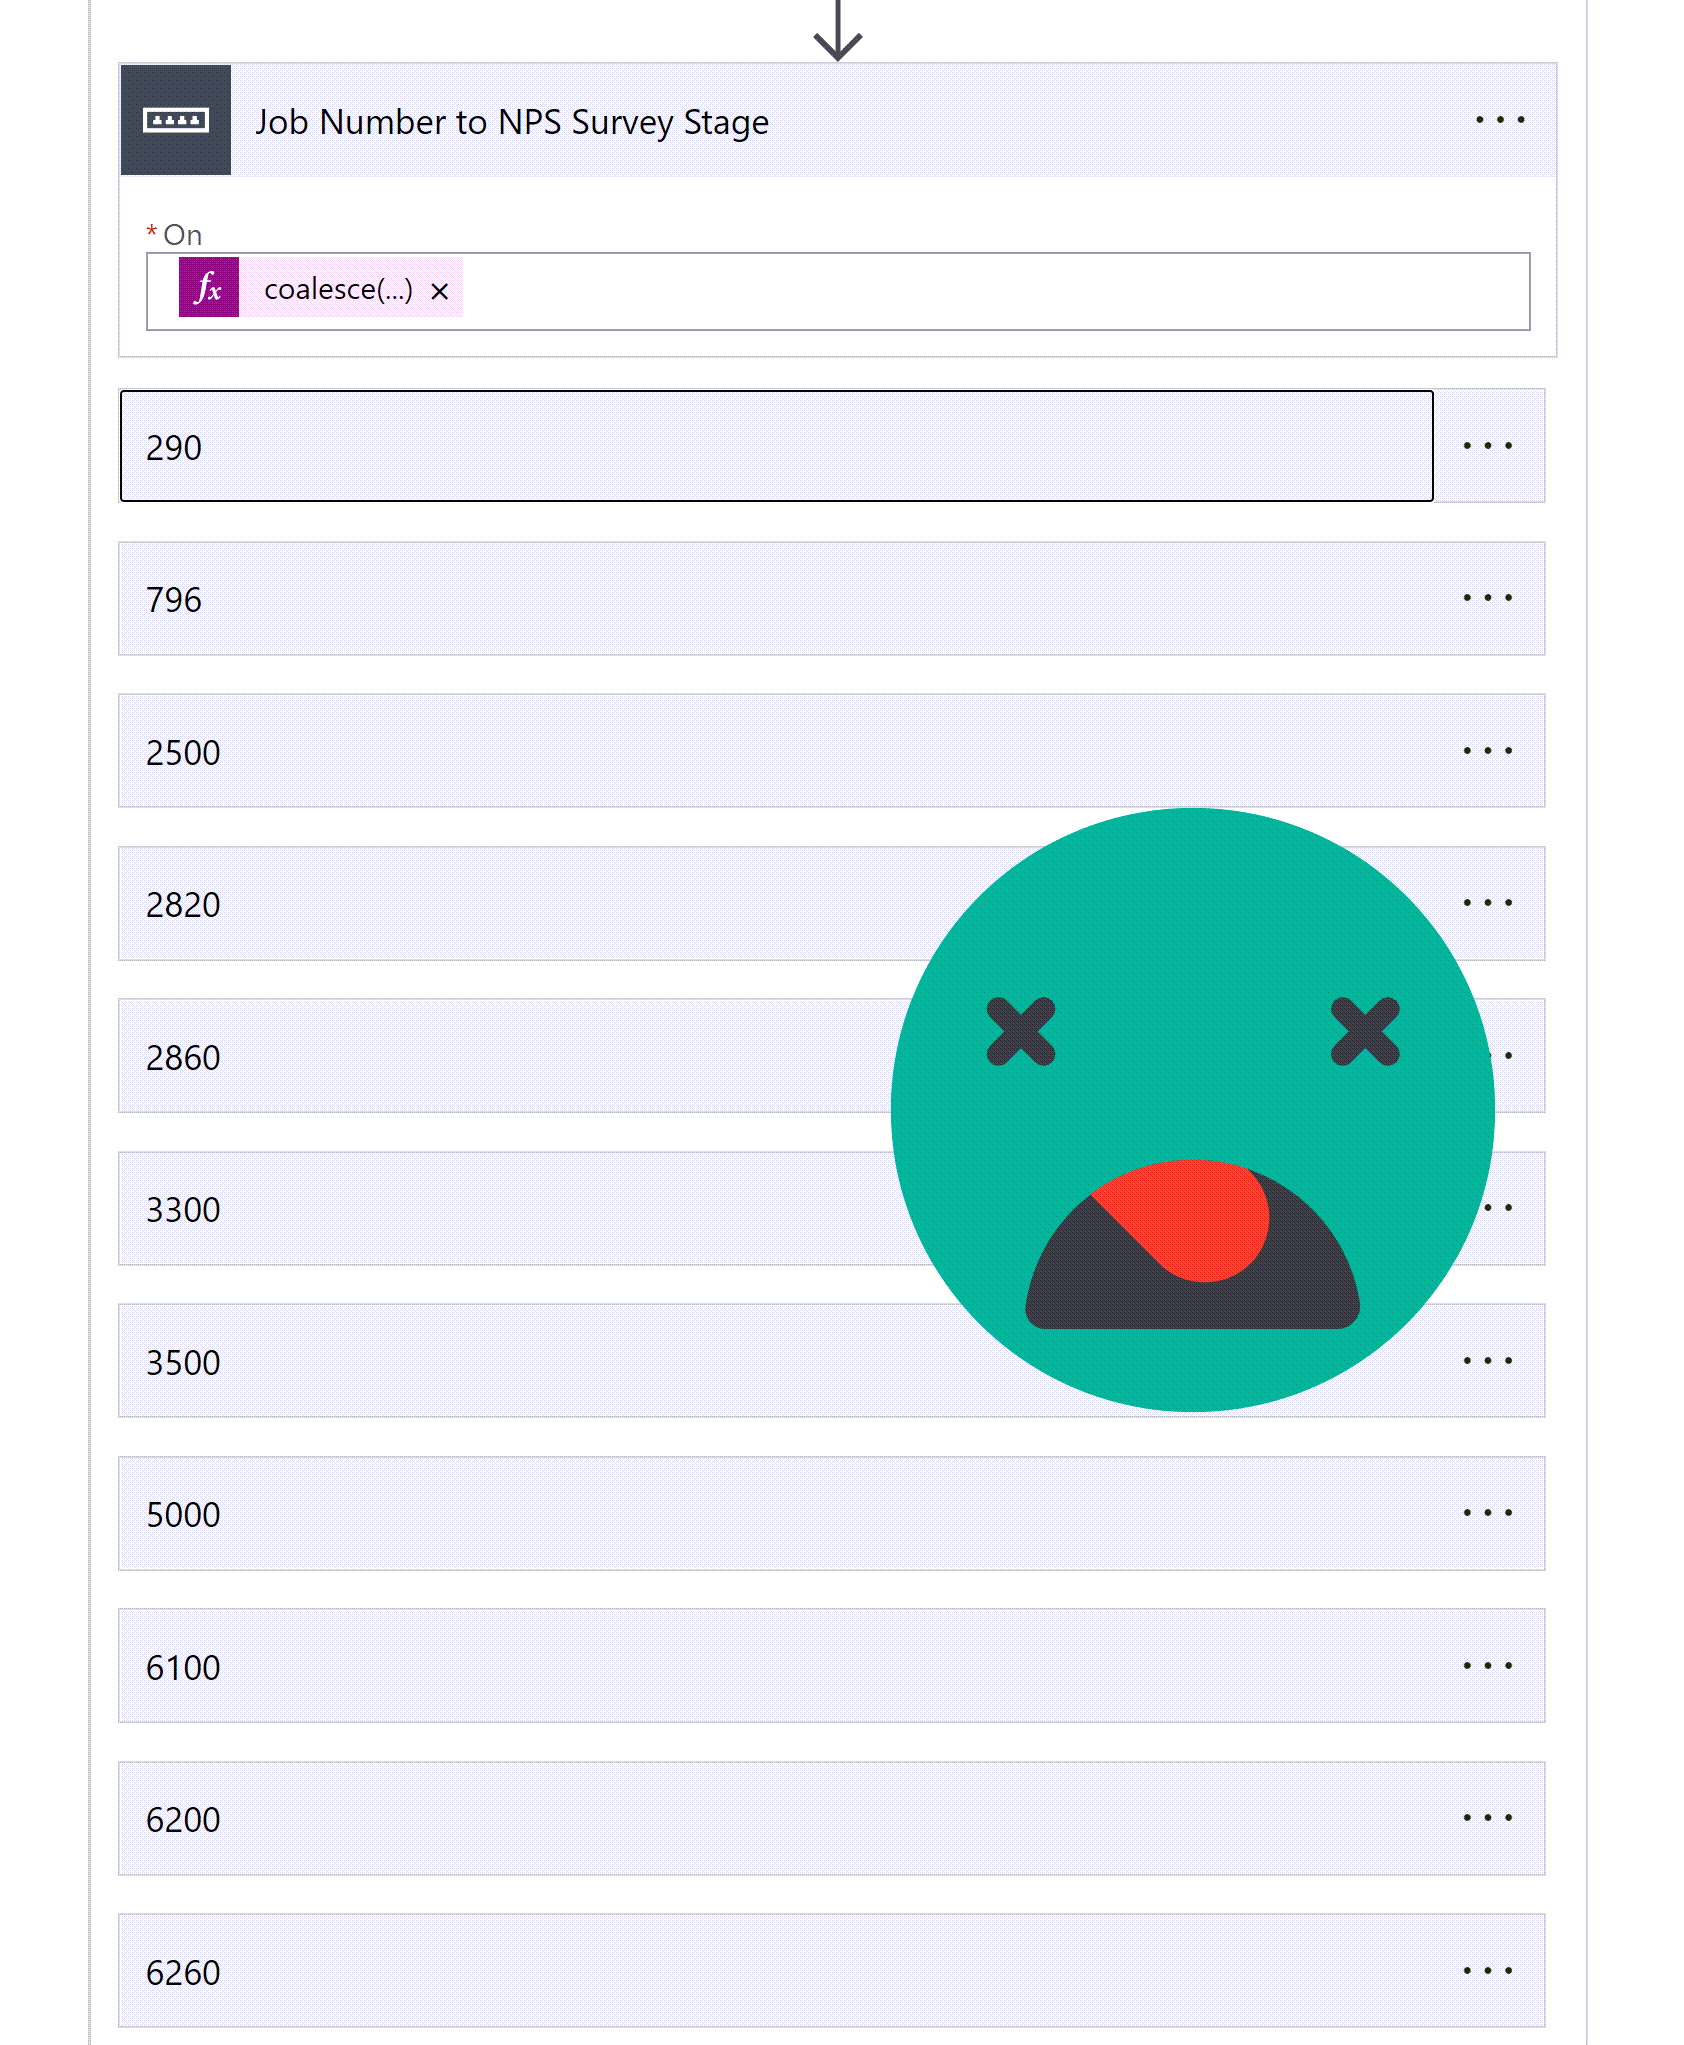
Nothing new or novel here and a method I have used often in the past. Example here -> https://d365demystified.com/2020/04/29/switch-case-in-a-flow-power-automate/ plus also make sure you implement coalesce() as seen here -> https://sharepains.com/2018/05/29/switches-coalesce-power-automate/ to handle null values more gracefully.

It works nicely for smaller choice sets but it’s the kind of ‘hard-coding’ that makes me feel a little bit dirty every time I do it. I don’t really like switch statements they are hard to work with and such flaky little creatures. When I came across a choice scenario with 10+ options, I decided there MUST be an easier way to do this!?
Option 2: GET the choice values

Enter ‘The Enabler’ George Doubinski - he’s not scared of a HTTP Request and big, long, complicated URLs. I take no credit for this solution, I am simply the inspiration, awkward question asker and pretty picture drawer. We are going to create the following flow, scroll on down for step by step instructions.
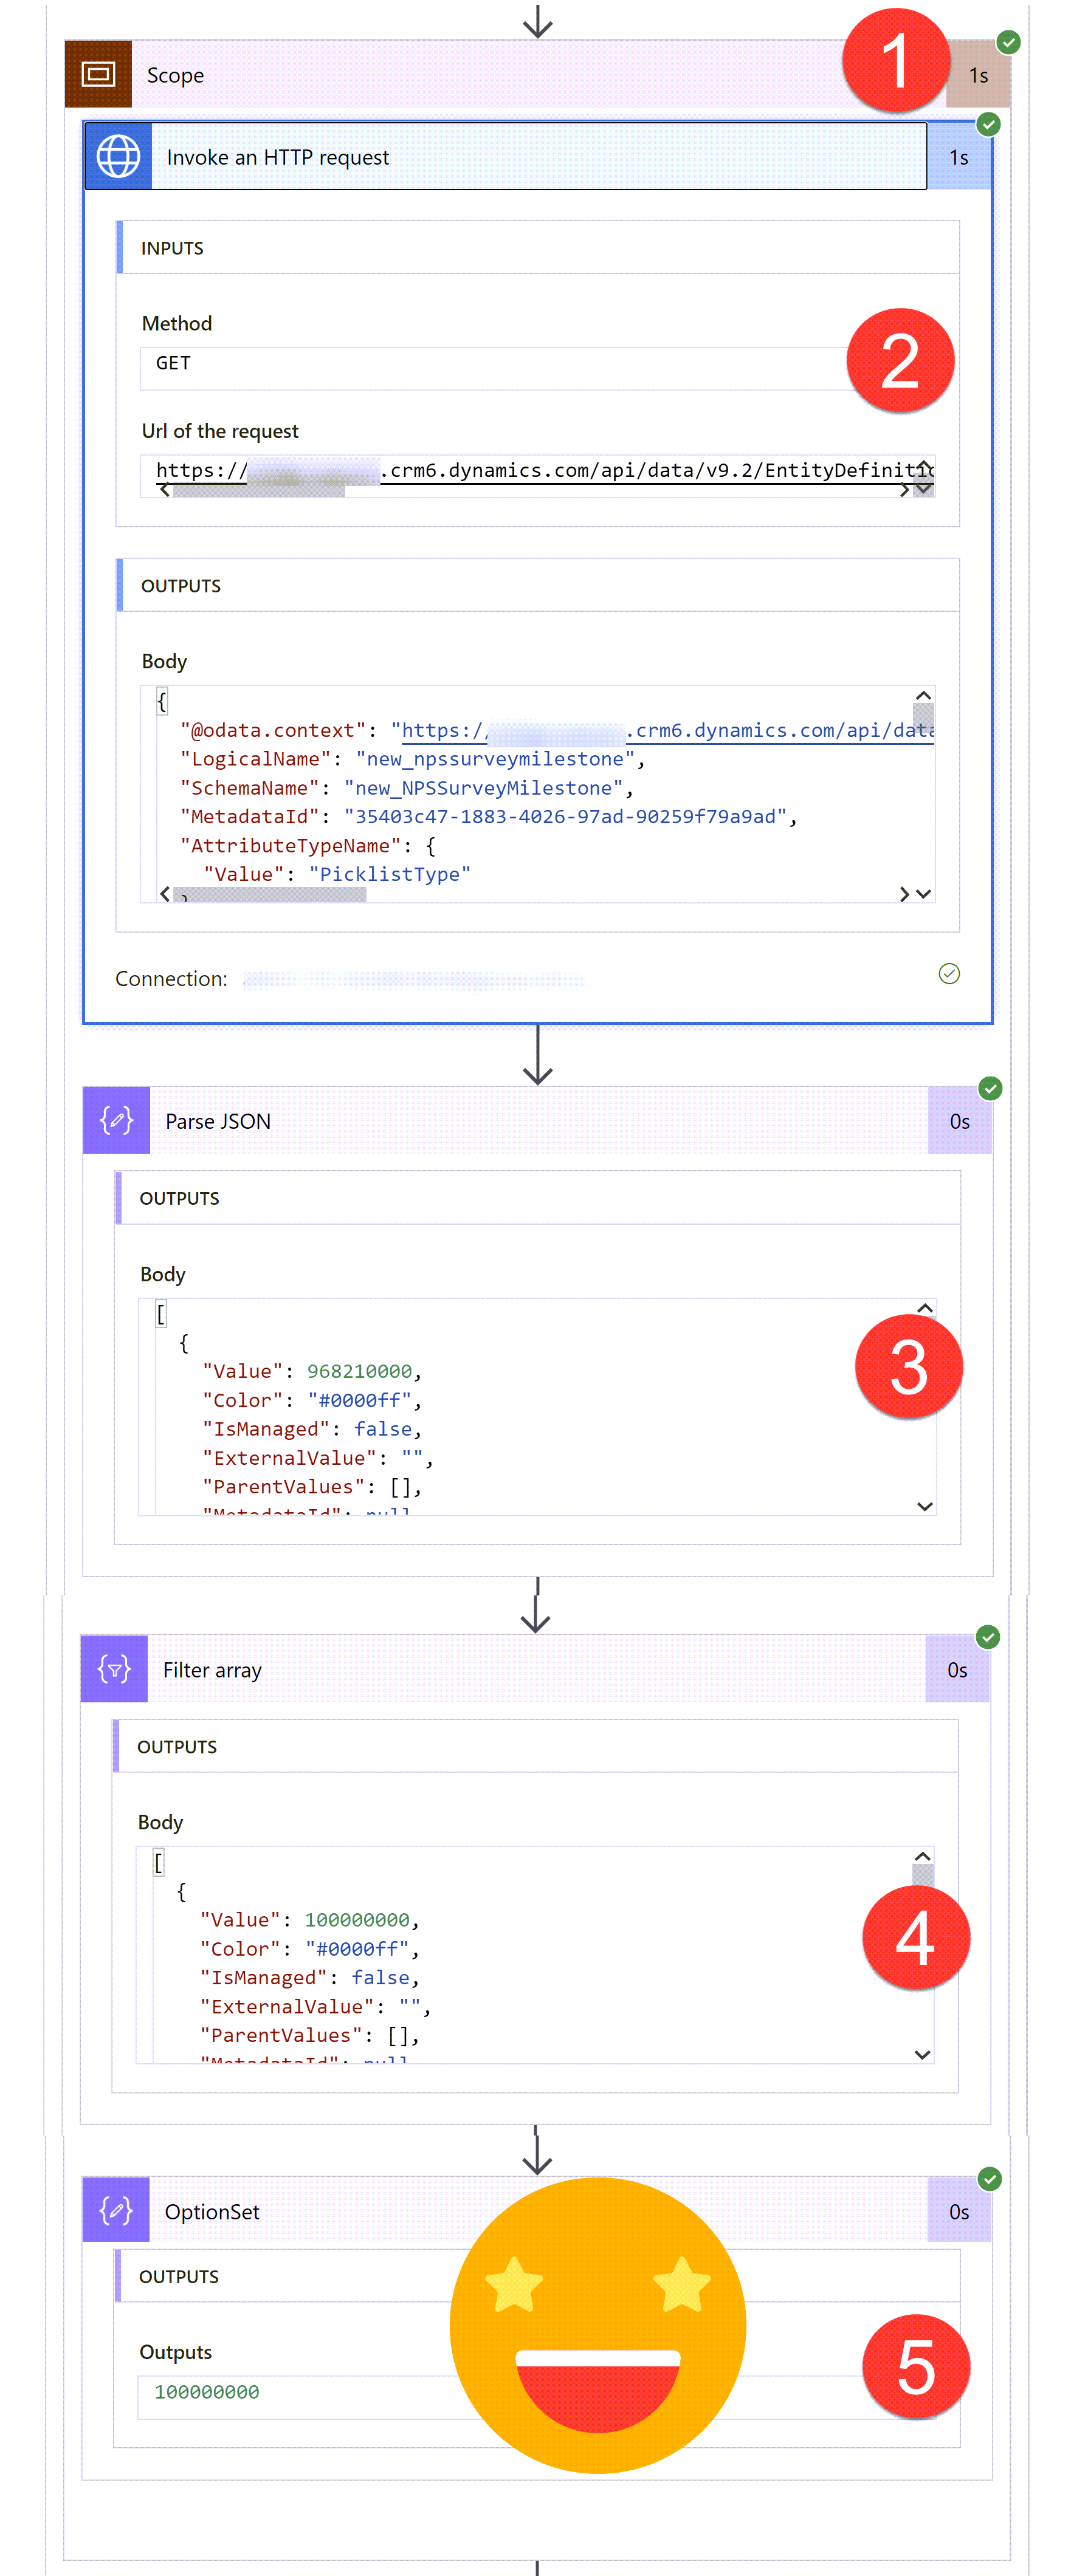
1) Scope It

All the following steps will live in a ‘Scope’ as they are a set of steps that relate to getting the choice value. Completely optional but apparently it makes things look a bit tidier and seems like good practice https://www.blueshiftco.com/blog/keep-your-flows-organized-using-scopes-in-power-automate
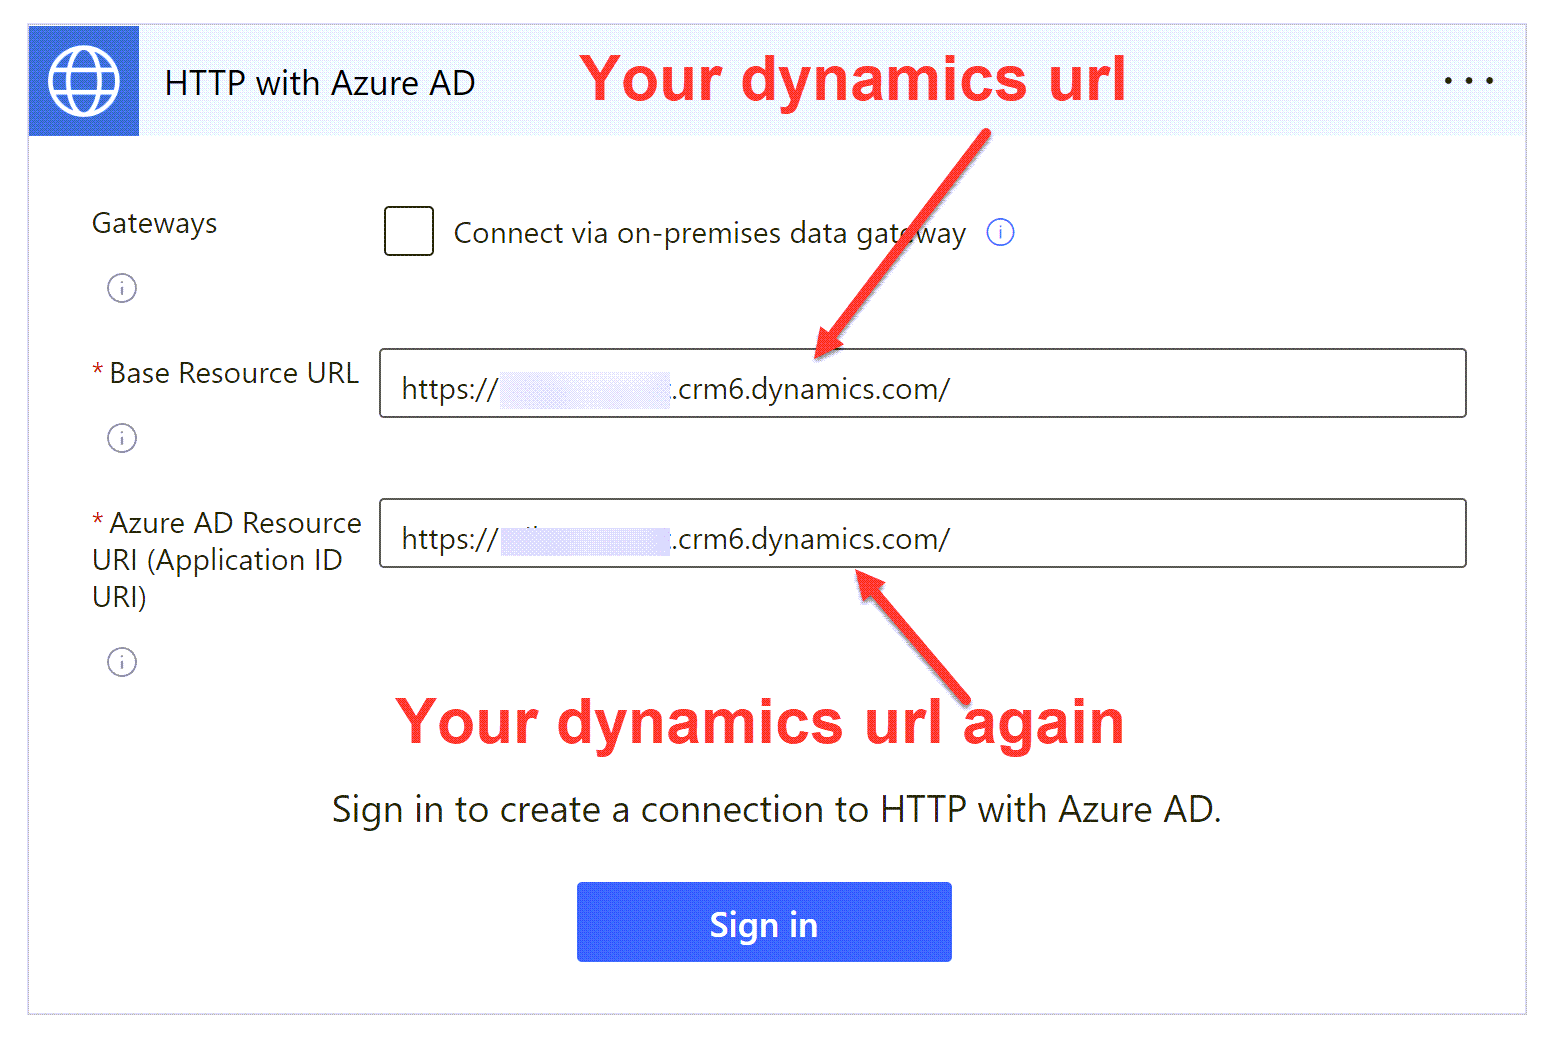
2a) Connect to HTTP with Azure AD

Don’t panic - you do not need to create an Azure App or anything else - just use your Dynamics/Power Apps URL for both the ‘Base Resource URL’ and the “Azure AD Resource URI’
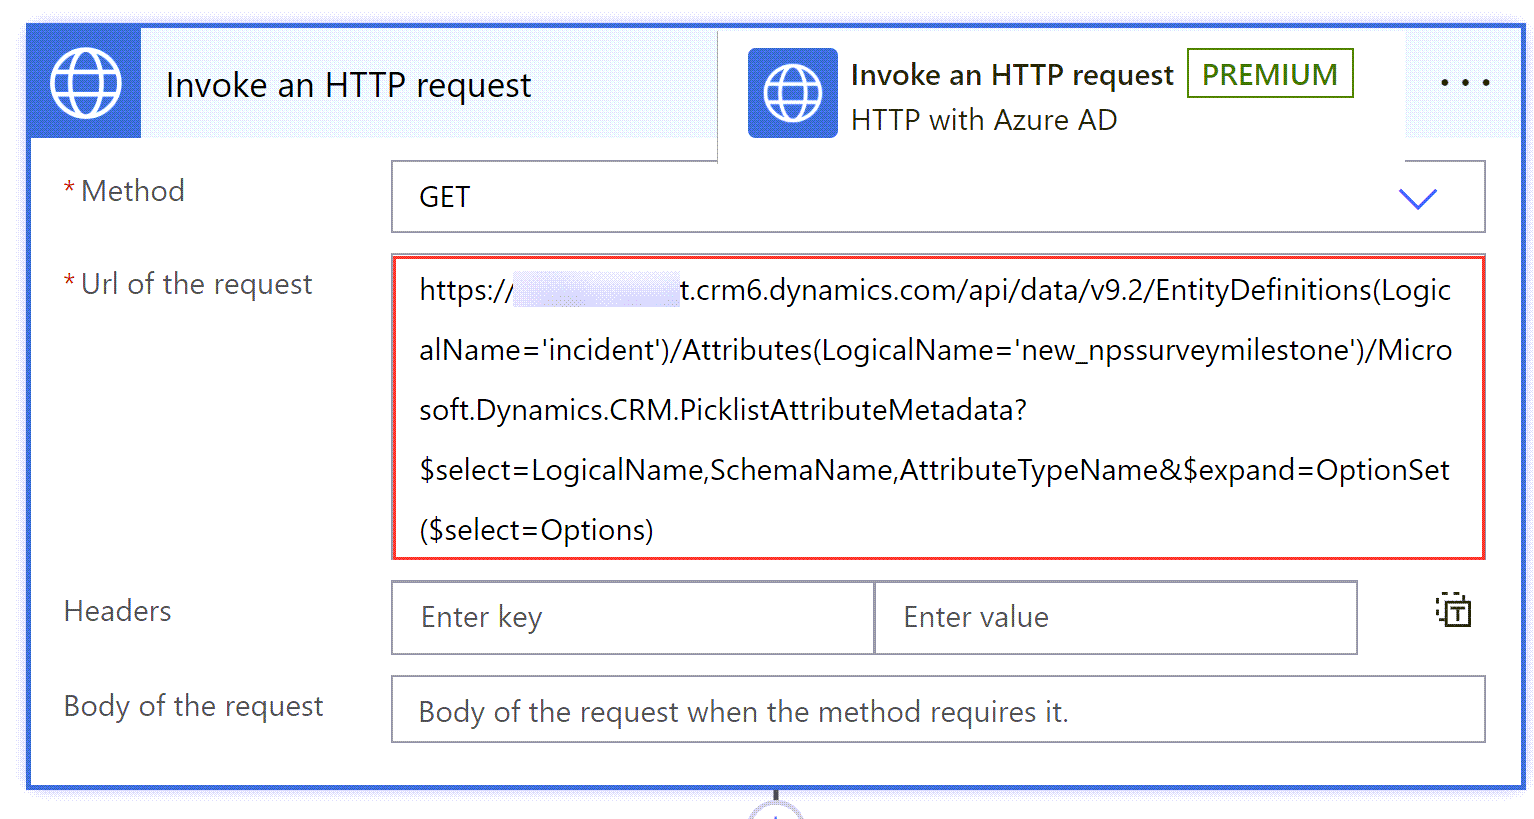
2b) HTTP GET Request

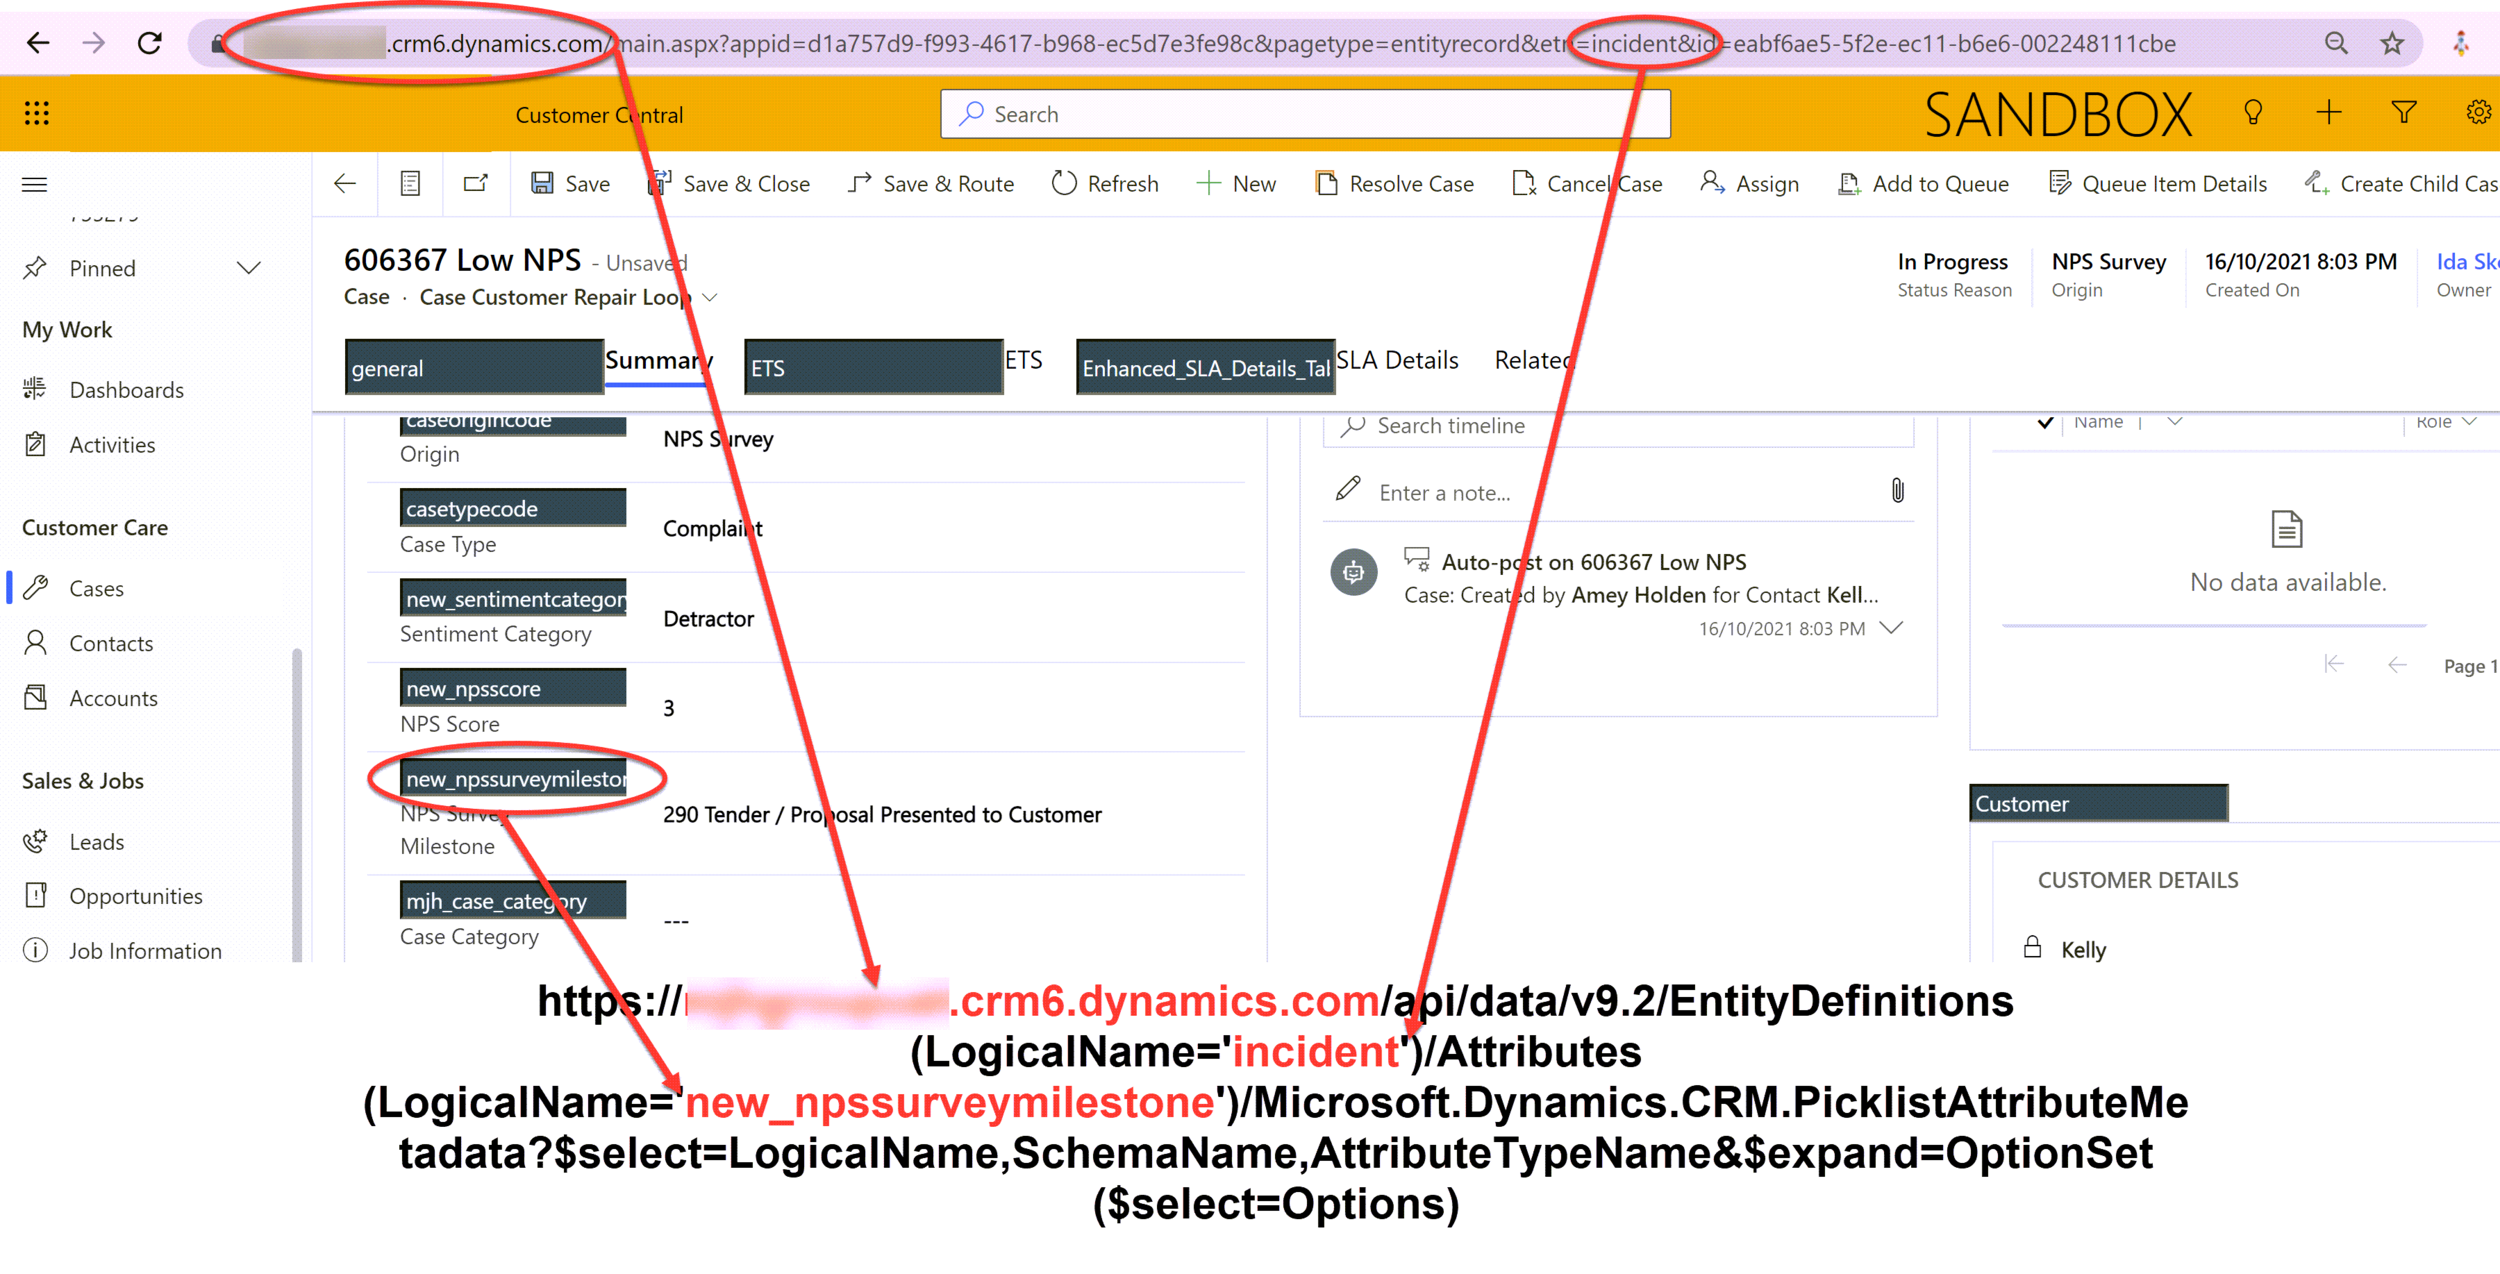
The Method is GET then you need to use this lovely big long scary URL. Most of it you can leave ‘as is’, but you do need to update it in three places to add your Dynamics/Power Apps URL, the table name and the column name of the choice column you want to get values from.

https://YOUR-DYNAMICS-URL.crmX.dynamics.com/api/data/v9.2/EntityDefinitions(LogicalName='TABLE-NAME')/Attributes(LogicalName='COLUMN-NAME')/Microsoft.Dynamics.CRM.PicklistAttributeMetadata?$select=LogicalName,SchemaName,AttributeTypeName&$expand=OptionSet($select=Options)

Copy the above snippet and update the section in red below + guidance on how to easily find them. You can check it’s right by running the flow, if the action is unsuccessful - it will let you know why.
3) Parse JSON

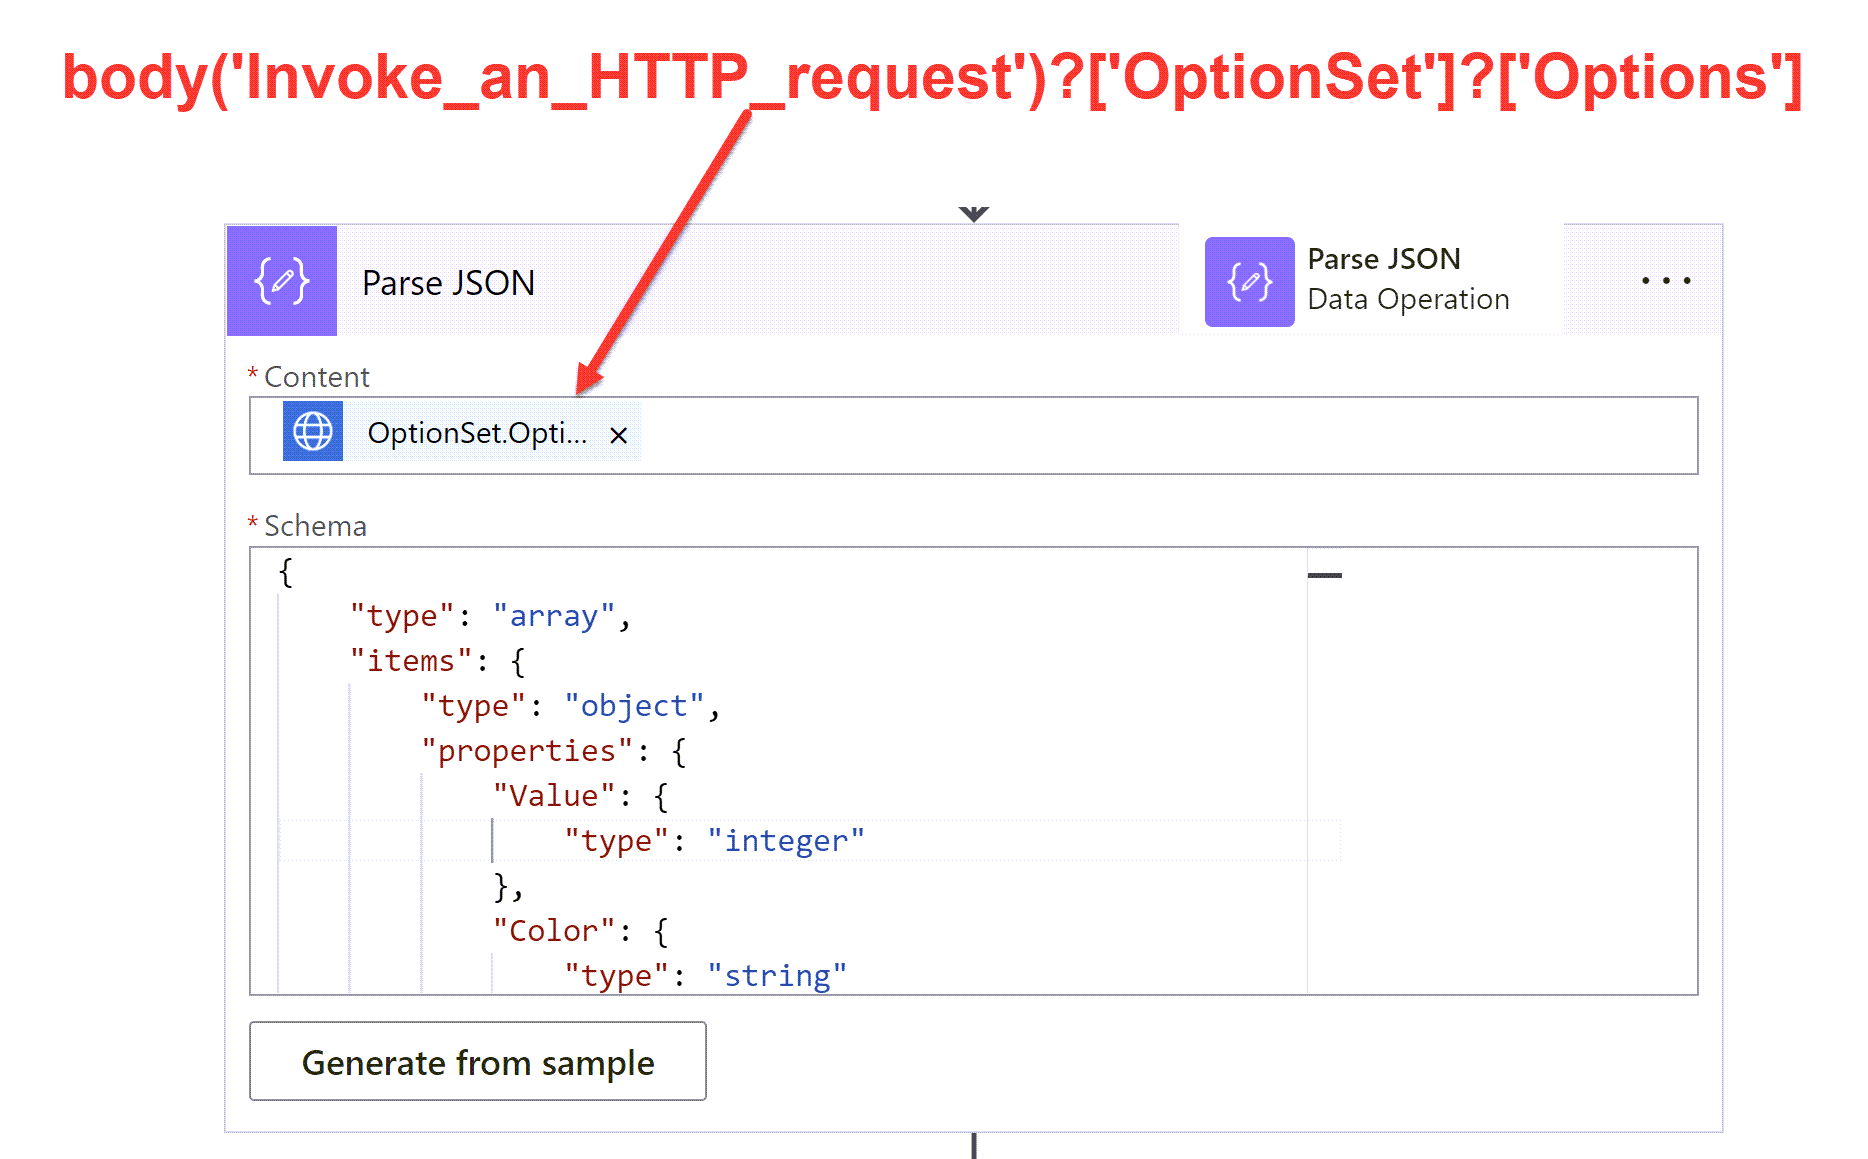
We are going to use a ‘Parse JSON’ action to make some sense of our HTTP GET request. The content selects just the ‘Options’ from what was returned, we don’t need the rest. Scroll down to the bottom of this post for the Schema snippet.

body('Invoke_an_HTTP_request')?['OptionSet']?['Options']

Filter the array & get the choice value

4) Filter Array

The outputs from the Parse JSON contains all of the choice labels and values + lots of other stuff, so now we need to filter it down to get the value we want. This is where you will use a value from a previous action/trigger in your flow. Using any of the standard condition statements such as ‘equals’ or ‘starts with’. In this case I have the start of the label to match.

item()?['Label']?['UserLocalizedLabel']?['Label']
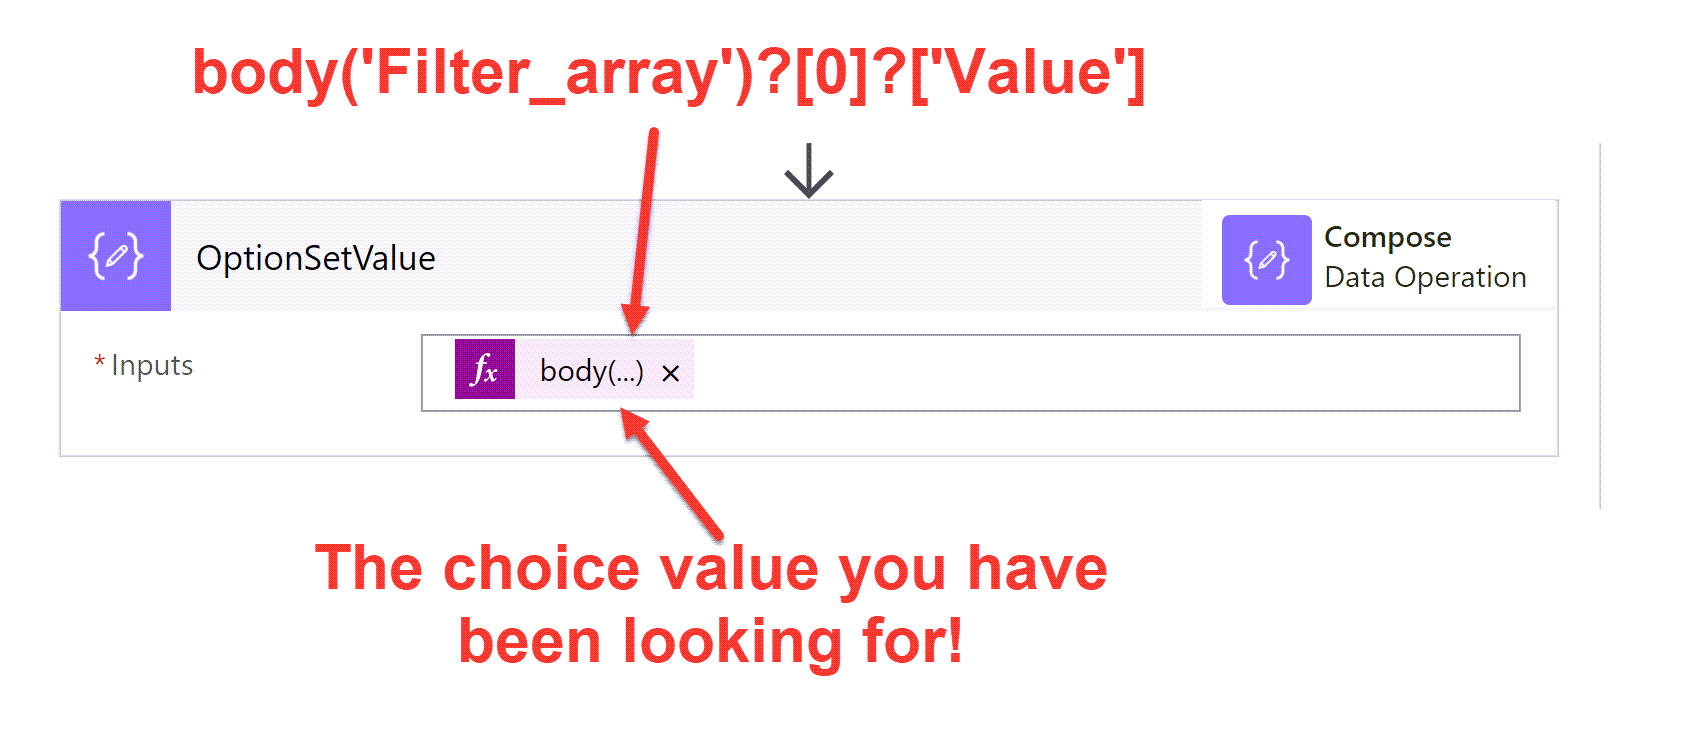
body('Filter_array')?[0]?['Value']
5) Get Choice Value

Even though we have filtered the array to only one value, it is still an array so if you just take the ‘Value’ as a variable you will get sucked into another unwanted loop. instead we can use the [0] action to get the first item in the array then ask for the specific part of the array item - the ‘Value’.

NOTE: I am making the assumption that I will only get one match because the filter I passed will always match to a single choice, if this is not the case - create some better filter conditions 😉

I never thought I would be so happy to see a number rather than words but my flow is happy and I’m free from the rusty chains of a Switch statement. Happy choice making!

If you would rather watch a video and listen to the angelic voice of George Doubinski with occasional interruptions from me, feast your eyes on this episode of Citizen Can -> https://youtu.be/AHB03NV73aE

{
    "type": "array",
    "items": {
        "type": "object",
        "properties": {
            "Value": {
                "type": "integer"
            },
            "Label": {
                "type": "object",
                "properties": {
                    "LocalizedLabels": {
                        "type": "array",
                        "items": {
                            "type": "object",
                            "properties": {
                                "Label": {
                                    "type": "string"
                                }
                            }
                        }
                    },
                    "UserLocalizedLabel": {
                        "type": "object",
                        "properties": {
                            "Label": {
                                "type": "string"
                            }
                        }
                    }
                }
            },
            "Description": {
                "type": "object",
                "properties": {
                    "LocalizedLabels": {
                        "type": "array"
                    },
                    "UserLocalizedLabel": {}
                }
            }
        }
    }
}


******************************************************************

One approach could be to embed an array with the labels and ids in your flow. You can use a filter array to get the correct id and use an expression in the add row action.


Below is an example of that approach. 

Drawback of this approach is that you need to maintain the optionset values in your flow. Alternatively, you could dynamically retrieve the optionset values via an HTTP action instead of the initialize variable action.


1. Add an Initialize variable of type array. 


2. Add a Filter Array. Filter the array on the label field value.

addresstype_array.png

3. Use an expression to retrieve the correct id of the corresponding label:


body('Filter_array')[0]['Value']


addresstype_array02.png


Hope this helps a bit? 


Friday, 10 May 2024

SSDT for Visual Studio (VS) 2015

In this course, we will learn to implement and build a SSRS Report in Dynamics CRM. The Microsoft’s Dynamics 365 CRM and Model Driven PowerApps offers various number of advanced reporting tools. These advanced reports are often necessary when client requirements demand complex calculations, retrieving data from different data sources, grouping large sets of data based on rules, and returning multiple data sets.  The Dynamics CRM out-the-box reporting system is not fully capable of driving such complex logics, hence we use SSRS Reports to suffice the above requirements. Lets start with building your own SSRS Report from scratch.

SSDT for Visual Studio (VS) 2015

Click here to download SSDT for Visual Studio (VS) 2015. 


When the download is complete, run the SSDTSetup.exe (as administrator) program to install the tool.  When prompted, choose to install SQL Server Reporting Services and click on next as shown below.


Dynamics 365 Report Authoring Extension

The Dynamics 365 Report Authoring Extension is an addon for SQL Server Data Tools that will allow you to write reports using the FetchXML .  Currently, this is the only way to write SSRS reports that can access Dynamics 365 Online data directly.

Click here to download the Dynamics 365 Report Authoring Extension. Extract the package and install it in your system.


Create a new SSRS Report

We will create a new SSRS report from scratch using the above downloaded tools.

Create a Reporting project.

Launch the SQL Server Data Tool (SSDT) 2015 as shown below.


Click on Files >> New >> Project and create a new Project with the Projecting Services as “Report Server Project”, framework as “.Net Framework 4.5.2” or above as shown below.


Add a report in the project file.

In the project, right click on the folder called “Reports” >> Add >> New. Select the Report Project type as “Report” and click on Add.


Now we have added a new blank report to our reporting project file. Here you will observe the reporting components such as Data Sources and Data Sets are populated in the Report Data section as shown below.


Add Data Source to your report.

We have to give a data source to your SSRS report. In our case, the Dynamics 365 environment will act as a data source. Right click on the Data Sources >> Add Data Source. In data source, select the Embedded Connection type as Microsoft Dynamics 365 Fetch and enter the CRM Dynamics URL in connection string. (Note : – This is the above downloaded Add-On). Click on Ok.


Add a Data Set to your report.

Once the data source is added, now its the time to add the data set. The data sets are the tables which are used to store the data from the data source. As our data source in Dynamics CRM, you will use the fetch XMl as your data set.

Consider the scenario where you have to create a SSRS Report to display data of Account entity. To do so, navigate to CRM >> Advance Find >> Query the Account entity (Add the columns as per your need) and click on Download Fetch XML as shown below.

Copy the downloaded Fetch XML, navigate back to report project, right click on the Datasets >> Add Dataset. Select the above created Data Source, set Query Type as Text and paste the above downloaded Fetch XML query in the Query text area as shown below. Click on Ok.


Once you click on Ok, the SSDT data set will get connected with your Dynamics CRM. Enter the credentials and help SSDT will establishing the connection.


Now, you can see the data set is successfully created in form of tables as shown below.


Create a table and insert data.

In the same project, open the tool box, select component “Table” and drag it in the designer panel as shown below.

You can add multiple rows and columns by right clicking on table >> Add new Row / Column. Below is the table created for demo purpose
Right click on the Table/ Tablix >> Tablix Properties and select the data set which was created above


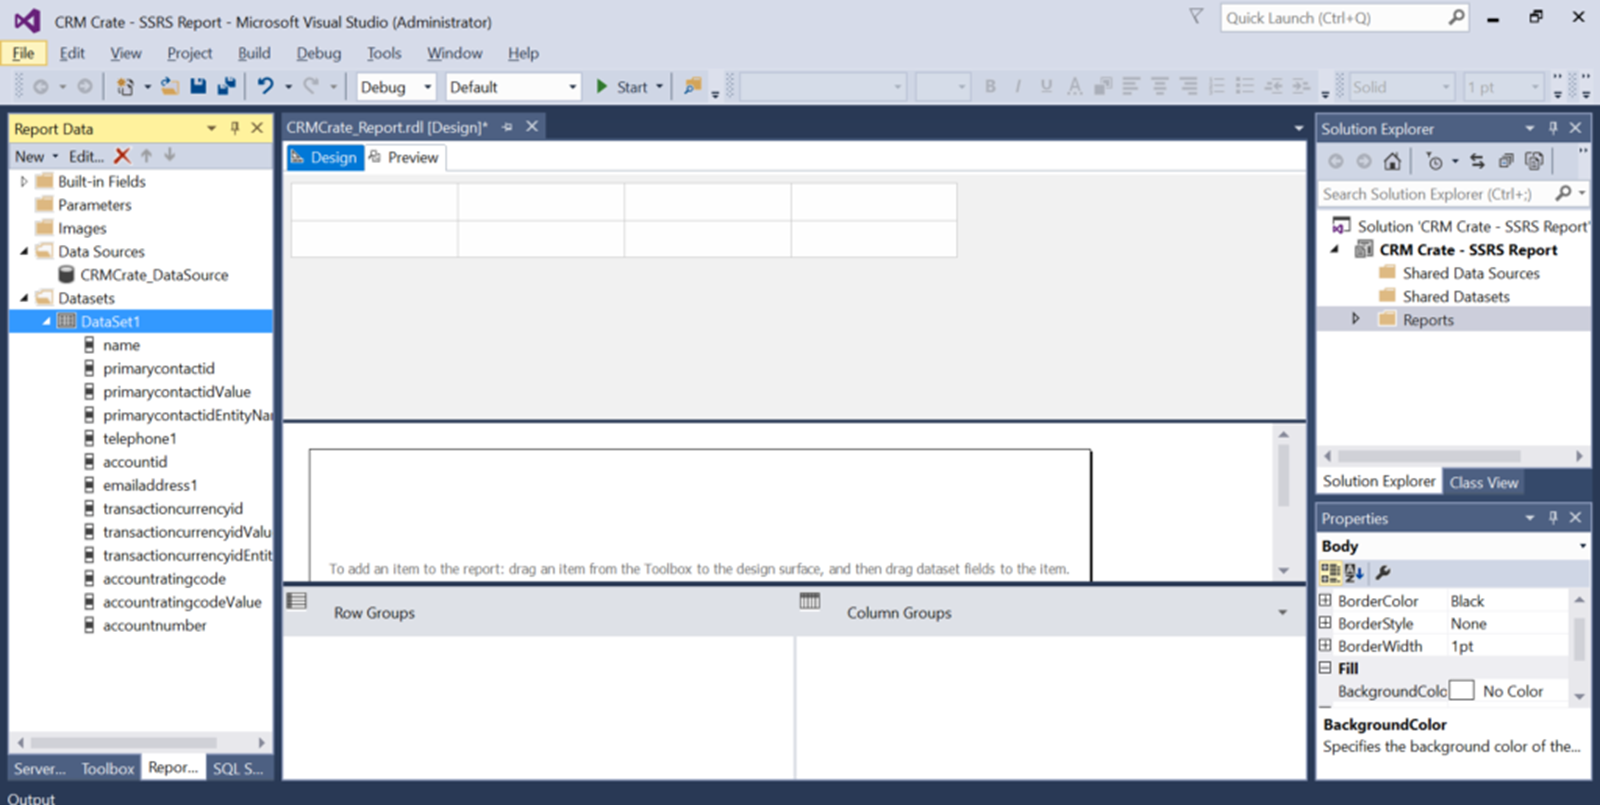
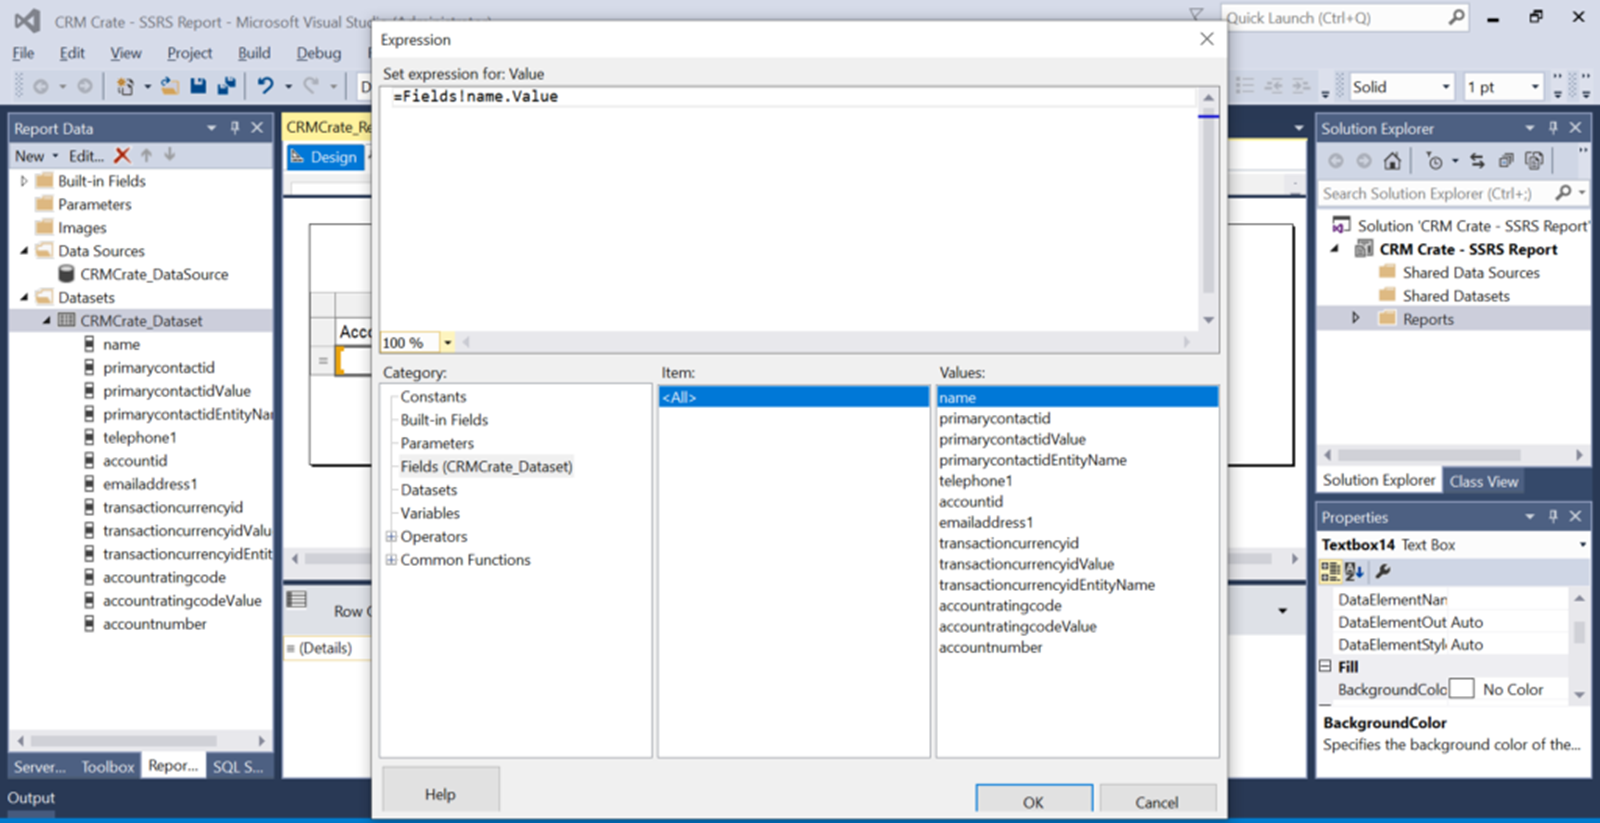
Lets add the data to our table, right click on the below row component and select “Expressions”.


We can perform complex operational logics and calculation with of the Expressions. In Expressions, navigate to the section called “Fields”. Here you can find all the fields or columns available in the data set. Add the expressions (Fields mapping) in each of the rows as per your need.


Now our table is ready with the necessary data. Lets deploy this table in the Dynamics CRM.

Deploy the SSRS Report in Dynamics 365 CRM
Rebuild the above created report and go the project’s local folder and copy the .rdl file (Report Defination File) as shown below.


Now, navigate back to the Dynamics CRM. Open the Advance Find >> Reports >> New Report. Select report type as “Existing File”, upload the above obtained .rdl file in this section. We have done the categorization in order to display the report in Account entity’s report section as shown below. Click on Save.


Now, the report is deployed in Dynamics CRM.

Test the deployed SSRS Report

In CRM, navigate to the Account record >> Ribbon Bar >> Run a Report. In the section “Run a Report”, you will find the report which we have created above.


How to Trigger a Microsoft Flow from a Custom Button in Dynamics 365

  When using Microsoft Flow the out-of-the-box button is nested under the ‘Flow’ section and is not easy to find nor is it customizable. Tri...