Useful JScript syntax’s – ADX/Dynamics 365 Portals
CRM form script’s (i.e., Onload, OnSave, OnChange) won’t run on ADX/Dynamics 365 Entity Form’s.
What if we must Get/Set, Hide/Show or Enable/Disable controls based on business logic? We need to write custom script and add in “Custom JavaScript” section of “Entity Form”.

Custom Javascript
In this article, I am providing syntax’s to Get/Set attribute values and basic validations.
Get value:
Text Field:
Here ‘name’ is CRM field’s schema name.
- var contactName=$(“#name”).val();
Look up
- var lookupGUID = $(“#new_contactid”).val();
- var lookupValue = $(“#new_ contactid_name”).val();
- var entityName= $(“#new_contactid_entityname”).val();
Option Set
- var userType = $(“#new_usertype”).val();
DateTime
- var dobValue= $(“#new_dob”).val();
- // Convert to date
- var dob=new Date(dobValue);
Checkbox
Below is the script to determine whether the checkbox is checked or not
var isChecked = $(“#{field_name}”).is(“:checked”);
if (isChecked == true) {
alert(“Checked!”);
}
else if (isChecked == false) {
alert(“Unchecked!”);
}
Radio Button
Radio button renders as 2 controls. Below is the syntax to read which radio option has been checked.
var isOption1Checked = $(“#{field_name_0}”).is(“:checked”); //Returns true/false
var isOption2Checked = $(“#{field_name_1}”).is(“:checked”); //Returns true/false
Set Value:
Text Field
- $(“#name”).val(“Rajeev Pentyala”);
Look up
- $(“#new_contactid”).val(lookupId);
- $(“#new_contactid_name”).val(lookupName);
- $(“# new_contactid_entityname”).val(EntitySchemaName);
Option Set
Here ‘new_usertype’ is CRM field’s schema name.
- $(“#new_usertype”).val(10000);
Checkbox
$(‘#{fieldname}’).prop(‘checked’, true);
Radio Button
// To set Radio 1 to ‘true’
$(‘#{fieldname_0}’).prop(‘checked’, true);
// To set Radio 2 to ‘true’
$(‘#{fieldname_1}’).prop(‘checked’, true);
Date time
Below is the snippet to set Date field to ‘Today’
// Get today()
var dateValue = new Date();
// Get date field
var dateField = $(“#new_mydatefield”);
var $displayField = dateField.nextAll(“.datetimepicker”).children(“input”);
var dateFormat = $displayField.attr(“data-date-format”);
dateField.val(moment.utc(dateValue).format(“YYYY-MM-DDTHH:mm:ss.0000000\\Z”));
$displayField.val(moment(dateValue).format(dateFormat));
Note: Portal uses Moment.js for Date operations.
Note
Get/Set statements need to wrap in Document’s Ready event.
$(document).ready(function() {
// $(“#name”).val(“Rajeev Pentyala”);
});
Enable/Disable Controls:
Lookup
- It’s very tricky to Enable/Disable Lookup’s
- Lookup control render as multiple components on ADX form, to disable lookup selection, we need to find the ‘Magnifier’ button and Hide it.
$(“#new_contactid_name”).parent().find(‘.input-group-btn’).hide(); // Find lookup’s Magnifier button and Hide it
Date
- Below is the script to disable ‘Date’ control
// My Date field’s schema name is ‘new_dateofbirth’
var dateField = $(“#new_dateofbirth”);
// Get ‘Text’ field of Date Control
var displayField = dateField.nextAll(“.datetimepicker”).children(“input”);
// Get ‘Calendar’ Icon of Date Control
var dateIcon = dateField.nextAll(“.datetimepicker”).children(“span”);
// Make ‘Text’ field of Date Control Read-Only
displayField.attr(“readonly”, “readonly”);
// Hide ‘Calendar’ Icon
dateIcon.css(“display”, “none”);
Text
- $(“#name”).prop(‘disabled’, true);
Hide/Show Controls:
–Option 1
// Hide
$(“#fieldname”).hide();
$(“#fieldname_label”).hide();
// Show
$(“#fieldname”).show();
$(“#fieldname_label”).show();–Option 2
// Hide
$(“#fieldname”).closest(“tr”).hide();
// Show
$(“#fieldname”).closest(“tr”).show();
Make OOB Required Field Non-Required:
- If the Field is OOB Required or set as Required using Metadata, below is the function to make field as Non-Required.
- Note: OOB required field will have the validator naming convention as “RequiredFieldValidator” + fieldSchemaName“
- Make sure you pass field’s Schema Name to below function.
function makeOOBFieldNonMandatory(fieldSchemaName){
$.each(Page_Validators, function (index, validator) {
if (validator.id == “RequiredFieldValidator” + fieldSchemaName) {
Page_Validators.splice(index, 1);
}
});
$(“#” + fieldSchemaName+ “_label”).parent().removeClass(“required”);
}
- To set custom validator, refer this article
Liquid Script Syntax’s:
- Get current Portal User (i.e.,Contact) guid
$(document).ready(function () {
var portalUserId = ‘{{ user.Id }}’;
});
- Get current Portal User (i.e.,Contact) Name
$(document).ready(function () {
var portalUserName = ‘{{ user.fullname}}’;
});
- Check if current Portal User has a specific ‘Web Role’
$(document).ready(function () {
{% if user.roles contains ‘Administrators’%}
alert(“Current portal user has ‘Administrators’ web role”);
{% endif %}});
- Check if User is logged-in or not
{% if user %}
// Logged-In User
{% else if %}
// Not logged In. Anonymous User
{% endif %}
Validations:
Custom Validation on ‘Submit’
- On click of the ‘Submit’ button a function named webFormClientValidate is executed.

Validation-on-submit
- We can extend this method to add our custom validation logic.
- In below example, I am preventing ‘Submit’, if Name is not ‘Rajeev’
if (window.jQuery) {
(function ($) {
if (typeof (webFormClientValidate) != ‘undefined’) {
var originalValidationFunction = webFormClientValidate;
if (originalValidationFunction && typeof (originalValidationFunction) == “function”) {
webFormClientValidate = function () {
originalValidationFunction.apply(this, arguments);
// Start custom validation.
// Prevent Submit if Name!=Rajeev
if ($(“#name”).val() != ‘Rajeev’) {
return false; // To prevent the form submit return false
}
// End custom validation.
return true;
};
}
}
}(window.jQuery));
}
Refer Adx portal’s blog on Custom JavaScript.
Session Timeout:
Following 2 keys need to be added to ‘Site Settings’ entity.
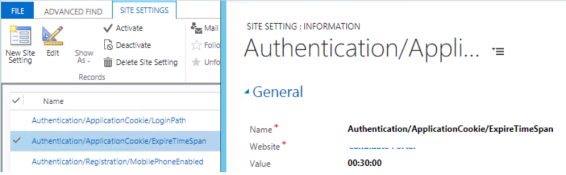
Name : Authentication/ApplicationCookie/ExpireTimeSpan
Value : The default amount of time cookie authentication sessions are valid for. Default: 24:00:00 (1 day). To set 30 minutes interval specify value as 00:30:00.Name : Authentication/ApplicationCookie/LoginPath
Value : /SignIn
Description: Redirection onto the given login path after session timeout. We can configure our own custom Web Template and redirect up on session expiry.
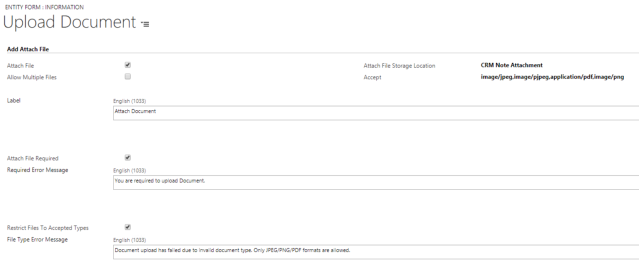
Restrict ‘File Types’ during uploads:
- To allow specific file types only, during the uploads from portal, provide configurations specified on screenshot on the portal’s ‘Entity Form’.
- Make sure to check the ‘Restrict File To Accept Types’ checkbox.
- In the ‘Accept’ field, specify the mimetypes of allowable file types separated by ,
- image/jpeg,image/pjpeg,application/pdf,image/png