In some previous posts, we looked at using callbacks and promises. In this post, we will look at Await / Async in JavaScript.
Await / Async is built on promises, and is a clean way to represent asynchronous processes in a synchronous way.
For example, consider the code below. We have 2 functions, DoSomethingAsync and DoSomethingElseAsync. The first function will complete in 2 seconds, and the second function in 1 second:
function DoSomethingAsync() { |
return new Promise(function(resolve, reject) { |
console.log("Finished DoSomethingAsync"); |
function DoSomethingElseAsync() { |
return new Promise(function(resolve, reject) { |
console.log("Finished DoSomethingElseAsync"); |
console.log("Finished!"); |
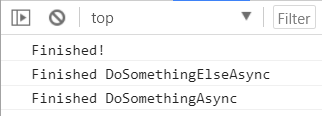
If we were to run this code, we would get the following output. The “Finished!” line will be printed first as each of these lines of code is run sequentially, then the DoSomethingElseAsync, which takes less time to run than the DoSomethingAsync function, which is actually called before it:
We can change this code to use async and await. Rewriting our functions, we can use the async keyword and return a promise. We will then run each function using the await keyword:
async function DoSomethingAsync() { |
return new Promise(function(resolve, reject) { |
console.log("Finished DoSomethingAsync"); |
async function DoSomethingElseAsync() { |
return new Promise(function(resolve, reject) { |
console.log("Finished DoSomethingElseAsync"); |
async function RunAsync() { |
let result = await DoSomethingAsync(); |
let result2 = await DoSomethingElseAsync(); |
console.log("Finished!"); |
In doing this, our code actually runs as if each statement were waiting for the previous one to complete:
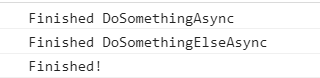
This makes the code very readable, compared to using just promises, or just callbacks.
You can also use try/catch to handle errors:
async function DoSomethingAsync() { |
return new Promise(function(resolve, reject) { |
console.log("Finished DoSomethingAsync"); |
reject("An error has occurred"); |
async function RunAsync() { |
let result = await DoSomethingAsync(); |
console.log("Finished!"); |
How to create a record in Dynamics 365 Online V 9.X using JavaScript WebAPI?
Xrm.WebApi.createRecord(entityLogicalName, data).then(successCallback, errorCallback);
Parameters:
| Name | Type | Required | Description |
| entityLogicalName | String | Yes | Logical name of the entity you want to create. For example: “account”. |
| data | Object | Yes | A JSON object defining the attributes and values for the new entity record. See examples later in this topic to see how you can define the data object for various create scenarios. |
| successCallback | Function | No | A function to call when a record is created. An object with the following properties will be passed to identify the new record: · entityType: String. The entity logical name of the new record. · id: String. GUID of the new record. |
| errorCallback | Function | No | A function to call when the operation fails. An object with the following properties will be passed: · errorCode: Number. The error code. · message: String. An error message describing the issue. |
Return Value:
On success, returns a promise object containing the attributes specified earlier in the description of the successCallback parameter.
Example:
Create a new Javascript Webresource (new_Account.js) and copy paste the below code in it and call it OnLoad of the page of the Account.
After that, open any existing Account record
function CreateAccountRecord() {
 // Define the data to create new account
 var accountData =
 {
 "name": "Arun Potti Inc.", // Single Line of Text
 "creditonhold": false, // Two Option Set
 "description": "This is the description of the sample account", // Multiple Lines of Text
 "revenue": 10000000, // Currency
 "industrycode": 1, // 1 - Accounting // OptionSet
 "primarycontactid@odata.bind": "/contacts(39582A13-E6E7-E711-A95E-000D3AF27CC8)" // ContactId - Arun Potti // Lookup
 }

// Create account record
 Xrm.WebApi.createRecord("account", accountData).then(
 function success(result) {
 // Show Account GUID
 Xrm.Utility.alertDialog("Account created with ID: " + result.id, null);
 },
 function (error) {
 // Show Error
 Xrm.Utility.alertDialog("Error :" + error.message, null);
 }
 );
}
Output:
 Other Example :
var data =
{
"name": "Sample Account",
"creditonhold": false,
"address1_latitude": 47.639583,
"description": "This is the description of the sample account",
"revenue": 5000000,
"accountcategorycode": 1
}
Xrm.WebApi.createRecord("account", data).then(
function success(result) {
console.log("Account created with ID: " + result.id);
},
function (error) {
console.log(error.message);
}
);
Other Old methods for previous versions
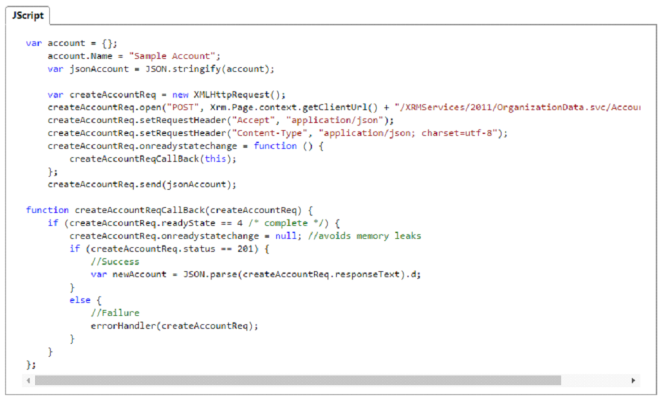
With XmlHttpRequest, you create an event handler for the onreadystatechange event and detect when the request has completed. In the event handler, check the status code returned to determine whether the request succeeded. Finally, use the open and send methods. The following sample uses XmlHttpRequest to create a new account record.
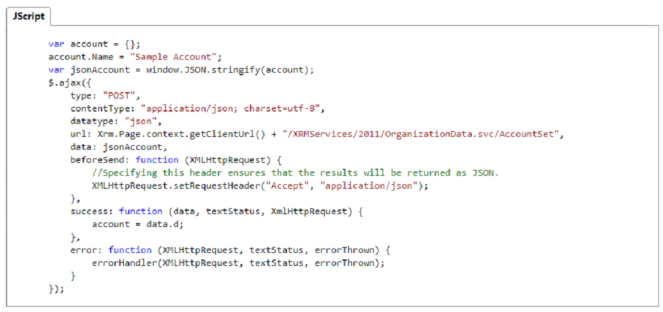
USE JQUERY
Other future api will be
createRecord (CIF JavaScript API Reference)
Microsoft.CIFramework.createRecord(entityLogicalName, data).then(successCallback, errorCallback);


No comments:
Post a Comment